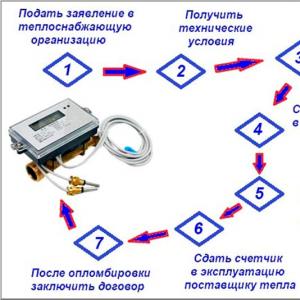
How to make a garden shredder with your own hands. DIY wood chipper (drawings) Advantages of wood chippers
Branches left after pruning trees are rather inconvenient waste. Heaped in a heap, they take up a lot of space, and you can’t immediately put branches into the oven, you have to chop them with an ax for a long time. To make a fire and just burn it in the garden is a pity. A suitable option for a zealous owner is to make a do-it-yourself branch chopper to process them into chips. And there is a use for it - at least burn it in a boiler, at least use it for compost. We are interested in the designs of home-made crushers, since the prices of factory units are not comparable with the volumes of wood processing in an ordinary private household.
Varieties of garden shredders
As soon as they do not name the chippers used for crushing wood waste. Chip cutter, wood chipper, shredder, wood chipper - this is not a complete list of names. Despite such a variety of terms, the device of various units is almost the same. Any crusher consists of the following elements:
- steel frame, where all parts and mechanisms are attached;
- the main drive is an electric motor or a gasoline (diesel) engine with a power take-off shaft;
- cutting mechanism;
- main gear (usually belt);
- protective cover;
- 2 bunkers - for supplying wooden sticks and unloading wood chips.
In fact, homemade branch shredders are divided into varieties only by the device of the cutting mechanism, the rest of the elements differ only in size. If you carefully look at the drawings of the crushing part published on the Internet, the following popular solutions can be distinguished:
- In the middle of the shaft, 2-3 dozen circular saws are attached, equipped with hard alloy teeth.
- A design that repeats the jointer device on a circular machine. Longitudinal grooves are made on the shaft (from 2 to 6 pieces, depending on the engine power), where chopping knives made of carbon steel are fixed. The branches are fed for shredding at an angle of 90° to the knives.
- Disc crusher for wood, where the knives are attached to the plane of a steel circle mounted on a shaft. Here the branches must be fed at an angle of 30-45° to the surface of the disk, which is ensured by the design of the loading hopper.
- Chipper with two shafts that rotate synchronously. The cutting edges of the knives mounted on the shafts converge at one point during rotation. Due to this, not only crushing occurs, but also self-tightening of branches after capture. Feed wood - perpendicular to the rotating knives.
 Crushers: disc (left) and two-shaft (right)
 Note. To increase torque and cutting force, garden shredders use a flywheel mounted on the free end of the shaft. The exception is a disc chipper for branches, where a heavy metal circle with attached knives serves as a flywheel.
Next, we will look at how to make the first three types of garden shredders on your own. A twin-shaft chip cutter is a rather complicated unit to manufacture, requiring investments and labor costs, which is not always justified. Hammer and other original do-it-yourself wood shredders are shown in the video:
To process thick branches and branches for firewood, you can make a mechanized cleaver. Options and drawings of the machine are presented in our instructions.
Manufacturing guide
First of all, you need to understand that without the skills of plumbing and welding and the appropriate tool, you will not be able to make even a simple chopper from circular saws. In addition, for the manufacture of shafts and housings for bearings, you will have to contact a turning workshop, unless you manage to find a finished assembly from an old machine. The whole process is conditionally divided into the following stages:
- Choice of shredder design.
- Selection of the engine for the drive and calculation of the main gear.
- Preparation of metal and parts that need to be machined on a lathe.
- Frame assembly.
- Installation of the drive, cutting mechanism and belt drive.
- Installation of the protective casing and bunker.
Note. We are talking about a belt drive, as the easiest to manufacture and safe to use. In the event of some kind of accident or overload, the belt will slip or come off without any consequences. What cannot be said about a rigid connection through a chain (reducer).
 Disc crusher design
 As for the choice of the design of a homemade branch chopper, the recommendations here are simple:
- a circular saw unit is the best option when you need to get small wood chips at minimal cost;
- if you plan to grind branches of small diameter into a larger fraction, then a jointer-type cutting mechanism will do;
- when it is necessary to cut branches up to 5 cm in size in large quantities, it is better to make a disc crusher.
 Knife shaft and its principle of operation (like a jointer on a circular saw)
 When the type of chip cutter is selected, you can start harvesting parts, materials and equipment. But first of all, you need to…
Engine selection and belt drive calculation
Drive power is an indicator that determines how thick a branch you can process on a do-it-yourself crusher. Here are some tips for choosing an engine:
- For your purpose, an electric motor with a power of 2.5-3.5 kW, at least 2 kW, is ideal. The 1.5 kW motor can be used to assemble a grass and small branch shredder.
- The power of a gasoline or diesel engine should be 5-6 liters. With. These are placed on household walk-behind tractors and mini-tractors.
- Buying an electric motor with too much power is pointless, except that one is lying idle in your barn. It will consume an amount of electricity that does not correspond to the work done.

Note. The number of revolutions of the electric motor does not play a big role, since we will get the required speed of rotation of the knives due to the V-belt drive.
In order for your wood shredder to confidently shred branches, the knife shaft must be driven at a speed of no more than 1500 rpm by selecting the diameter of the driving and driven pulleys. Crucial here is not the speed of rotation of the knives, but the developed torque (force). The distance between the pulleys and the length of the belt also does not play a big role. Unless a belt that is too long reduces the transmission efficiency and lends itself worse to stretching.
Calculation example. There is a 2800 rpm electric motor that needs to be put on the crusher. The optimal solution is to reduce the speed on the shaft by half, to 1400 rpm. Then the diameters of the pulleys will differ by 2 times. For example, the size of the drive pulley is 100 mm, then the diameter of the driven pulley (standing on the working shaft) will be 200 mm.
Advice. When ordering pulleys for a V-belt drive to a turner, it does not hurt to think about the future. It is better to make pulleys for 3 or 4 streams so that the revolutions on the working shaft can be changed by rearranging the belt. Then the chopper can be adjusted to different working conditions, for example, for crushing corn stalks, sunflowers or grass.
 Pulleys for several streams are more practical in operation
 Preparation of materials
The best way to save money on making a wood chipper is to find suitable materials in the household. The following types of rolled metal are suitable for assembling the frame:
- single equal-shelf corner with a width of 50 to 63 mm;
- 2 corners of 35 mm, welded in a "box";
- profile pipe 40x40 mm in size;
- channel No. 6.5-10;
- pipes are round with a diameter of 32-48 mm.

The motor is mounted on a steel sheet with a thickness of 10 mm and dimensions corresponding to the distance between the mounting holes on its flange (with a margin of 30-50 mm on each side). To tension the belt, 2 types of devices are used:
- The holes in the engine mounting plate are made oblong so that it can be pushed back and fixed with bolts.
- The plate is installed with one end on a hinge, then the belt is pulled up due to the weight of the electric motor. On the other hand, it is fixed with stud nuts, as shown below in the photo of a homemade chopper.
 Here the tension occurs under the weight of the electric motor
 To make the simplest shredder design, buy 20-25 carbide-tipped circular saw blades and the same number of 20 mm spacer washers. This will give you a working section about 80 mm wide, which you can increase or decrease as desired by adding or removing saws.
Note. The thickness of the teeth of a circular saw is greater than the steel base, so it is impossible to mount the tools close to each other. Washers are used to compensate for the width of the teeth, which are placed between the saws.
The shaft, driven by a belt, must be machined on a lathe from a steel rod. But before you make this part, find 2 bearings, under whose seat size the shaft will be machined. You will also have to make housings for bearings with mounting flanges. Sometimes they can be bought ready-made in the secondary market or in specialized stores.

Advice. As an option, you can use rear axle bearings with a bore diameter of 25 mm from the classic Zhiguli models, and use a ready-made stud with nuts as a shaft.
To install circular saws on the shaft, you need to cut the thread. As a flywheel, use a circle of steel with a thickness of 10 mm or more, or a large pulley from some kind of agricultural machinery. You will also need a steel base plate for the branches, which acts as a counter knife. Cut it out of a sheet with a thickness of at least 10 mm.
 Knife Shaft Drawing - Front View
 If you have chosen the design of a branch chopper with chopping knives, then you can take the drawing of a knife shaft for a jointer as a basis. Just change the diameters of the axles in it, where you need to press the selected bearings. It is better to reduce the width of the working part to 100 mm, because you are not going to put whole logs into the crusher. Chip knives are usually made on a milling machine from car springs.
 Shaft drawing for 3 knives - end view
 To assemble a disc-type chipper, in addition to a shaft with bearings and knives, you will need:
- a steel circle 15-20 mm thick with a diameter of 40-50 cm (depending on the power of the electric motor);
- sheet metal of at least 5 mm on the casing, whose front wall serves as a counter knife;
- the same, 1-2 mm thick for welding the bunker;
- M12-16 bolts with nuts for fastening.
The cutting device of the disc grinder with the attachment of knives is shown in the drawing:
 The number of knives can be changed (put 2 or 3 pcs.)
 Frame manufacturing
Regardless of what type of crusher you have chosen, you need to make a base for it - a frame, where the drive and the chipping mechanism will subsequently be installed. Weld it from corners or pipes, using the following recommendations:
- Adjust the height to suit your height so that it is convenient to lay branches in the bunker.
- The structure must be stable. Therefore, make the width of the frame at least 500 mm, the length is arbitrary.
- Give the bed rigidity by welding crossbars between the uprights.
- For convenient movement of the unit to the frame, it is desirable to attach a pair of wheels and weld the handle.
 Compact motor placement
 Think about where you are going to put the electric motor. For a chopper made with your own hands from circular saws, the recommendation is this: put the motor in the alignment of the frame so that it does not protrude beyond its dimensions. The same applies to other types of crushers.
Chopper Assembly
To begin with, we will assemble a chip cutter from a package of circular saws, observing the following order:
- Assemble the saws on the shaft by laying washers between them and tightening nuts on both sides.
- Press the bearings onto the shaft and then into the outer housings. Bolt the latter to the frame, after making holes in it.
- Slide the pulley and flywheel onto the ends of the shaft, fasten them securely.
- Close to the teeth of the saws, install a steel plate - counter knife.
- Install the electric motor and final drive, tighten the belt well.
Advice. Before assembly, do not forget to lubricate the bearing cages by removing the plastic covers. Position the saw blades so that the tooth profiles do not match.

It is better to fasten the counter knife not by welding, but by bolts through oval-shaped holes. The point is to adjust the gap between the edge of the plate and the working teeth, which allows you to change the size of the chips within a small range. The direction of rotation of the saws is “towards you”, that is, the teeth should “run into” the counter-knife.
After mounting the parts, fabricate and install a protective cover made of thin metal, and a receiving hopper in front. The dimensions of these elements are arbitrary, the main thing is ease of use and safety. Finally, connect the unit to the mains with a power cable through a 25 A circuit breaker.
The assembly of the knife crusher is carried out in the same order, only first you need to install and secure the knives in the grooves of the shaft. There is one subtlety here: the more the cutting edges protrude beyond the surface of the shaft, the larger the chips will be at the exit. The bunker is welded in such a way that the branches are fed at an angle of 90° to the cutting mechanism. How to do it right is shown in the video:
Advice. The unit can be improved by making an additional tightening device. It is necessary to make a second shaft of smaller dimensions, weld metal strips along it and connect it to the main mechanism through a belt or chain drive. The speed of the tightening shaft must be lowered, otherwise the branches will beat on the hands during loading.
 Homemade tightening drive
 There are also no special tricks in the manufacture of a disk chopper of branches, it is enough to follow the drawings and securely fasten all the nodes. The only point: when making the outer casing, try to make the front wall along which the knives rotate thicker, and the gap between them smaller. Otherwise, the mechanism will tighten the flexible thin sticks inward and wind them onto the shaft.
 Crusher assembly drawing
 The rear wall of the casing must be well attached to the frame at least 4 points, for which additional brackets will need to be welded, as shown in the assembly drawing.
Conclusion
The most difficult operation in the manufacture of a garden shredder is turning the shaft and milling the knives from the spring, which you cannot do yourself. You will have to pay for this service, unless there are a couple of metalworking machines in the household. The task will be simplified if you can find a drive assembly, for example, from an old circular saw.
Another option is to use the circular saw itself to crush the branches by installing a cutting mechanism on its drive. Again, the shredder can also function from the engine of a walk-behind tractor, you just need to make the belt drive correctly.
All photos from the article
The problem of recycling wood waste is acute for many summer residents. Its most optimal solution is a wood chipper that can turn any branches into shavings, which can then be sent to the compost pit. Of course, wood chipping equipment is very expensive, however, you can make it yourself, this article is devoted to this topic.

General information
The wood chipping machine allows you to forget about the need to kindle fires to burn cut tree branches, tops, roots, stems, etc. With it, you can quickly process all this waste into chips and shavings, which are excellent material for compost or even fuel for solid fuel boilers.
Thus, home-made wood shredders allow you to solve several problems at once:
- Waste disposal;
- Saving space on the site;
- Provision of compost pit material;
- Fuel supply for the winter;
A do-it-yourself wood chipper is quite simple to do, and you don’t need to invent anything. It is only necessary to accurately recreate the design according to the available drawings and diagrams.

Chopper device
Before starting work, it is necessary to understand how wood shredders and wood materials are arranged. Otherwise, it will simply not work to assemble the car.
The design is extremely simple, and consists of the following elements:
- frame;
- Engine ;
- Shaft with cutting elements;
- receiving compartment;
- Protective cover .
The principle of operation of the apparatus is as follows:
- The engine through a chain or belt drive rotates a shaft with cutting elements.
- When wood waste enters the receiving box, the cutting elements chop them, turning them into small chips.
- Next, the chips move in the housing and exit from the other side of the device.
In general, a wood shredder resembles an ordinary meat grinder.
Below are the finished drawings, which, if necessary, can be corrected at your discretion.

Also quite common is the design with circular saws as knives. It is also quite simple in execution, but at the same time quite effective.

Details
To make your own disc grinder, you will need the following parts:
- Profile pipe;
- Sheet of metal to create a disk;
- Sheet metal 2 mm thick to create a receiving compartment and a protective shell.
The price of all these parts is quite affordable, and you can buy them at the auto parts market or at an agricultural equipment store.
As for the equipment, to assemble the device you will need:
- Welding machine;
- Bulgarian;
- Electric drill.

So, the instruction for the manufacture of this design looks like this:
- First, a frame is made from a profile pipe.
- Next, an axle should be welded to the frame, on which wheels can be put on.
- Then the engine is installed inside the frame.
- Behind the engine is a reflective shield with a hole for the shaft.
- After that, several small slots must be made in the disk to fix the knives.
- Then you need to assemble the disk and install it on the shaft.
- Next, a casing with a receiving compartment should be made from sheet metal and installed on the chopper.

In the photo - an example of a finished disc wood chipper
- At the end of the work, a handle should be welded to the frame, which will allow you to conveniently move the device around the site.
This completes the manufacturing process of the device. It remains to connect it to electricity and check it in action.
Advice!
Knives for the apparatus can be made from automobile springs.
To do this, you need to cut off the plates of a suitable length, sharpen and make holes in them for attaching to the disk.

By the same principle, you can make a gasoline wood chipper. The only thing is that it will be larger. In addition, the engine controls should be made on the handle.
Conclusion
Having experience working with metal, it will not be difficult to make a wood waste shredder on your own. If there is no such experience, then the main parts can be ordered in a locksmith's workshop. However, in any case, all the costs and troubles are incomparable with the benefits that this unit bears.
You can find some additional information on the topic voiced from the video in this article.
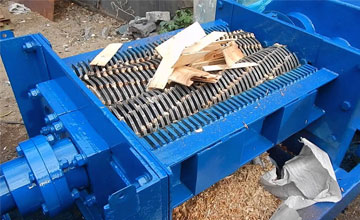
Most shredders are designed to work with quality wood, so it is difficult to process thick twisted trunks and branches.
Any nail that gets along with the wood causes them such serious damage that further work is possible only after repair.
Unlike these devices, the shredder initially designed to work in harsh environments- it will grind wood with twisted fibers without any problems, and a nail, a small metal fragment or a bullet that got inside will not damage it in most cases.
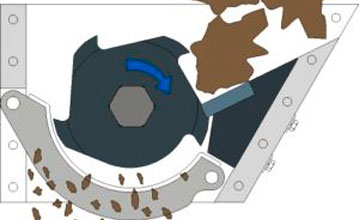 During rotation, the shaft with its hooks (knives) hooks and drags it to the jack knife.
As it approaches the breaker knife, sometimes referred to as the counter knife, the piece of wood being shredded takes on a position where no further movement or even rotation is possible.
When this happens, the hooks begin to crush the wood, breaking off large pieces from it. Reaching the counter knife hooks act as scissors and cut debris wood into pieces of a certain size.
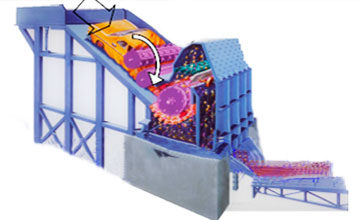
Then all the chopped wood either enters the hammer mill, where further grinding takes place, or flies out.
Due to the low (200–300 rpm) shaft rotation speed and huge torque, the shredder easily crushes wood of any species, and also cuts metal parts that are not too thick.
Due to the fact that the hooks move rather slowly, when meeting parts made of non-hard steels, they do not receive serious damage. But this is precisely what is the most common cause of breakdowns of shredders of other models.
The shafts are made of high-alloy steel, which has high strength, and is also hardened in various ways, due to which the part receives high strength.
Varieties
These choppers differ in:
- number and design of shafts;
- way of supplying wood.
Number and design of shafts
The most popular are single and double shaft shredder models. In the single-shaft model, the shaft works together with the breaker knife, and in the twin-shaft devices, both shafts are both shafts and breaker knives for each other at the same time.
 Two-shaft devices are noticeably more expensive and more complex, but have higher performance. However, it is more difficult to regulate the size and shape of the chips on them.
On single shaft devices most often, the shaft is made in the form of a blank (cylinder), to which knives are attached with bolts.
This design is more difficult to manufacture, but more maintainable - if the knives are damaged, it is enough to unscrew the countersunk bolts and replace them.
On two-shaft shredders are used compound shafts made of a hexagonal shaft and interchangeable nozzles. Half of the nozzles are equipped with knives, the second half is smaller in diameter and acts as a counter-knife. If one or more knives are damaged both shafts will have to be removed to repair, then disassemble them and change the damaged parts.
For the manufacture of small chips, type-setting shafts are used, in which the thickness of each nozzle is 5–10 mm. The gap between the nozzles of both shafts is tenths or hundredths of a mm, and the greater the thickness of the nozzles, the smaller the gap.
This is due to the fact that splitting up wood causes the shaft to heat up., and thin parts heat up faster, which means they have higher thermal expansion.
Sometimes compound shafts are assembled with a slight shear on each nozzle, resulting in an overall shear of 5 to 25 degrees along the length of the shaft. This design is better suited for shredding warped wood.
Wood feeding method
in shredders use 3 ways to feed the material:
- top loading, in which the wood is pressed against the shafts by its own weight and the weight of the pieces lying above it;
- gear (gear), in which rotating gears engage the wood and push it towards the knives;
- press (pusher), in which the wood is pushed to the knives by a special plate connected to a hydraulic, electric or crank drive.
 Top loading used only on the cheapest shredders, because it cannot build up enough pressure to process quickly wood, which reduces productivity.
Lack of sufficient pressure causes the piece of wood to constantly rotate until it reaches a position where both the shaft and the counter-knife prevent further rotation.
Despite some shortcomings, this method of feeding wood is gaining more and more popularity. The reason for the growing popularity is that such shredders are easier to load using machinery, because it is enough to fill the trimmings into the receiving hopper, and gravity will do the rest.
Often top loading combined with a pusher, thanks to which it is possible to eliminate the main disadvantage of press feed - the restriction on the height of the press. Excess wood during the movement of the press will rise along the bunker, and after its return it will take the vacant place.
gear feed
Gear feed system wood provides constant pressure, sufficient for effective grinding of any wood. Toothed gears are made in the form of shafts, the length of which is equal to the width of the space intended for the movement of wood.
Thanks to this, the shredded wood receives an impulse of translational movement, regardless of the place in which it is located.
In some shredders, the height of the space for the movement of wood exceeds the size of the shaft protruding above the counter knife, so they provide for the redistribution of the shredded material.
To do this, the mobility of the last feed gear, installed in front of the chopping shaft, is limited by the height of this shaft, due to which the lower layer of wood passes under it first, then, after its completion, the upper one passes.
 Such a system allows you to download quite large volumes of crushed material, but only works well with logs and branches.
Usually such a supply system connected to a separate electric motor through a powerful gearbox with a large gear ratio.
However, there are models where the chopping shaft and the feed system are connected to the same motor.
All gears are interconnected by a chain drive, due to which, at low rotation speeds, they create huge torque.
Most often, this drive is used where it is necessary to grind not waste, but unprofitable round wood, so such shredders have not received wide distribution. After all, such a drive greatly increases the price of an already very expensive unit for chopping wood.
Pusher
Pusher used on shredders of small capacity, designed for shredding small-sized wooden material, for example, chopped firewood, trimmings of trunks and branches or parts of chipboard, MDF and other wood.
Regardless of the drive type, creates such pressure, which provides fast grinding wood, because no time is wasted waiting for the right position to be taken.
However, this also limits the rate of return of the pusher to its original state. After all, you have to choose a balance between speed and pressure, so the return time is 1-2 seconds.
Such delivery systems always powered by a separate electric motor, because there is always a chance that the wood will be too hard, which the shredder will not be able to grind in the usual time.
If the feed system and the shredder shaft are connected to a common motor, this can lead to its complete stop. If the engines are different, then in such a situation the load on the motor of this system increases sharply, which can be compensated in various ways.
For example, we use the principle of automobile clutch, in which a large load leads to disc slippage relative to each other. In the supply system with hydraulic drive the bypass valve can perform the same function.
In systems with electric drive automation reduces the current strength, due to which the excess pressure on the wood also disappears.
 The main disadvantage of this system is limited amount of material, which can be loaded into them.
Exceeding this amount will lead to jamming of the feeder, because for maximum efficiency it is necessary that the top layer of wood does not exceed the level of the upper edge of the shaft or shafts.
Therefore, exceeding the amount of wood will lead to the fact that some of them will rest against the body and cause jamming. Because of this, such systems are used only in shredders of small productivity.
Advantages and disadvantages of these wood chipping units
Main advantage shredders of this type in that they suitable for the processing of any, including those containing metals, wood. With the correct setting of all shredder mechanisms, it is made of any wood produces technological chips that we have been talking about.
Therefore, wood chopped with it can be used for any purpose, with the exception of manufacturing, because it does not meet the requirements for arbolite chips. You can read more about wood chips for wood concrete and equipment for its production here (Chips for wood concrete).
Changing the shape and size of chips
To obtain chips from trunks and branches, they are better suited gear driven devices. When the whole trunks are fed, the wood comes into contact with the butt end of the knives, which is why the knives not only crush it, but also immediately separate it along the border of annual rings. As a result, the chips are short, thin and narrow.
If the trunks and branches are pre-cut into pieces, the length of which is equal to or slightly less than the length of the shaft, then the knives begin not to crush the wood, but to separate it into fibers, which is why the chips are wide and quite thick.
Top loading devices best suited for shredding small-sized waste. When processing long trunks or trimmings of suitable length that move down parallel to the shafts, the chips obtained are the same as described above.
However, small-sized offcuts fall differently all the time, so the shape and size of the chips also turn out to be different.
The same thing happens in press-feed shredders, where the feed press is constantly moving in and out of the shaft.
That's why change the size and shape of the chips in shredders with top and press feed almost impossible.
However, in gear-fed shredders, both the feed rate and shaft speed can be changed. An increase in the feed rate, as well as an increase in the speed of rotation of the shaft, leads to a decrease in the size of the chips, and a decrease leads to an increase in the size.
Popular models and their prices
We have not included prices for shredders in the table, because their cost directly depends on the configuration, which is why the same shredder model, but in different configurations, can differ significantly in price.
In addition, many manufacturers and resellers offer shredders tailored to specific requirements, so that at a minimum cost it is possible to obtain maximum efficiency.
| Model | Characteristics and brief description | Website of the manufacturer or seller |
| UNTHA LR1000 | Austrian single-shaft machine, suitable for shredding any wood waste. Equipped with hydraulic pusher. Ready chips are removed from the machine by a screw drive. Equipped with various protection systems, as well as shaft reverse. Thanks to electromagnetic sensors, it stops the shaft if a metal object gets into the hopper. Productivity 2-6 m3 per hour, weight 2.4 tons. | www.stanki.ru |
| VECOPLAN Series VAZ | Single-shaft industrial shredders of high productivity. Are suitable for crushing of any wood waste. The size of the finished wood chips is 10-100 mm (depending on the size of the sieve and settings). Maximum productivity 18 tons per hour. | www.alforest.ru |
| RRM-2/6 | Two-shaft apparatus of small capacity with top filling. The maximum productivity when working without a sieve is 1 t/h. When installing a sieve, performance decreases, and the smaller the holes, the greater the reduction in performance. | www.bmpa.ru |
| Wagner WS 70 | Single-shaft unit with hydraulically controlled pusher and top loading. If the resistance to the movement of the pusher becomes too great, it automatically withdraws, allowing the crushed parts to change their position, then again presses them against the toothed shaft. | www.shredder.su |
| PIRANHA 2-76 | Twin shaft shredder with unique shaft arrangement and common counter knife. All parts of the grinding mechanism are made of tool steel. Equipped with top loading without drive. | productcenter.ru |
Every owner of his own plot, whether it is a country house or a small cottage with a garden, knows that it is sometimes very difficult to maintain order on it. The problem of waste disposal in the private sector is particularly acute, and if organics can be stored in a compost pit, and plastic and bottles can be taken to a landfill, then what about the abundance of wood litter? After sawing fruit trees or construction, a lot of unnecessary branches, boards and lumber remain. It makes no sense to leave them for firewood, but burning them is very long and troublesome. Especially for such cases, a wood chipper was invented. A new device is quite expensive, but, fortunately, making a wood chipper with your own hands is not as difficult as it might seem at first glance.
A wood chipper will become an indispensable tool for any summer resident. With it, you no longer need to make fires to burn the sawn off tree branches or think about where to put the waste after harvesting - stems, tops, roots, etc. The machine will process any organic solid waste into chips and shavings, which will subsequently serve as an excellent material for high-quality compost or fuel for solid fuel boilers. So, in one fell swoop, you solve several problems: garbage disposal, saving space and time, get an endless source of material for fertilizers and a supply of fuel for the winter. Like it or not, a wood chipper is very useful on the farm, but factory mechanisms are prohibitively expensive, so we suggest saving money and making it yourself. The most encouraging thing is that there is no need to "reinvent the wheel" - you just need to correctly repeat the design of the factory device using available parts. But before starting work, it is necessary to thoroughly study and understand the principle of operation of the machine. Otherwise, you will not be able to make the right drawing and make it a reality. The device of the grinder is outrageously simple - it is an engine, a shaft with cutting elements, a frame, a protective shell and a receiving compartment through which the material enters. Since such a unit will turn out to be quite heavy, it is better to install it on a two-wheeled base in order to easily move around the site. The principle of operation of the device is as follows: the motor rotates and moves the shaft through a chain or belt. When you push branches or stems of plants into the receiving box, the cutting elements cut them into small pieces that come out the other side of the device. Very similar to an ordinary kitchen meat grinder. Chopper deviceBefore choosing a scheme and purchasing the components of a future chopper, you need to decide on its purpose, that is, what exactly (or most often) it will chop - thick branches of fruit trees, small boards or plant residues after harvesting. The power of the device, the type of its operation and, accordingly, the cost of the necessary parts depend on this. chopper motorFor garden shredders, you can use gasoline or electric motors. Each of them has its own characteristics of use. For example, with a gasoline engine, large thick branches can be processed, and it is also valued for its mobility. A device with an electric motor, on the contrary, must always be close to the power source, but it takes up much less space than a gasoline one. It is light and easy to use, but will not cope with overly large objects due to low power.
What to look for when choosing a garden shredder motor:
Since a home-made chopper in most cases is designed for various jobs, it is better to choose the “golden mean” for it - a 4 kW electric motor or a 5-6 horsepower gasoline equivalent. Chopper knivesThe second important part of the chopper is the cutting elements or knives. The type and principle of operation of the mechanism, as well as the size of the processed material, depend on their design. So, a simple disk with knives will grind only fragile branches into dust, combined designs can process thick branches and produce the same small chips, there are those that grind wood into chips 2-10 cm long. If you plan to use recycled material for solid fuel boilers, it is better to choose the latter option. Since our goal is to copy one of the factory models of the chopper, consider the knives used to produce them:  Unfortunately, it is almost impossible to make the described models of knives on your own, therefore, for home-made devices, their own cutting elements were invented: a knife-disk design, a set of circular saws and a two-shaft system with 8 knives. Chopper BlueprintTo make a wood chipper, it is not enough just to buy the necessary spare parts, you must have professional locksmith skills. The whole process takes place in three stages - the creation of a drawing, the preparation of materials and the assembly of the apparatus. Since we are not going to come up with anything new, you can take any suitable chopper model as the basis for the drawing, and add the rest at your discretion. To create a drawing, you can use a special computer program AutoCAD. We have described the main components of the mechanism above, but this is only a general view. The most important thing to pay attention to when creating a drawing is the location of the knives and the angle of their cut. Let us consider the development of a chopper design with a two-shaft cutting element. So, the shafts will be between the plates, and each shaft will contain 3-4 knives. To fasten the cutting elements, it is better to use bolts, shifting them relative to the central part of the shaft. The shaft rotates freely thanks to 4 bearings, which are fixed on the plates. The synchronism of the movement of the shafts is provided by 2 gears that drive the motor. To transmit torque, use a belt or chain of your choice. Depending on the size of the knives and the diameter of the raw material that you are going to grind, vary the gap between the shafts. If you use a 4 kW electric motor, its speed is 2500-2800 rpm. This indicator is good for a disk mechanism designed for thin branches and stems of plants. The two-shaft mechanism must be powerful, so the number of revolutions must be reduced. The images below show drawings of a wood chipper with 2 shafts, each with 3 knives:
The disk model looks much simpler mainly due to the simple design of the knives.
The drawing can display the disc diameter, the number of knives and their location. The more knives, the finer the raw material will be at the output. The disk can be positioned vertically or at an angle.
A stud with circular saws is attached to the frame. Often in such devices a belt is used to drive, so two pulleys should be made on the shaft and stud. Most of the materials needed to assemble the shredder can be purchased at the auto market, farm equipment store, or hardware store, but some parts will have to be ordered or made by yourself. To do this, you need to be able to work as a grinder and a welding machine. Double Shaft ChopperThe work on the creation of a two-shaft shredder consists of the following phases - assembling the frame and receiving compartment, creating a chopping drum with knives, assembling the drum and engine. Necessary materials:
The first step is to make a frame. To do this, cut 4 parts from the profile pipe: 2 - 40 cm each, 2 - 80 cm each. Fix the short parts between the long ones at a right angle with a welding machine to make a frame. The distance between the two inner crossbars must be such that the chopping drum can fit between them. In order to subsequently move the chopper, wheels must be attached to it. To do this, fix 2 racks on the frame, on which the axle and wheels will then be held. Mechanism assembly:  The assembly of the wood chipper in the video below will help you more fully understand how the whole process goes:
Disc chopperUnlike a twin-shaft shredder, the disc shredder requires far fewer parts, time and effort to assemble. Necessary materials:
Such a small number of parts is due to the low power of the apparatus. If a two-shaft mechanism can grind thick branches up to 10 cm in diameter into chips, this one will cope with a maximum of 2 cm. Knives can be made as described in the instructions above. Progress:  As you can see, nothing complicated, the main thing is to get all the necessary details. A homemade wood chipper with two shafts has a lot of power and is designed for processing large branches. Chip sizes can be controlled from 2 cm to 8 cm depending on the number of knives per shaft. |


Removal, processing and disposal of waste from 1 to 5 hazard class
We work with all regions of Russia. Valid license. Full set of closing documents. Individual approach to the client and flexible pricing policy.
Using this form, you can leave a request for the provision of services, request a commercial offer or get a free consultation from our specialists.
Storing branches from small bushes and trees is a problem that most gardeners and summer residents face after winter cleaning. Wood shredder is a technology designed to solve the problem of wood debris. With this device, you can quickly turn large branches into small chips and use it as compost.
general characteristics
There are many signs by which you can classify shredders, but the main ones are:
- Engine's type.
- Appointment.
Wood waste chopper by type of engine is:
- Electric.
- Petrol.
According to the purpose of the crusher are:
- Household.
- Industrial.
A gasoline engine has a higher performance (makes the chips much thinner), but making such a device with your own hands is not easy enough, since you have to find a two-prong internal combustion engine. In addition, such devices are harmful to the environment due to the emission of gasoline residues.
As for the electric engine, such devices are less powerful and are great for small cottages. Such a chopper can be easily made with your own hands practically from improvised means.
A standard chipper for turning wood waste into chips consists of the following components:
- Engine.
- Knives are cutting tools. They can be of two types: milling cutters or saw blade.
- Gear or belt drive.
- The receiver is in the form of a funnel, preferably steel.
- Collection device, it can be replaced with an outlet box.
Something that needs to be clarified about the receiver. Branches will be fed into the funnel, which, after passing through the saws, will become small chips.
The receiving mechanism must necessarily have the form of a funnel. This is done so that the engine can concentrate the power of the saws in a limited area.
To make a cutting module with your own hands, you will have to turn on your imagination. Shop crushers usually have milling knives. It can be quite difficult to find such elements at home, so you will have to make the cutter yourself. For this, several 20 (in diameter) centimeter saws and a steel shaft are taken, on which saws are assembled using separating washers.
No grinding device can work without a transmission mechanism, which is of three types:
- Geared.
- Chain.
- Belt.
There is no particular difference between them, therefore, when making a device with their own hands, everyone chooses based on their capabilities and desires. It is worth noting only that the most simple in execution is a belt mechanism.
Training
Drawings are the main element, without which not a single stage of assembling the chopper with your own hands can do. Here the exact dimensions of the length and width of the structure should be noted.
In addition to the dimensions of the device, the following should be noted:
- Calculate the amount of materials for manufacturing.
- Paint the drawings of the structure itself, in particular, mark the locations of the holes for fastening the case and other components.
- Mark the area where the support racks with wheels will be located.
- Type of engine used. The choice should depend on the needs of the owner.
An important detail that many people forget about is the support platform. It is necessary for the device to be stable during operation. The drawings must indicate the dimensions of the site.

DIY chopper
Do-it-yourself assembly of a standard apparatus consists of three main stages:
- Assembly of the body (frame).
- Engine mounting.
- Chopping drum attachment.
Let's start in order.
Frame
The frame for the grinder is made of a metal profile having a size of 50 by 50 mm.
For this:
- We cut off 4 blanks with a grinder. The first two 400 mm. length, and the second - 800 mm.
- We weld 400 mm. cuts to the ends of long blanks so that a rectangular frame is obtained.
- The remaining blanks, there should be two of them, are fixed inside the frame. The length from the extreme crossbars should be equal to the dimensions of the engine and drum.
- Using welding, we attach a sheet of metal profile to the resulting square. Its thickness should be 5 mm. Holes for mounting the engine should be cut out on the sheet.
- We install four legs at the corners of the case. Their height must be at least 50 centimeters. The lower part of the legs is connected with a profile of 20 by 20 mm. by welding.
Engine mounting
For the optimal power of the device with your own hands, a 5 kW engine is enough. It must be attached to the mounting holes with a plate. This will allow the power tool to move while the cutter drive belt is tensioned.
A homemade tensioner is a corner welded across the body, which is fastened with two tension bolts. At 2 ends of the corner, it is necessary to drill holes that correspond to the dimensions of the bolts for fastening. One end of the tension bolts is inserted into the slots, and the other end is attached to the engine mounting bolts using small corners.

chopping drum
A homemade chopping drum is mounted on the opposite side of the frame from the engine. The mechanism itself is made from a piece of steel pipe, 45 cm long and 35 cm in diameter.
We make a drum and mount the drum:
- A plate must be welded to the end of the cylinder. In it, we first make holes on which the shaft will be attached in the future.
- On both sides of the cylinder (bottom and top), we cut out rectangular windows for loading wood materials. Approximate size 100 by 20 mm. It is also necessary to make holes for the exit of chips. Their size is 30 x 40 mm.
- Four paws should be attached to the lower window, which will serve as fastening of the mechanism to the frame. We create holes on the paws and the body, the dimensions of which are equal to the bolts for fastening.
- The chopping knives are mounted on two discs welded to the end of the shaft.
- A homemade cutting mechanism can be made using knives from old grinding devices, we use a length of no more than 4 centimeters.
- Before fixing the knives, their ends must be bent and two holes must be made on each side.
- We mount the shaft in the holes made in the end face of the casing. At the end of the shaft we put on bearings, on which there are support covers. They are bolted to the casing.
- We attach pulleys to the protruding ends of the shaft.
If everything is done correctly, then with your own hands you can make a device that saves a lot of time on cleaning the summer cottage.
Video - a lecture on how to make a do-it-yourself branch crusher.