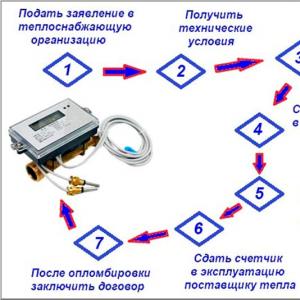
How to cover the roof of the house with corrugated board with your own hands. How to put a profiled sheet on the roof. How to fix corrugated board on the roof
This article is useful for those who want to make a roof from corrugated board with their own hands. We will give step by step instructions that will help you make the roof covering yourself without spending extra money on hired workers.
A do-it-yourself corrugated roof should be durable in order to protect the entire structure from precipitation and mechanical stress. The roof of the building is laid out in the form of a multi-layer cake, in which each of the layers performs its important function. And, the finished design has everything you need for mechanical protection, good insulation and full ventilation. For a long-term coating, slate, tiles and metal corrugated board with an anti-corrosion coating are used. In private construction, profile sheets are among the cheapest and most practical roofing material.
In order to carry out roofing work with high quality, the rafter system is installed at a certain angle at the first stage, which holds the entire weight of the roof. Insulating material and a crate are attached to the rafters, on which insulating material is laid, which does not let moisture through from above, and from below allows steam to penetrate. Important in the roofing system is the gutter for drainage and water pipes. Various fasteners and seals are important, which limit the free space under the roof and thus contribute to its insulation.

The profile sheet is used for pitched and broken roofs of houses, outbuildings, terraces and arbors. Such sheet roofing material is produced by cold profiling from high-strength steel, and is covered with special materials that resist corrosion. Thanks to the stiffening ribs, stable resistance of the profile sheet to external loads is ensured. Affordable cost of corrugated board, a wide selection of different colors and ease of installation, allow it to be used in private and industrial construction. In order for the material to fully fulfill its purpose, you should know how to properly cover the roof with corrugated board with your own hands and proceed with the installation, following the sequence, according to the instructions and the flow sheet for laying the roof.

When designing a roof truss system for laying corrugated board, the concepts of how to properly cover the roof with corrugated board with your own hands are taken into account, and the light weight of the roofing from the profile sheet is taken into account. For the installation of the roof in this case, there is no need for reinforced supporting structures and the rafters are laid in gable roofs at an angle of 12 degrees - for this, corrugated board of the NS-35, NS-20, S-44 brands is used. It is possible to install the coating at a smaller angle, but in this case, the profile of the brand H-60 or H-75 should be used and vertical and horizontal overlaps should be arranged. Moreover, the horizontal overlap is treated with a sealant, and the vertical overlap must be laid in at least two waves.
In the case when the pitch of the rafters is less than a meter, then the boards for the crate are used with a cross section of at least 30-100 mm, and with an increase in the pitch of the rafters, the thickness of the material for the crate should be significantly increased. An unedged board is used as a material for the crate, and where the valley is attached, the crate is made in a continuous layer. You should also take care of high-quality ventilation of the roof - for this, waterproofing material is laid on the rafters and the contour of the crate is fastened with transverse bars. Thus, an air gap is provided between the waterproofing layer and the finish coating of the roof with profile decking. The air inflow is provided through the overhang of the eaves, and the air outlet together with the vapors is carried out in the region of the ventilation ridge. All wooden elements are carefully treated with wood protection compounds and a fire retardant coating before installation.
Roofing material is always laid in such a way as to counteract the winds that prevail in the area. When the wind blows more often from the right side, then they begin to lay sheets of corrugated board from right to left. And, with intense gusts of wind on the left, the laying of profile sheets begins on the left side.

To cover the roof with corrugated board with your own hands, you will need tools. Their list includes:
- tape measure for the necessary measurements;
- level for checking the horizontal installation of corrugated sheets;
- rope to determine the necessary measurements;
- pencil or marker;
- electric or cutting shears on a metal profile;
- a drill for drilling holes for fastening and a screwdriver for their installation;
- hammer for preliminary fastening of sheets on the crate;
- stapler for construction work, which is used to install insulating and vapor vent coatings;
- construction gun with insulating sealant.
It should be noted that the profiled sheet coated with polymers is unstable to high temperatures, therefore, all cutting and installation of the corrugated board is carried out without the use of welding. In addition to scissors that cut metal, you can use a hacksaw with fine teeth and an electric jigsaw. Cut edges are recommended to be treated with a primer, which protects the metal from corrosion so that rust does not attack the coating starting from the cut point.

To ensure the reliability of laying, profiled roofing sheets are fixed to the crate with self-tapping screws. For greater stability, these fastening elements are made of durable, galvanized steel. All self-tapping screws are equipped with a special gasket made of rubberized elasomer, which is designed to ensure the sealing of the attachment points. This is necessary so that moisture does not penetrate to the details of the crate and does not spoil them.
Sealing is also necessary so that moisture does not get on the edges into the hole in the corrugated board and it does not corrode.
The dimensions of the self-tapping screws are 4.8 × 35, 4.8 × 60, 4.8 × 80 mm, the thickness of the outer layer of protective coating is from 12 microns. And, the composition of the material for the manufacture of self-tapping screws includes stabilizers, which prevent their destruction under the influence of ultraviolet rays.
The head of the self-tapping screw is additionally covered with powder paint with a thickness of 50 microns. And the protective gasket is made of elastomer - it is designed to establish valleys from aluminum sheet. When installing the roof, the color of the fasteners is matched to the color of the corrugated sheets.
When installing the roof, you cannot do without special seals - they are made of polyurethane foam and are placed between the crate and profile sheets. Roof sealant comes in various shapes, but the most effective is the one that matches the shape of the profiled sheet. The sealant is used for better thermal insulation of the room under the roof, extending its service life and to reduce the level of the noise effect of the coating during rain and snow. For the best bonding, an adhesive composition is applied to the insulation on one or both sides. And, for ventilation of the room under the roof, a heater with special recesses is used.
The use of a sealant makes it possible to eliminate small gaps that are formed when laying the sheet to the roof plane in corner places. Voids are dangerous because water can flow into them, or a bird can fly in, and cold air can stagnate there. All these factors affect the quality of the thermal insulation of the house and the condition of the multilayer roof. Therefore, the material for sealing elements is selected durable and resistant to biological factors.

The drainage system plays an important role in protecting the walls and plinth from water, and the foundation from excessive moisture. Unorganized drainage of water from the roof during rain is produced by the flow of moisture from the roof to the ground without gutters and downpipes. This method of removing water from the roof gradually leads to damage to the basement of the house and undermining the foundation.
An organized way to remove water from the roof is the drain, which consists of gutters and downpipes. Modern drainage systems are sold complete with all fasteners and are designed for any area of \u200b\u200bthe house. The most common materials for the drainage system are PVC, galvanized steel with a polymer coating and copper gutters.
The snow retention system becomes an important safety element, and is arranged so that heavy layers of snow in early spring do not fall in heavy blocks, but gradually disappear. Snow retention systems are horizontal strips arranged on the roof in a special way to prevent snow from sticking together and ensure gradual melting and removal of water from the roof. The color of the snow retainers should not differ from the roof covering.

How to cover the roof with corrugated board with your own hands, the video shows how the lower part of the sheet is attached to the crate and 7-8 fasteners are used for installation. Roofing sheets are laid according to the scheme with horizontal and vertical overlap. The vertical overlap must capture at least one wave - basically, the method is used in which at least two waves are laid parallel from above and below. The horizontal overlap from the top row to the lower one directly depends on the angle of the roof slope - the greater the angle of the roof, the less the overlap should be.
On rectangular slopes, the laying of profile sheets begins from any end along the cornice line, whether it is right or left. When the slope is triangular in shape, the center of the cornice is determined and the sheets are laid symmetrically on the right and left sides. Along the cornice line, the sheets of corrugated board should hang down by 60 mm, if a drainage system is provided. When it is not provided, the overhang increases from 100 to 300 mm.
The first sheet of corrugated board is installed along the end of the roof and the eaves and is attached to the crate in its upper part. It is aligned with the eaves and provides an overhang of 40 mm - this is the distance the roof should protrude beyond the walls of the house. It should be noted that alignment of the roofing material along the edge of the end face is not allowed. Subsequent sheets are attached along the longitudinal side, aligned with the eaves, and only after these operations are screwed to the crate. The process is continued until the entire surface of the slope is covered. Having fixed the required number of sheets, they are aligned along the horizontal line of the eaves and the sheets are connected to each other at the ridge in every second deflection.
The final fastener is made through the crate step along the vertical line. On a horizontal line, sheets are attached to every second deflection. The joints between the sheets are reinforced with hardware, in the upper and lower parts of the corrugated board. Excess material is cut off with electric scissors or a saw - then an end plate is installed in the upper part, with a layer of waterproofing. This work is carried out, as well as laying the roof from the bottom up. At the end of the work, the corrugated board is attached to a self-adhesive sealant with an overlap of 100 mm, and a fastening step of at least 300 mm.
The overhang on the front of the structure must be at least 70 mm. In order for it to have smooth edges, the profiled sheet is attached at the eaves at a distance of 30-40 cm, and subsequent fastenings are arranged in a checkerboard pattern, given that the fastening step is at least a meter. Near the pediment, the fastening step should be in increments of at least 50-60 cm, and the fasteners of the longitudinal overlap are located in the upper part of the profile at a distance of 30-50 cm. The fastener is fixed with a screwdriver or drill, which is equipped with a reverse motion mechanism and smooth speed control .
 When the roof is installed at the same time as the drain, it is planned to install a drainage element before the start of roofing. A cornice is attached to the crate, a gutter and a cornice strip are mounted, which directs the flow of water into the drain. At the place where the roof ridge is attached, a continuous crate is provided, but at least two gaps for ventilation should be left.
The waterproofing membrane is laid on the slopes, not reaching the ridge by 10 cm - such a precaution will contribute to the proper ventilation of the space under the roof.
The elements of the roof ridge are fastened in the lower part to the right and left of the slope, using seals, and the end of the ridge is closed with plugs. The elements that make up the ridge are fastened with an overlap of at least 15 cm. The wind bar, which prevents precipitation from falling on the walls of the structure, gives the building an elegant and finished look.
The roof is a reliable protection against atmospheric and mechanical influences.
The corrugated board for roofing is selected because of its strength and active resistance to external influences. It is the outer layer of a complex roof covering, which includes its insulation, ventilation and thermal protection. Sheets of corrugated board are laid sequentially starting from the middle, forming a coating to the right and left of the original sheet. In the process of coating, the sheets are attached to the crate and to each other. Ridge coverings are laid out from the ends of the roof, which are protected from the end with plugs.
A competent sequence of roofing processes, high-quality materials for them and exact compliance with all technological processes become a guarantee of long-term operation and a comfortable stay in a house under a reliable roof.
 Covering the roof with corrugated board with your own hands is quite easy and quite affordable for each of us. With careful preparation and a responsible approach to this work, do-it-yourself corrugated roofing will last no less than as a result of the work of professional craftsmen.
Decking is a fairly popular material that has been used in the construction industry for many decades. It is easy to install, has a small weight and at the same time serves for a long time, which attracts craftsmen and novice builders. But how to properly lay the profiled sheet on the roof, many may not know. This is a rather responsible process, but nothing is impossible.
The profiled sheet is made of thin metal, which has corrosion protection and is coated with various compounds that protect it from the effects of atmospheric phenomena. The grooves that are formed on it thanks to the cold rolling technology give the sheet increased strength, and hence resistance to mechanical stress.

Roofs from corrugated board - photo
Corrugated sheet or corrugated board is highly reliable and easy to install, it is ideal for covering the roofs of various buildings - industrial, warehouse, residential purposes, etc. It is a durable material that can last a very long time if used correctly and was chosen taking into account various features the region where the building is located and operating conditions.

On a note! Decking can also be used for other purposes - sheathing the walls of the building, creating fences, for formwork during the construction of the foundation. But in the above cases, other types of material are usually used - not those used to create the roof.
The material is also distinguished by a low price, which makes it possible to purchase it even for those who have a limited budget for construction. And even the cheapest version of corrugated board will clearly please the novice builder with its quality.

Features of choice
Roof structure made of profiled sheet, if in general terms, includes several elements. This is a crate, heat and waterproofing layers, the corrugated board itself. And the material, due to its low weight, is excellent for laying on non-reinforced structures. It is suitable for the construction of a roof, the slopes of which will be at least 12 degrees.

On a note! The slope can also be made with a smaller angle, but then all the joints between the individual sheets of corrugated board will have to be additionally sealed.
When choosing a corrugated board, you need to pay attention to its thickness, as well as the height of the ridge. The thickness should be at least 0.8 mm, and the height of the corrugations should be from 21 to 25 mm. It is worth stopping at such brands as HC20, HC35 or C44. But for roofs with slopes of only 5-8 degrees, a professional sheet H75 or H60 is suitable. It is best to choose sheet models with a trapezoidal or wave-shaped corrugation.

Roofing profiled sheet - wave
Advice! The greater the angle of the roof slope, the more “low” grade the corrugated board is purchased.
By the way, when choosing a material, it is worth remembering that the stronger it is, the smaller the step will be for the crate. So, you need to calculate all the cost options and choose the best one in specific conditions. After all, you can also save on the purchase of materials for the crate. The main thing is that the savings should be reasonable.

When calculating the amount of material, the dimensions of the sheets and the need to form overlaps are taken into account. So, the length of one profiled sheet can be 12 m, width - up to 1250 mm. When buying material for sheathing small roof sizes, it is recommended to buy sheets of such a size that they completely cover part of the slope from top to bottom. Then the number of joints of the coating will be minimal, which means that the indicators of the tightness of the roof will increase.

Prices for corrugated board
Decking
Installation rules
During the installation of corrugated board, certain rules must be observed, otherwise the roof will be unreliable and will not last long. And these rules apply to all components of the roof structure. For example, if the rafters are installed in increments of up to 100 cm, then the boards for the crate can be used with a cross section of only 3x10 cm, this will be enough. But if the distance between adjacent rafters is 1 meter or more, then the cross section of the lathing bars should be larger. To create it, an unedged board can be used. But in the place where the valley will be attached, the crate should be continuous at a distance of 60 cm on each side of the valley axis.

Table. Required crate step.
| The value of the slope angle, degrees | Lathing type/pitch | Profiled sheet thickness, mm | Material Grade |
|---|---|---|---|
| Up to 15 | solid | 0,5 | C8 |
| fifteen; over 15 | solid; up to 30 cm | 0,5 | C10 |
| fifteen; over 15 | solid; up to 50 cm | 0,5-0,7 | C20 |
| Up to 15; over 15 | 30 cm; 65 cm | 0,5-0,7 | C21 |
| Up to 15; over 15 | 50 cm; 1m | 0,5-0,7 | HC35 |
| At least 8 | up to 3 m | 0,7-0,9 | H60 |
| At least 8 | up to 4 m | 0,7-0,9 | H75 |
Decking is a material that is created from metal that is prone to corrosion, although protected by certain coatings. It is imperative to provide good ventilation under it - this will reduce the risk of a large amount of condensate forming, which negatively affects the profiled sheets. In order to form a ventilated space, a counter-lattice is laid - then the best option for the gap between the finishing roofing material and the waterproofing layer will be obtained.

Prices for different types of building boards
Building boards
Attention! Wood is a material that does not like water. It negatively affects him and gradually destroys, leads to the processes of decay. To reduce the risk of their occurrence, it is recommended to impregnate all wood products with protective compounds before starting the installation of the roof.
Installation of corrugated board always begins with the installation of a cornice strip, fixed to the crate with self-tapping screws or nails. Further work on laying the lining carpet and other materials is carried out so that drops of water do not fall on them in the future, but immediately fall off the profiled sheets onto the eaves and enter the drainage system.

It is recommended to glue all joints between the individual elements of the corrugated board with sealants and use a special mastic or sealant. Sheets of corrugated board can be laid starting from either side of the roof - right or left. But the individual elements must be necessarily overlapped on top of each other. On gentle slopes, when using gaskets, the overlap can be one wave, and without them, two waves of material. If the roof slope is steep, then the material is laid with an overlap in one wave without the use of gaskets.

If the roof is large enough and the sheets are not long enough to cover the entire distance from top to bottom (from the ridge to the eaves), then the profiled sheets are overlapped, the width of which is 20 cm. top.

Attention! It is recommended to work on the roof using safety ropes and, preferably, fences. It is required to move along the laid corrugated board in soft shoes, stepping only on the recesses. If the coating of the material has been scratched or otherwise damaged, these places are additionally treated with protective compounds.
fixing material
For fastening the profiled sheet, special galvanized fasteners with a hexagonal head are used. These are self-tapping screws 4.8x19 mm. They are screwed from the ridge to the eaves in 50 cm increments. Along the ridge or on the eaves, screws are screwed into every second corrugation so as to attach the material to the crate. On the rest of the area of \u200b\u200bthe profiled sheet, self-tapping screws 4.8x38 mm are used, taking into account that there are 4-5 of them per 1 m 2 of the sheet.

For fastening the profiled sheet, only roofing screws are used, which have special linings made of dense rubber that protect the metal from moisture penetration to it. The screws must be screwed in tightly, at right angles to the surface.

Methods of multi-row laying of corrugated board
If the installation of roofing material involves laying it in several rows, then there are two options for doing this work. In the first case, the first sheet in the bottom row is laid first, and the sheet of the second row is immediately mounted next to it. Next, the installation of the second element of row 1 and the second element of row 2 is carried out. A part of the roof of four sheets is obtained. Further, according to the same principle, the second block of 4 sheets is mounted, etc. That is, the roof is “sewn up” as if by separate large sheets, consisting of 4 smaller ones. This method is applicable to material having a drainage groove.
In the second case, the block is assembled from 3 sheets, where the two lower sheets are first fastened together, and the third sheet, which is the first element of row 2, is already attached to them. The structure is aligned with the cornice overhang, it is fastened. The option is suitable for sheets that do not have a drainage groove.

The following tools may be required for installation:
- screwdriver;
- construction level;
- scissors for cutting metal;
- drill;
- roulette;
- sealant gun.
Contrary to the opinion of inexperienced craftsmen, welding cannot be used for laying a profiled sheet. Under the influence of high temperatures, the material will be destroyed. If it is necessary to trim the sheets, scissors for metal products are used, and all sections after the procedure are treated with anti-corrosion compounds.

Installation of profiled sheet and other roofing elements
Creating a roof from this material involves the following steps:
- installation of a rafter system;
- waterproofing;
- creating a crate;
- insulation installation;
- creation of a counter-lattice;
- laying of corrugated board and its fastening;
- attachment of additional straps.
On a note! A layer of insulation must be laid only if it is planned to create a warm room under the roof. Otherwise, this step can be skipped.

Glass wool, polystyrene foam, mineral wool can be used as a heater. They must be laid very tightly, in an interference fit, so that cold bridges do not form under the roof, letting cold air into the room. The material used is the same thickness as the width of the rafters.
The waterproofing material is fixed with the help of construction staples from a stapler or nails, it is attached directly to the rafters, covering the insulation. As a waterproofing material, it has shown itself well. A crate is mounted on top of it.
Before corrugated sheets are laid, a cornice strip is mounted. It will protect the ends of the rafters from moisture. Installation of cornice elements is carried out with an overlap of 10 cm, and fastening with self-tapping screws - in increments of 30 cm. But after laying the profiled material, ridge and end strips are fastened. The first will close the gap remaining for ventilation at the junction of two slopes. The end bar is also called the wind bar and is installed on the ends of the roof. It is necessary to reduce the wind load experienced by corrugated board.

Advice! To work with corrugated board, it is better to invite an assistant. It will not only facilitate the lifting of the material to the roof, but also help with the installation of the material.
Foamed polyurethane products act as seals that are placed between individual sheets for better connection. Also, the purpose of using seals is to reduce the noise level that will come from the roof during rain, to increase thermal insulation performance. This type of seal is attached under the sheets to the crate. It is recommended to use material with special perforation.
Video - Installation of roofing corrugated board
Fastening of corrugated board
Step 1. The first sheet is being laid on the roof: a double-sided adhesive tape is glued onto the previously designed cornice. A strip of sealant is glued to it. If a sealant for sheets with a self-adhesive base is used, then adhesive tape is not used. The profiled sheet is laid on the crate so that its edge, with a slight indentation, lies on the strip of sealant.


Step 2 The profiled sheet is fixed with the help of roofing screws. At the edges, self-tapping screws are screwed in more often than on the rest of the material element. The vertical step of the self-tapping screws is 50-60 cm.


Step 3 The next sheet of corrugated board is laid with an overlap on the previously laid first. In this case, the sealant is used in the same way. The edge of the sheet with the drainage groove should be at the bottom, under the second sheet. The sheet is also fastened with self-tapping screws.


Step 4 Next is the design of the roof in the place where there is a pipe. The profiled sheet is laid around this part of the roof. Only the topmost element does not fit. A sealant is glued to the profiled sheet laid below the level of the pipe.

Step 5 A layer of sealant is applied to the seal.
Step 6 The junction bar is cut and bent according to the shape of the pipe. Then it is laid close to it so that part of it lies on the seal, and is attached to the pipe with dowels.


Step 7 The plank is attached to the sheet of roofing material with the help of roofing screws.

Step 8 The side rails are attached in the same way. They are placed on top of the previously installed bar.

Step 9 After installing the lower and side junction strips, the roof section above the pipe is designed. First, seals are glued around the perimeter of the installation of the upper part and on the upper parts of the side rails.

Step 10 According to the shape of the side junctions, bends are made on the upper junction bar. The plank is installed in its place. Its width should not be less than 40 cm.


Step 12 On top of such an abutment, a decorative one is mounted, which is also fastened with dowels.

Step 13 A polyurethane sealant is applied along the perimeter of the junction so that it closes the gaps between the bar and the pipe.

Step 14 Using a sealant, the top sheet of corrugated board is installed. It is fixed with roofing screws.


Step 16 On the other side of the extension, the valley is installed in the same way, but in the upper part it overlaps the previously installed one.

Step 17 A sealing tape with a width of at least 200 mm and a thickness of at least 10 mm is glued along the edge of the valley.

Step 18 A polyurethane sealant is applied to the surface of the tape.

Step 19 With an overlap of 4 cm, a profiled sheet is laid on the valley. It should cover the sealing tape. The material is fixed with roofing screws.

Step 20 End plates are being installed. The plank is cut to the shape of the roof, one of its edges is bent, as shown in the figure. From the inside, a sealing tape is glued to the edge.


Step 21 The bar is installed in its place and fastened with roofing screws from above and from the front side.

Step 22 The installation of the ridge bar is in progress. With a small indent from the edge, double-sided tape is attached to the profiled sheets. A sealant is installed on it and coated with a sealant.


Step 23 A ridge element is installed on top, bent accordingly to the shape of the roof.


Step 24 The ridge element is fixed with roofing screws.

Prices for popular models of screwdrivers
Screwdrivers
Video - Do-it-yourself corrugated roof
Video - Installation of a profiled sheet on the roof
Proper laying of the profiled sheet on the roof is a guarantee that the roof will be reliable and will last for many years without leaking. On average, the service life of this type of coating is at least 20 years. But this is provided that all installation rules have been observed.
For a comfortable stay in the house, it is important to make a high-quality and reliable roof with a good coating. To date, one of the best roofing is corrugated board. It reliably protects the roof from leaks, collapses, provides tightness in the under-roof space. And the most important thing is that it is environmentally friendly. However, the correct installation work plays an important role. Only in this case, the corrugated roofing will serve you for many years. This article will provide detailed instructions on how to cover the roof with corrugated board with your own hands, as well as video and photo materials.

As mentioned at the beginning of this article, corrugated board has a lot of advantages, which makes it an indispensable roofing material. You can also note other positive aspects of this material:
- The profiled structure of the sheet has a high bearing capacity.
- The lightness of the material greatly simplifies the work with it.
- After laying the sheets on the roof, no joints are formed. This ensures the tightness of the coating.
- Due to the special polymer coating, the material does not corrode, and as a result, its service life increases.
Note! Laying corrugated board on the roof should not cause any special problems, and at first glance, everything may seem extremely simple. However, during installation work, no flaws and inaccuracies should be allowed.
![]()
For the transportation of corrugated board, specialized transport is required. Sheets must only be laid horizontally. It is also recommended to pull them together with slings, after laying them on a hard and even surface. There are also special requirements for the driver. It is necessary to drive the car without sudden braking and turns. Failure to do so may result in damage to the material on the way to its destination.
In addition, it is important to ensure high-quality storage of corrugated board. The base must also be level and firm. If it's time to lift the sheets to the roof, then you need to do this with the help of a log. Their length should correspond to the height of the roof from the ground. You can lift several sheets at once.
Note! If the weather is windy, then it is impossible to lift the sheets onto the roof.

Today, such types of corrugated boards are known:
- Mark C. The canvas has a sinusoidal or trapezoidal shape. If you decide to perform a decorative roof finish, then this option is just the way.
- RS brand. It is used both for laying on a roof, and on walls.
- Mark N. This model is equipped with additional stiffening ribs.

It is very important to know what slope angle is allowed for a particular product. Each manufacturer develops individual instructions. Therefore, when buying, you should ask for instructions, which is called the so-called "Installation of the roof from corrugated board instructions." Based on this, it is important to consider the future slope of the roof. Knowing the slope will help you calculate how much overlap each sheet should have. Below are some calculation options:
- A slope of less than 15° will provide an overlap of 200 mm or more.
- A slope of 15 to 30 ° will provide 150–200 mm and no more.
- If the slope is less than 12 ° or the roof is flat, then each seam and joint should be carefully sealed. Otherwise, the roof will not cope with its functional responsibilities.
Calculation

Before buying material, it is important to calculate the number of sheets. This requires information regarding the width and length of the slope, as well as what brand of corrugated board will be used. To calculate, you can use a special program or draw a roof on a reduced scale. This will help to perform almost accurate calculations. It should not be forgotten that the sheets are overlapped. Depending on the angle of the slope and the grade of the profiled sheet, the overlap will differ. So you will find out how much the length and width of the sheet will be “eaten up”. Moreover, do not forget to add an overhang to the cornice, which can be up to 30 cm.
Note! It is necessary to purchase all additional elements in advance, for example, valleys and slats. They will be fixed in places where the slope has a certain kink, from the end, on the ridge and in other similar places.


Each sheet is attached to the crate with self-tapping screws. This is the only way to ensure reliable coverage. Fasteners are subject to special requirements. So, they must be made of galvanized steel. In this case, each self-tapping screw must have a special gasket made of elastomer or neopreon rubber. This rubber will provide a hermetic docking of the self-tapping screw with the profiled sheet. Due to this, moisture will not penetrate the wooden elements of the roof, which means that rotting of the supporting structure will be prevented.
The following technical parameters are presented for self-tapping screws:
- Size 4.8x32mm, 4.8x60mm and 4.8x80mm.
- The presence on the cap of a protective and decorative coating in the form of powder paint and a layer thickness of 50 microns.
- The surface is treated with electrolytic galvanization with a thickness of 12 microns.
- The presence of a protective gasket made of elastomer for profiled sheets and for valleys made of aluminum sheet.
- Self-tapping screws should contain stabilizers that do not allow the negative effects of ultraviolet rays.
Note! When buying coating sheets, purchase one color and self-tapping screws. This will give the aesthetics of the entire roof.
It should also be mentioned about special seals, which are made of foamed polyethylene and polyurethane foam. The sealant is placed between the sheet and the crate. It is believed that a strip seal with a rectangular cross section is universal. But it will be much more effective to use those seals that repeat the shape of the profiled sheet.

The presence of a seal reduces the noise of a metal roof, increases the quality of the thermal insulation of the cake and increases the service life. A special adhesive is applied to the strips of the seal on both sides, so its installation is greatly simplified. It is very important that the sealant be perforated for ventilation in the under-roof space.
Note! The presence of a seal eliminates the large gaps resulting from the fit to the roof structure of the sheet. Birds, insects and cold air often get into these gaps. The special properties of the sealant material make it bioresistant and moisture resistant.

Immediately before the installation of profiled sheets, hydro and vapor barrier is laid. To make a vapor barrier, you can purchase a special film or roofing material, in extreme cases. The vapor barrier is attached to the crate. It is recommended to lay it from the lower edge of the roof. Due to this, each subsequent layer will be lower and moisture will not penetrate to the wood.
Note! If the brand of corrugated board S-8, S-10 or S-20 with a thickness of up to 0.5 mm is used, then the crate must be continuous. In all other cases, the step of the crate is selected individually from the characteristics of the roof.
Separately, it is worth mentioning about the layer of insulation, which will save 25% of heat. Those roofs on which corrugated board is mounted are advised to use matte insulation. The result is a roofing cake:
- A layer of vapor barrier film.
- Insulation.
- The final waterproofing layer.

When making this “pie”, a “cold triangle” should be organized. Its presence will ensure a good passage of warm and cold air through the cracks in the cornice and ridge. So, natural ventilation will be created, which will prevent the formation of condensate.
The laid waterproofing layer will retain all the properties of the insulation. Otherwise, with strong moisture on the roof, an ice crust, dampness will form and, as a result, the process of wood decay is inevitable. For this reason, the material for each layer of the cake must be chosen carefully. It must be of high quality.

In order for all the work to go smoothly and without failures, take care of the availability of the necessary tools in advance:
- rope;
- roulette;
- screwdriver;
- a hammer;
- metal scissors;
- construction gun with sealant;
- marker or pencils;
- construction stapler;
- drill.
Note! Profiled sheets are cut cold, as the polymer coating is not resistant to high temperatures. It is better to use scissors for metal or a jigsaw. At the same time, treat each cut with an anti-corrosion primer. This will increase the life of the coating.
Laying scheme

The sheets are overlapped on the lower edge of the roof, and the screws are twisted into the bend of the wave. Compliance with a specific installation scheme will create a reliable roof. First of all, under the valley plank at the level of the crate, a dense flooring is made from the groove at a distance of 60 cm from both sides. The lower boards of the valley are mounted with an overlap of 20 cm. The bottom plank is fixed from the edges with nails, and the final fastening is carried out together with the roof. If the slope is gentle, then sealing mastics should be used here.
Under the ridge, the bottom bar is wound up by 25 cm. A profiled or universal seal should be laid between the profiled sheet and it. As for the installation of end boards, it is better to fix them above the crate, then it will be possible to fix the end plate. This structure will be called the wind corner. After that, a cornice strip and filing with corrugated board are installed. It is mounted below the profiled sheet.
Installation of sheets will depend entirely on the type of roof. For example, if the slope is gentle, then a longitudinal seal is used and overlapped by one wave. If the slope is a steep compactor, it is not necessary to use.
Note! If you have a hip roof, then the installation begins with the hip itself. A cord is stretched along the cornice and each subsequent sheet is aligned along it. It is unacceptable to do this at the end of the ramp.

There are two methods for laying sheets of corrugated board on the roof:
- Vertical direction. In this case, the first sheet with temporary fastening is laid below. Similarly, the sheet is mounted on the second row. Next, two sheets are stacked side by side, a square of 4 sheets is obtained. More sheets are stacked to it and so on. This method is in particular demand if the roof is equipped with a drainage groove.
- Another method of stacking sheets is to make a block of 3 sheets. First of all, 2 sheets are laid on the first row. Between themselves, they are securely fixed, and the 3rd sheet of the 2nd row is joined last. This block can be fixed while aligning with the eaves.
Note! No matter which sheet stacking method you choose, it is important to pay special attention to each docking point. It is on this that the reliability and quality of the roofing will depend.

For each sheet of corrugated board, 7-8 self-tapping screws are required. They need to be twisted into the bottom wave. As mentioned above, the material is overlapped both vertically and horizontally. The overlap will depend on the angle of the slope. From what place should the sheets be laid? If the roof slope has a rectangular shape, then it is possible from any end along the cornice line. If the shape is a trapezoid and a triangle, then first of all it is important to think over the laying scheme. However, the first sheet is mounted in the center, and then the sheets are stacked symmetrically on both sides.
If a drainage system is planned, then the corrugated board is mounted along the eaves with an overhang of 60 cm. If it is not, then the overhang is carried out according to the material grade:
- NS-20 - up to 10 cm.
- S-44 and NS-35 - up to 30 cm.

So, align the first sheet along the cornice and the end of the roof. After that, it is fixed with a self-tapping screw at the top. Each next sheet is fastened along the longitudinal side of the sheet. It is pre-aligned with the eaves, and then fastened with the crate. According to this scheme, row after row is assembled.
The installation of the material is carried out so that a frontal overhang 7 cm wide is formed. At the cornice, the sheet is fixed at a distance of 30–40 cm, and the remaining rows of self-tapping screws can be staggered in increments of 1 m. . On a longitudinal overlap, fasteners are located at the top of the profile at a distance of 300 to 500 mm.

The next step is to install the ridge and the end plate. According to the standard, the end plate is 2 m long. If the length is not enough, then it overlaps. The fastening of the strap is carried out from the roof overhang to the ridge.
Note! When mounting the end strip, make sure that it overlaps at least one wave of the sheet. Self-tapping screws are twisted in steps of 1 m to the profiled sheet.
After that, it remains to make the last node of the roof - the ridge. Only smooth ridge elements should be used here. A number of experts recommend laying a special ventilated seal between them. If the sheets are corrugated, then a ridge seal is used.

At the end of the roofing work, a junction bar is installed with profiled sheets. They are an element with a length of 2 m. They overlap up to 20 cm. Fasteners are made with self-tapping screws from the side of the roofing sheets. Mounting pitch 40 cm.
Note! When organizing the adjoining of the roof to the wall, a special sealant should be used. It is laid between the joint strip and the upper edge of the corrugated board.
To prevent snow and rain from getting into the cracks, a longitudinal seal is also laid to the side junction. If the roof is steep, then such a seal is not needed.

In conclusion, let's summarize:
- It is very important to pay attention to the transportation of roofing material.
- The sharp edges of the sheets can cut your hands, so you need to work with protective gloves.
- It is necessary for three people to lift the sheets to the roof. It uses two guides.
- The installer must wear shoes with soft soles so as not to scratch the surface of the sheets.
- If the surface is accidentally scratched, then these places must be treated with paint for polymer coatings.
- You can step on the sheets only in places of the crate.
So, we are convinced that corrugated board is an excellent material for roofing. However, it is important to remember that it can serve for a long time and with high quality only if the installation and calculation technology is followed. If you have your own experience in this construction industry, then write comments at the end of this article. It will be equally useful to pay attention to the photos below. On them you can consider the intricacies of performing work on overlapping the roof with profiled sheets.
Video
In the video provided, you can learn more about the intricacies of installing corrugated board on the roof:
A photo
In the photographs you can see roofs made of corrugated board in various forms:


Scheme
Below is a series of photographs and tables from which you can get the details of installing corrugated roofing:


Profiled sheet (corrugated board) is made of steel sheet coated with zinc, aluminum and protective polymers. It is widely used in construction as a roofing material, for the construction of gates, fences and other structures.
The material acquires corrugation when passing through a roll forming machine, while the ribs of the sheet can be in the form of a wave or in the form of a trapezoid. The width of the corrugated board is 113-120 cm, the length is 30-1200 cm, the thickness is 0.4-1.2 mm.

Advantages of corrugated board
Before proceeding to the installation of a roof from a profile sheet, consider the advantages of the material:
- Not subject to corrosion;
- Long service life;
- Ecologicaly clean;
- Variety of colors and shapes;
- High performance to environmental impact and mechanical stress;
- During installation, a minimum number of joints is formed;
- Universal.
The disadvantages include the formation of condensate and poor sound insulation.
Overlap of corrugated board and angle of inclination of the roof
In the case of using corrugated board as a roofing material, the installation of sheets must occur with an overlap.
- If the slope exceeds 30 °, the overlap of the sheet will be 10-15 cm;
- 15°-30° - 15-20 cm;
- less than 15° - up to 20 cm.
Calculation of roofing material
To correctly calculate the roofing material, you first need to calculate the area of \u200b\u200bthe roof, taking into account design features. To do this, the surface is divided into geometric shapes, all data is subsequently added up.
Each type of roof shape (triangle, trapezoid or square) uses its own formula to calculate the area. Eaves, end overhangs and kinks (ridges, ridges and junctions) are measured. Decking has two width indicators: total - 118 cm, and working - 110 cm, this fact must also be taken into account in the calculations.

To calculate the required number of sheets running horizontally, you need the length of the slope divided by the working width. The size of the overlap is also taken into account. The number and length of the sheets is equal to the sum of the overhang from the cornice, the overlap and the length of the slope.
2 meters is the standard length of the additional element, in order to determine the required amount of material, we summarize the length of the slopes, and then, taking into account 10 cm of overlap, divide the resulting figure by 1.9. To fix the corrugated board, self-tapping screws with rubberized gaskets are used, their number is 8 pieces per 1 m2. At the last stage, we determine the amount of insulation and waterproofing.
The device of a roof from a professional flooring
The indicators of thermal insulation, vapor barrier and waterproofing in the roof structure largely depend on the correct laying of the "pie". Roofing "pie" tout the entire structure of the roof. The system may be different, depending on the premises: whether it will be residential or not.
Pie device:
- Decking;
- Clapboard or drywall;
- insulation;
- Vapor-proof material;
- crate;
- Rafter leg;
- Ridge seal;
- Skate and rail;
- Rafter bar;
- Waterproof film.

The first sign of a violation of the roofing "pie" will be the formation of ice at sub-zero temperatures.
Tool and material for the installation of corrugated board
- Film or thick polyethylene;
- stapler;
- Glass wool or mineral wool;
- Silicone;
- For gluing waterproofing seams connecting tape;
- For waterproofing membrane in rolls;
- Paralysis film;
- self-tapping screws;
- Screwdriver;
- timber;
- Clapboard.
The list of the required amount of building material is compiled when calculating the estimate, and will depend on the type of roof structure.
We properly cover the roof with corrugated board with our own hands
At the first stage of installation work, waterproofing is laid, starting from the lower edge of the crate. The film is laid with an overlap of 10 cm to 15 cm. The material should not be strongly stretched, and a construction stapler is used to fasten it.
Installation of the counter-lattice

Between the waterproofing and the corrugated board, it is required to leave a gap to remove moisture. The counter-lattice is installed after, the design consists of planks 5 cm high, they are placed along the crate, parallel to the eaves and rafters.
Installation of corrugated board
To ensure that the mounting hole is tightly closed, use self-tapping screws with sealing gaskets. Silicone sealant is used to process the horizontal overlap of the corrugated board.

If the installation takes place in a sloping roof, then the sheets are installed with a vertical overlap in two waves. In the case of using a sealing gasket, it is allowed to install sheets with an overlap in one wave.
Installation of corrugated board on a gable roof occurs from the bottom row. Lay 5 sheets and fix in the center with a self-tapping screw. And after that, with a step of 50 cm, the corrugated board is interconnected with self-tapping screws. If everything is verified along the overhang, then the final fixation is performed.
Installation of end strips
The end plate for most sheets is 2 m, the lowest installation begins with an overlap of 5-10 cm. If installed correctly, at least one wave of the profiled sheet will overlap. In increments of up to 1 meter, self-tapping screws are fastened.

The fastening of the ridge strip with an overlap of 10 cm is carried out using smooth elements, they must be included in the kit. It is advisable to install a layer of air-permeable sealant between the corrugated board, fastening takes place in increments of 30 cm with roofing screws.
Installing the junction bar
With an overlap of 20 cm, an abutment bar is laid, fastening takes place with self-tapping screws in increments of 40 cm. Using a ridge seal, the joints of the ends of the wall and roof are sealed, this will help to avoid moisture getting into the cracks.

- The roofing process is considered high-altitude work, and safety measures must be taken before installation begins;
- It is better to lay the corrugated board on the boards during the installation process, and not on the ground;
- The corrugated board from the eaves should go down by about 5 cm;
- The waterproofing should sag a little.
- Use a taut cord to lay the profile sheets evenly along the cornice.
The creation of a roof is always associated with a mass of various nuances that require attention. Mistakes made during design and installation always cause premature destruction of the roof, so they should be avoided by thinking through all the stages of construction work in advance.
One of the problems is the choice and installation of roofing material. In recent years, corrugated board has been increasingly used for roofing, the most important advantage of which, compared with other roofing coverings, is ease of installation, which allows you to perform all the necessary work yourself. How to cover the roof with corrugated board yourself will be discussed in this article.
Characteristics of corrugated board
The professional flooring represents sheet material from steel with a zinc covering. Sheets often have a polymer coating, giving the material additional protection from external factors. A characteristic feature of corrugated board is the presence of a profile, due to which the sheets acquire greater rigidity. Since the rigidity of the material is achieved without increasing its weight, it ultimately turns out to unload the entire roof structure.

Covering the roof with corrugated board is carried out in several stages, going in the following sequence:
- Choosing the right material;
- Taking measurements;
- Transportation;
- Preparation of tools;
- Preparatory roofing work;
- Direct installation of a covering.
Material selection
There are several parameters that you need to carefully consider when choosing profiled sheets for a roof:
- Marking. There are several types of profiled sheets, but products with the H marking, which were originally developed as roofing, are best suited for the roof. When choosing a specific brand, it is imperative to pay attention to the wave height, which must be at least 20 mm, and the useful width of the sheet. You can use the general rule: with an increased slope of the roof, it is worth choosing a lower brand of corrugated board. It will not be superfluous to study the quality certificate when buying material.
- The presence of defects and damage. Of course, you should not use damaged or deformed roof decking. There should be no cracks, roughness or other flaws on the profile surface, and the coating should be intact. If the sheet bends too easily or breaks at the slightest bend, then it is strongly not recommended to use it. In addition, really high-quality corrugated board after arching returns to its original state on its own.
- Price. This parameter is especially relevant with a limited budget allocated for construction. The cost is affected by the thickness of the products and the type of coating. Different manufacturers can have exactly the same corrugated board, so you should study the market and choose the most suitable option.
- Coating type. Zinc coating is usually used to protect corrugated board from corrosive attack. The thickness of the protective layer varies, so you need to select the material taking into account the operating conditions. In addition, most profiled sheets also have a polymer coating that provides additional protection and enhances the visual quality of the material. It is worth noting that corrugated board is used not only for roofing. For example, quite often they make an interfloor overlap according to a profiled sheet, which allows you to quickly perform such work.
Do-it-yourself measurements
Before covering the old roof with corrugated board, it is necessary to carry out a number of measuring operations:
- It is necessary to measure all the elements of the roof structure and adjust them to the required dimensions;
- Special attention is paid to the roof slopes, which is associated with a possible change in the dimensions of the structure during the installation of the truss frame;
- The discrepancy between the lengths of the diagonals of the roof slopes cannot exceed 2 cm, otherwise the supporting structure will have to be redone;
- Roof slopes should not have height differences of more than 5 mm per 5 m of length.
Transportation of corrugated board
Profile sheets, despite the high rates of mechanical strength, may well be deformed and become unusable if not transported correctly, therefore, it is necessary to follow these recommendations:
- For the transportation of corrugated board, a solid and durable base is required, the length of which exceeds the length of the sheets;
- Sheets must be firmly fixed so that they do not rub or move during transportation;
- You need at least two people to load and unload the material, since profiled sheets cannot be dragged or bent;
- It is possible to lift sheets directly onto the roof only one at a time, using stretched wooden logs.
Roof covering tools
In order to cover the roof with corrugated board, the following set of tools is required:
- Scissors (for a thin profiled sheet, nibbler or lever scissors are suitable, and for products with a thickness of about 1 mm, it is best to take an electrically driven device);
- Drill;
- Sealant application tool;
- rivet pliers;
- Knife for cutting heat-insulating material;
- Construction stapler;
- Template for mounting the crate;
- wire cutters;
- Screwdriver;
- Marker;
- Roulette and level;
- A hammer;
- Lace.
Preparatory work
The whole stage of preparation comes down to the arrangement of the truss frame and lathing - the mandatory elements that make up any roof structure. In addition to their supporting function, these elements evenly distribute the weight of the roof and allow it to withstand certain operating conditions.

A properly designed and assembled crate greatly simplifies roofing with a profiled sheet - it is attached directly to its elements. The presence of a full-fledged crate also provides ventilation for the roofing cake, which reduces the effect of moisture on the structure.
Installation technology of corrugated board - how to block yourself
Before you cover the roof with corrugated board with your own hands, it is necessary to determine the amount of overlap of the sheets, which is determined depending on the slope of the slopes:
- With slopes of less than 15 degrees, the minimum overlap is 20 cm;
- If the angle of inclination is in the range of 15-30 degrees, then the overlap should be from 15 to 20 cm;
- With a roof slope of more than 30 degrees, the overlap of corrugated sheets can be reduced to 10-15 cm.

When all stages of preparation are completed, you can begin to cover the roof with corrugated board, for which the following algorithm is used:
- Using a screwdriver and self-tapping screws, the corrugated board is attached to the crate. Fastenings must be carried out in places of wave bending. To make the fastening reliable, you need to select galvanized self-tapping screws with a rubber seal. The consumption of fasteners is usually about 6-8 units per square meter.
- In the upper and lower parts of the slopes, self-tapping screws are screwed into the lower wave of sheets, and all other sheets are attached to each board of the crate. Between themselves, the sheets of corrugated board are connected in the upper bend with a fastening step of about 50 cm.
- The last sheet, located on the side of the gable, is usually laid with a large overlap or cut to the required size. The end strip must be installed with an overlap of at least 5 cm, and its fasteners must be located in 30 cm increments so that the element covers the first wave of the sheet.
- You also need to install the eaves overhang board in advance. It is installed with an overlap of about 10 cm. The pitch of the cornice fasteners is 30 cm.
- For the arrangement of internal joints, you need to use a corrugated board that has a smooth surface. The roof under the joint should be covered with the most durable material. The space between the edge of the corrugated sheet and the inner joint must be filled with a sealant. At the top of the wave, the joint is connected with nails, and at the bends with self-tapping screws. The fastening step is 30 cm. The end of the profiled sheet is placed under the ridge bar, and the remaining cracks and gaps are carefully sealed.
- The last stage of work is the installation of a ridge bar, the elements of which are installed with a 10 cm overlap and fixed every 30 cm with self-tapping screws.
This completes the installation of the roofing.

Conclusion
In this article, the question of how to cover the roof with corrugated board with your own hands was considered. This work is not difficult if you approach it wisely and competently complete each stage of the roof arrangement.