How to make a boat with your own hands: wood and plywood are the best friends of a fisherman. Do-it-yourself punt boat made of plywood: drawings, instructions
Before you start building a wooden boat, you need to prepare the main part of such a structure - the sides. To do this, you need to take the most even, long, wide enough boards that are made of spruce or pine.
Look at the photos of homemade boats and you will see that there are no boards on its sides that have knots - this is very important. The boards for this part of the boat should be in a dry place under slight pressure for at least one year.

Choice of boards for work
Before you start production, you need to make sure once again that the boards are absolutely suitable for the job. Next, for each board, you need to measure the desired length and carefully cut them off at an angle of 45 degrees. These boards will go to the bow of the boat.

After that, it is necessary to plan them and check that the boards connected to each other have no gaps. Then treat the ends with an antiseptic.


The next step is to prepare the bow of the boat, and a triangular bar serves them. It should be one and a half times longer than the width of the sides. The beam is also planed and covered with a layer of antiseptic.

Further instructions for making a boat with your own hands is to choose a suitable board for the stern of the boat. Do not neglect the stock, because it is better to cut off the excess later than to look for and start all over again.

Boat assembly
When the elements of the wooden boat are assembled, you need to start assembling the product. You should start with the bow. Both sides and a triangular bar must be connected to each other using self-tapping screws. It is advisable to immediately cut off the protrusions from above and below so that they do not interfere in the future.

The next step is very important and responsible, as it is necessary to give the future boat a shape. It is necessary to determine the width of the boat and put a spacer in the middle. Choose a spacer board the size of the height of the boat, so your sides will not burst.

When the strut is properly installed, you can begin to shape the boat, call a few people for help or stock up on ropes to hold the structure.

Use the drawings and adjust the dimensions of the stern for the manufacture of the boat in such a way that there are no gaps and cracks when connecting the back wall and sides.

When the backdrop is installed, cut off the excess part from the bottom, and on top you can make an element in the form of a triangle. Next, we deal with the struts that will constantly maintain the shape of the boat, as well as the seats that are installed on top of the struts. You can determine the number, as well as the location of these elements yourself, so it can be one, two or more places.


We align everything on the lower part in one plane and treat the entire surface with a protective layer. When the glue dries, start making the bottom of the boat.

The best option for the bottom will be a galvanized sheet of metal. Try to find one that matches the size of the boat.


How to make the bottom of the boat with your own hands
Put the future boat on a sheet of metal and circle its borders with a marker, do not forget to grab a margin of a few centimeters just in case, you can always trim the excess.

The next step is to cover the connection of the boat with its bottom with a special silicone sealant along the entire length in one line. On top of the sealant, until it dries, a cord is laid in several rows - all this is necessary so that the bottom of the boat is airtight and does not let water in.

When this process is completed, we proceed to the connection of the bottom with the frame. Carefully lay the bottom of the boat over the bottom of the boat. Use nails or screws to connect.


Start connecting from the middle and move to the edges of the boat. Do the work as slowly and carefully as possible, as this part is very important.

We cut off excess metal that sticks out more than 5 mm from the edge of the boat, and bend the rest with a hammer. It is also important to protect the nose of the boat from external factors with the help of the same metal. Cut out a rectangle of tin according to the size of the boat.

Everywhere where wood and metal are connected, it is necessary to walk with sealant and lace. By this time, before you start "wrapping" the nose with metal, you need to treat the entire boat with an antiseptic.


Be sure to make a mount on the bow for the chain. This will help if someone wants to steal a brand new boat, as on the pond it will attract special attention due to its novelty.

Before you build a boat, think through and review all the ideas of what you can make a boat out of. Perhaps you will choose for yourself a special material with which it will be more convenient for you to work, or maybe you need special protection or massiveness.

Do not forget to cover the bottom with a special paint on the reverse side, since galvanized metal collapses over time upon contact with water. And the wooden parts of the boat must be covered with several layers of special impregnation and, as a result, the boat should be left to dry in the shade.


For convenience, a wooden flooring can be laid out inside the boat at its bottom. So the bottom will not rattle when you move along it.

This will complete the boat. Read more articles on how to make the best homemade boats with descriptions to find out some other nuances that may be useful to you in future buildings.

DIY boat photo


Despite the fact that in almost any fishing store you can buy a boat for fishing, it is much more profitable from the material and practical side to make a boat out of plywood with your own hands.
And although it will take a lot of time and effort to make a homemade boat, you can be proud of the result for a long time. It's always nice to know that something is handmade.
Necessary tools and materials
You can take ready-made drawings on how to make a plywood boat:
- punts;
- kayaks;
- with motor;
- sailing.
Even if no drawing is to your liking, you can always design the boat yourself. But the skills of competent construction of drawings will not be superfluous, otherwise it will turn out not a boat, but a pile of firewood. Options for the execution of the drawings are shown in the photo.


To create a homemade plywood boat, you will need the following set of tools:
- jigsaw;
- saw;
- screwdriver;
- a hammer;
- Sander;
- a set of clamps;
- set of brushes.
As for materials, the main component of the structure, of course, is plywood. Waterproof plywood for boats is best, but if you don't have one, you can use sheets of birch veneer plywood. In this case, the thickness of the sheets must be at least 5 mm, and some structural elements, for example, the bottom, keel and frames, must be 10-16 mm thick.
In addition to plywood, you will need to use wood for mounting the strut frame, floor grating, seats, and more.
All seams and joints must be smeared with glue, polymer resins, epoxy resin or similar means to ensure the tightness of the boat.
Also important materials are impregnations, varnishes, paints and varnishes. After all, the ship, firstly, must have a decent appearance, and secondly, it must not rot after the first sortie to the reservoir.
Making boats from plywood


It is worth noting that the construction of a plywood boat can only be carried out from high-quality sheets that do not have such surface defects as knots, cracks and delaminations. It is desirable to use the dimensions of the sheets as large as possible. Larger plywood is easier to work with and the construction is stronger. But often there is no suitable plywood, and two sheets have to be glued together. To do this, the ends of the two sheets to be glued are ground at an acute angle so that the length of the bevel is equal to at least seven sheet thicknesses. Such gluing is called "on the mustache." Bevels are carefully smeared with glue and pressed against each other with a set of clamps.
Using the drawings found or created by yourself, you can start marking materials. At this stage, it is important to observe exactly all dimensions. Deviation from the drawing by at least 1 mm will lead to the formation of gaps at the joints and, accordingly, the vulnerability of the structure will appear. For convenience, you can use patterns that are applied to plywood and circled. The photo shows an example of such a pattern.
So, using a jigsaw and a saw, cut out each structural element. Particular attention should be paid to the ends of the blanks - the angles of the joining of the surfaces should be observed. To create a tailgate, you will have to glue several layers of plywood to obtain the design thickness and, as a result, the required strength. This will significantly make the structure heavier, but is a necessary measure (especially if you plan to mount it under the motor). The same should be done with the frames.
Homemade boats made of plywood for a motor require additional hardening of the tailgate by gluing it with fiberglass and reinforcing it with hard wood.
To strengthen the structure, it is recommended that transoms and frames be additionally fixed with galvanized or tin-plated screws. However, do not forget that the length of the screw should in no case exceed the thickness of the fastened parts.
For convenience, the transom is placed on the goats and the bottom and sides are attached to it. The reduction of the ends should be carried out from the nose. The elements are fastened with glue and suture materials. If, as a result of this operation, the structural details do not converge, then you will have to disassemble everything and squeeze the frames. Therefore, it is better to measure everything in advance.
In the case of creating a homemade punt, the task is simplified as much as possible. Assembling a punt structure by a skilled enthusiast can take as little as 2-3 hours. Since there are no complex geometric shapes, the work can be easily done by just one worker, without spending much physical effort.


Particular attention will need to be paid only to the joints and gratings of the floor made of wooden slats. The flooring is necessary because the bottom of the boat is very vulnerable to the deformation load received from the soles of the shoes.
Seam gluing
A do-it-yourself plywood motor boat requires special attention and control when gluing all the seams of the structure. The photo shows the final results of gluing the seams.
Gluing steps:
- Preparation of a sealing composition based on aerosil and epoxy resin in a ratio of 1:1.
- All corner joints are reinforced with wooden fillets (they play the role of stiffeners).
- All joints from the inside are carefully coated with a sealing compound, and strips of fiberglass are glued on top.
- After complete drying, frames are installed, which are fastened with glue and screws.
- Now the lining of the floor grating on the bottom begins.
- Installation of seats, oarlocks and other structural elements according to the drawing.
- After complete drying of all joints and surfaces, the boat can be removed from the goats.
Painting work
The final, but no less important stage in the construction of the boat is painting. Before proceeding with painting, it is necessary to prepare all surfaces and joints by grinding and degreasing.


After that, it is necessary to carefully coat every centimeter of the surface with wood impregnation. It is recommended to use impregnation for river or sea vessels.
Now you can start painting. Painting work is usually done with a hard brush, but spray guns are also acceptable. As a paint, it is recommended to use enamels intended for painting ships. The durability of the boat directly depends on the quality of painting work.
If you approach the task wisely, you can simply build a boat with your own hands, both for fishing and for a comfortable stay for the whole family.
The easiest way is to build a punt for fishing. The boat will be especially effective and practical if waterproof plywood is used as the material, and the tailgate is equipped with a motor mount. The stages of construction of the punt can be seen on the video.
The motorboat is perfect for use on rivers and lakes. But at sea, a home-made motor punt should be used only with full confidence in the quality of the assembly.
A motor boat made of waterproof plywood can serve its owner for many years.
It so happened that in the country we always had three boats: a metal cauldron and two wooden punts. Kazanka on the water every year, and of the punts, one on the water, and the second for cleaning and painting. The next year is the opposite. About five years ago, during a fire, the boat that lay under the house along with the house burned down. Rebuilt after the fire.
And the only punt, which was now painted in the spring, and then rather, rather, launched into the water (because, you see, they really want to go fishing), began to gain physical wear and tear extremely quickly. The question arose about what should still be done the second. Dad and brother-in-law searched for a larch board of the right size for a long time and eventually found a blank for boards of a smaller section at the sawmill, which they had not yet had time to dissolve. Buying waterproof plywood was already a matter of technology.

Two boards, trimmed slightly at an angle, 15 degrees (by eye), drilled holes in the edges and laced up with wire (copper 2.5 sq. mm. But it doesn’t matter at all). Further, straining all the sphincters, they parted the middle and spread it with a bar. 
I was not going to participate in the work, my father and brother-in-law built it, because the boat is a fishing boat, and I am not a fisherman at all. But when they work nearby, I could not resist, besides, I have more carpentry experience purely technically. In theory, only dad knew the technology. He and his grandfather twenty or thirty years ago built not one, and perhaps not two boats. 
Gradually got into place struts. 
The bow and stern (resting parts) have taken shape, all connections are planted on the sealant quite abundantly. Pretty hemorrhoid fit, for the first time, anyway, for sure. 
The heat has gone. Plywood 12 mm. 


The benches were made from used boards. Also larch, once framed the door frame at the parents' house. 
A rail is sewn along the perimeter at the junction of the side and the bottom, and is also planted on the sealant. A rail is also sewn along the sides from above along the edges - a bulwark.
Click the button to subscribe to How It's Made!
Buying a wooden boat is a rather costly process that requires a lot of investment. But its manufacture opens up a variety of options, shapes and style solutions for the creator, in which the boat will be made, in addition, he will be able to save a little. A handmade wooden boat will be a great addition to fishing, hunting and just relaxing on the water. We will consider how to build a wooden boat further.
The main types of boats
There are several types of materials suitable for building a boat. Among them:
- rubber-based fabric;
- plastic components;

- steel;
- wood;
- plywood.
Inflatable boats are also called fabric boats. For their manufacture, rubber or polymer compounds are used. They are unstable and do not hold well on the water. Easily cracked, unstable to cold and frost. They require constant patching and are very dangerous because they are damaged at the most inopportune moment. The advantages of this kind of boats are ease of transportation, compactness and ease of storage.
Boats made of plastic are primarily distinguished by their attractive appearance; they are produced in a wide variety of colors. In addition, if you use plastic boats correctly, they will serve their owner for decades.
Wooden boats made of boards are less durable than plastic boats. In addition, they require constant care in the form of applying moisture-repellent solutions. Some wooden boat owners soak the device in water before using it to keep it in shape.
Wooden boats photo:

Boats based on plywood are the best option among wooden boats. Plywood has moisture resistance, resistance to heavy loads, strength and durability. The only drawback of plywood is the difficulty in bending it, so such boats do not have smooth lines, but are characterized by the presence of sharp corners.
For the manufacture of metal boats, duralumin is used, which has the properties of strength and resistance to wear. It is possible to use stainless steel for the manufacture of a boat, but in this case, its transportation becomes impossible due to the enormous weight of the weight.
Homemade wooden boats: manufacturing features
To draw drawings of wooden boats, there are special online programs that help calculate the dimensions of a single part. With the help of a 3D constructor, every detail of the boat is visible from all angles.
We offer you to get acquainted with the option of equipment of the boat of the following sizes:
- the lower length of the bow and stern is 200 and 850 cm, the upper length is 500 and 1120 mm, the height is 150, 185 mm;
- dimensions of reinforcing ribs: 1st - bottom height, top and length - 830 mm, 510 mm, 295 mm;
- the board must be cut at an angle; to calculate it, it is better to use a calculator.
Tip: Before starting to build a boat, study additional literature related to the number of main boat parts and their names.
This boat is made of plywood, when buying which be sure to pay attention to moisture resistance. Such plywood will last several times longer and will not require additional costs for its repair and maintenance.
For the manufacture of the bottom, use plywood with a thickness of 1.2 cm or more, and for the sides and other parts - 0.8 or 1 cm.
After buying plywood, start making boat parts. To do this, you need to prepare special patterns. They are made on large sheets of paper, for example, on wallpaper. The shape of the pattern exactly repeats the shape of the part.
Use an electric jigsaw to cut out the details. Since the dimensions of the plywood do not allow building the bottom of the boat completely, it is necessary to resort to gluing it from several parts. To do this, use EDP glue or any other adhesive solution that is resistant to moisture. The gluing procedure is carried out using overlays, in the form of plywood strips, from 10 cm long.
For gluing the internal stiffeners, birch beams are used. They are located inside the boat and have a certain angle of inclination. In some versions of the construction of a wooden boat, solid saddle beams are used, for gluing which two side parts are connected to a flat bench. This design allows you to significantly reduce the internal filling of the boat, and also increases the buoyancy property, even if the boat capsizes.

For beginners in boat building, the main problem is connecting several parts together, especially if it happens at different angles. The simplest method is the so-called "stitching and gluing" method. In this case, the parts are interconnected using a wire made of steel or a strong nylon thread. Before that, special holes are drilled in the edges of the parts, their diameter should not exceed four millimeters, and the location from the edge of the boat should not exceed five millimeters. When the body is connected with threads, it is the turn of the next process, which includes gluing all joints with fiberglass. It is fixed to the surface by impregnation with moisture-resistant glue or epoxy resin. It is recommended to carry out gluing both inside the boat and in its outer part.
Start assembling the hull of the boat from the side sections, which include the side, bow and stern. First, holes are drilled, in relation to the indicated values, monitor the evenness of the drilling step. Tighten these parts with a thread or wire. Keep track of the relative position of the parts and the evenness of all corner joints. Self-tapping screws will help to fix the stiffeners, and fiberglass provides them with additional fastening. Make sure that no air bubbles form under the fiberglass, if any, take care to remove them.
The bottom is attached to the body in the same way. On the upper part of the sides, it is necessary to glue the timber for the mooring purpose. Its main function is to protect the boat from mechanical damage during its mooring at the pier or shore.
The keel is a mandatory element of the boat. He is responsible for the safe entry of the vessel into turns and for the stability of its side parts. Its fixation occurs along the central part of the bottom, and is installed along its central line.
For the manufacture of the central keel, use not one, but a set of several rails. With additional gluing of parts into the bow or rear of the boat, its strength and stability increase.
We recommend taking care of strengthening the transom - the rear of the stern. After fixing the main parts of the boat, it is recommended to open it with special impregnations. After they dry, proceed to test the vessel. Transport the boat to a river or reservoir and lower it into the water, if there are no leaks, it is ready for operation. It is also recommended to control the amount of cargo that it is able to carry. When all the problems are fixed, paint the boat with oil paints. It is necessary to carry out staining in several layers.
DIY wooden boat: instructions for making
With the help of ordinary plywood and skillful hands, it will be possible to build a good boat. The average cost of such a boat is about $ 20-30, which is much lower than buying alternative boats made of rubber or wood.
To make a boat of this type you will need:
- several sheets of plywood;
- polyurethane adhesive;
- nails;
- latex-based paints;
- silicone sealant;
- a syringe to help close the seams;
- sandpaper;
- jigsaw;
- paracord;
- clamp;
- screwdriver;
- roulettes;
- drills;
- brushes for applying paint.
After preparing all the necessary tools, the process of preparing individual parts follows. To do this, the plywood sheet must be divided into three sections, which will act as a bottom and main parts. The first section is 460x610 mm, the second is 310x610 mm, the third is 610x1680 mm.
Two sidewalls are made in the size of 310x2440 mm. Use small bars of 25x50x2400 mm as supports. The required number of props - 3 pcs. To make the bow, it is recommended to use a bar measuring 25x76x2400 mm. To build a hull, the use of two bars 25x50x2400 mm is required. They are cut into several pieces and fastened with paracord.

When all the details are cut out, proceed to self-assembly of a wooden boat. To carry out this process, you need nails and pins. Instructions for assembling a wooden boat with your own hands:
- installation of the bottom and attaching the left side to it;
- fixation of the stern on the left side and connection with the bottom;
- attaching the right side to the bottom and stern;
- nasal fixation.
Before fixing the boat with nails, first assemble it with glue. When the appearance of the boat satisfies the manufacturer, fix the joints with nails.
The next step is painting and polishing the finished product. After collecting the boat, start polishing it from small roughness and bumps. This will require sandpaper or a grinder. Using silicone sealant, it is necessary to close up all the gaps formed during the assembly process. Leave the boat outdoors until it is completely dry. After a day, start painting the boat. Apply the first layer on the outer surface, and the second on the inner. After the paint has dried, you need to apply another layer inside the boat.
Now you should check the device on the swim. If there are minor flaws, they need to be eliminated.

Wooden punt boat: the main stages of manufacturing
Before studying the instructions for making wooden punt boats, let's get acquainted with their advantages:
- minimum construction costs;
- light weight, which greatly simplifies its transportation;
- compactness - ease will fit in the garage for the winter, and even in the trunk of a car during transportation;
- does not require special finishing and care;
- easily made by hand.
When choosing the length of the boat, one should take into account the number of people and cargo that will be placed on it, the interval between the optimal values of the length of the punt is from 1.8 to 3.8 m. In this case, the width of such a boat is from 1 to 1.5 m. The average value the height of the sides is half a meter. The weight of the boat depends on its size and is about 70 kg. The boat freely accommodates from one to four people.
It is possible to install an additional motor or sail, which can simplify the management of the boat. We will consider how to make a wooden boat further.

1. The first stage of work on the boat is the choice of material for its construction.
To build a punt, you need two types of plywood:
- plywood with increased moisture resistance characteristics, the thickness of such material reaches a mark of two centimeters, this type of plywood is based on the use of an adhesive base, please note that it contains harmful substances, therefore it is not recommended to use it in residential premises, as an alternative we recommend purchasing multilayer plywood laminated type, it is more safe for health;
- aviation plywood five-layer type - has a small weight, but is highly durable; seats and a transom are made from it.
There are certain rules for working with the material that underlies the construction of a punt, namely:
- use a disc plate to cut the material into parts;
- if the thickness of the plywood does not exceed one centimeter, a clerical knife is enough to cut it;

- with a thickness of two to six centimeters, the most optimal option is to use a jigsaw;
- it is not recommended to cut the plywood across the grain, as there is a risk of cracking, if necessary, in this type of cutting, draw weakening strips on the top layer of the veneer;
- when arranging popular types of wooden boats, the parts are connected to each other using wire, self-tapping screws or epoxy resin; install a self-tapping screw;
- if it is necessary to equip a boat with curved shapes, you need to wet the plywood, bend it into the desired position and fix it until it dries completely, the duration of the procedure is about 15 hours;
- in the process of gluing parts, pay attention to the glue packaging, it contains general recommendations for its drying and work rules, which include cleaning, degreasing and surface treatment with glue;
- pay attention to the location of the fibers on the surface of two plywood parts, with their parallel arrangement, the fastening reliability increases several times;
- when plywood is delaminated during the work, it is recommended to glue it, for this, a paper sheet impregnated with glue is placed between the delaminated layers, such plywood is not suitable for building a boat, since it is defective.

2. The next stage involves the choice of the optimal tool for the work. An electric saw or a jigsaw will help cut the material. With the help of an electric planer, it will be possible to make the necessary angle of the bar. It is allowed to use any both electric and mechanical tools for grinding. Using a screwdriver, install self-tapping screws and make holes for them.
3. The most optimal place to work on the boat is the floor, since large parts will not fit on the table. Set the plywood sheet on the floor surface and transfer the details to its surface using a square.
Tip: To significantly save material, you should make a preliminary sketch of the boat on paper. Experts recommend, if possible, to build an exact copy of the boat out of cardboard in order to have an idea of its original form.
There will be two versions of the boat. The first involves the installation of vertical sides that have straight lines. The second - the classic version - is the installation of sides, a slightly narrowed character. To make them, you will need a piece of work. To do this, it is recommended to use an electric planer. Walk with him on the surface of the parts once. Then repeat the procedure with any grinding tool. If there are barbells or other jumpers in the fretwork that increase rigidity, at this stage they are cut out.
Tip: To make the assembly process easier, use the plastic ties used with the cables. They become almost invisible after the final finishing of the boat with epoxy resin.
When the frame is assembled, proceed to connect the bottom. Its fixation is carried out with clamps or the same metal wire. Please note that the bottom must be sealed with high quality, for this it is poured with resin. If you use fiberglass gluing, then leaks cannot be avoided.
When all joints are dry, proceed to the next treatment. It includes sanding seams. Next, the joints are glued with fiberglass coated with epoxy resin. The outer part is glued twice, and the inner one once.

4. Installation of additional components.
If it is necessary to install a sail, the vessel needs to be additionally strengthened, thereby increasing its stability. It is better to do this with a dagger. for its manufacture, plywood 0.6 cm thick is required. In addition, a steering wheel is cut out of this plywood. The number of daggerboards depends on the size of the boat. The best option is to install two daggerboards at the extreme parts of the vessel. The steering wheel is attached to the boat with several loops, preferably of a non-removable nature.
A punt boat is a traditional fishing boat that appeared long before the keel counterparts made of PVC and aluminum. Convenient and rather simple, it was used not only for fishing - with its help bulky cargo, people were transported by water. Despite the appearance of a large number of models of inflatable boats, the punt has not lost its popularity even today. One of the reasons for this is the fact that such a watercraft can not only be purchased, but also made by hand.
In more detail about what a punt is, what it consists of and what types it happens, what its pros and cons are, as well as how to make such a boat yourself will be described in this article.
Device
This craft consists of:
- from two sides (right and left) up to 60–70 cm high;
- flat bottom reinforced with longitudinal or transverse stiffeners (lamellas);
- rectangular stern (transom).
To transport people and control the boat, 2–3 benches (banks) are attached between its sides. Various fishing accessories are stored in a box with a lockable lid mounted on the stern. Depending on how many people are planned to be transported on the boat. Its length varies from 2 to 4 meters with a width of 1.0–1.2 meters.
Most modern models have a pointed or narrowed bow shape, due to which such a boat acquires better maneuverability and speed of movement (especially against the current), has less windage in a strong headwind.
You can move on a punt both with the help of oars, and on mounted propeller or jet engines mounted on the stern.
Kinds
Depending on the material for the manufacture of punts, they are of the following types:
Wooden - a classic version of this boat. Wooden boats are made independently from coniferous boards (spruce, pine), plywood. The disadvantage of such boats is their decent weight, which is why anglers who do not have a car with a trailer use such a boat only on a nearby pond.
A wooden boat must be made of boards with a moisture content of not more than 16%, without cracks and falling knots.
Plastic - lightweight and durable factory boats, having a one-piece construction, made of durable and impact resistant polypropylene, fiberglass, ABS plastic. It is impossible to make such a boat on your own. Its price, in comparison with inflatable analogues, is somewhat lower. The disadvantage of such a boat is its fragility at low temperatures and a very difficult self-repair.

Plastic models should be used only in the warm season - in cold weather and frost, their body becomes brittle and easily damaged
Metal - such boats are made of aluminum and duralumin. In terms of strength and weight, such boats are the “golden mean” between wooden and plastic models. Having a small weight and constant, independent of air and water temperature, the strength of the hull material, they can be freely used throughout the open water season.

The aluminum punt boat is not suitable for sailing on the sea - the lightweight design is quite easy to capsize in a big wave
Advantages and disadvantages
If you ask yourself which boat is better - keel or flat bottom - then the latter has a number of advantages such as:
- Stability - due to the large area of \u200b\u200bcontact with the water, a flat-bottomed boat is more resistant to side waves and wind compared to a keel boat;
- High cross-country ability and carrying capacity - having a small draft, such boats allow transporting up to 5-6 people with a length of 4 m, while moving through shallow water areas;
On a note. By installing an outboard screw motor-swamp vehicle on a punt, you can navigate through overgrown and silty bays and swamps. The design of the unit and the material of manufacture of its screw allows it to grind the grass that comes in its way and not get clogged with dirt.
- Light weight - plastic and aluminum punts have a weight much less than wooden and some inflatable boats;
- Ease of manufacture - you can make a punt with your own hands with a minimum set of tools and materials. The cost of such a craft will be significantly lower than the factory model.
The main disadvantage of such a boat is low maneuverability and speed compared to keel boats.

Due to the small draft, the patency of the punt in shallow areas of water is higher than that of any boat or keelboat
DIY punt making
Do-it-yourself punt assembly includes drawing up drawings, purchasing materials, preparing the necessary tools, making the bottom, sides, stern from the board, fixing them and treating the structure against decay with antiseptics and resin.
Materials and tools
Required tools:
- Electric jigsaw.
- Roulette.
- Square.
- Marker.
- A hammer.
- Screwdriver.
Of the materials, dry spruce or pine boards 25-30 mm thick, bars with a section of 50 × 50 mm for cross-sections, nails or galvanized self-tapping screws, resin, tow, waterproof paint are needed.
Drafting
In order to build a punt boat from boards on your own, you must first make understandable and visual drawings (project) of its main parts: sides, bottom, stern (transom). Based on the drawings, the need for materials is calculated: board, plywood, bars for the frame and lamellas.

The drawing of a flat-bottomed boat should be clear and understandable - an error in size in the manufacture of a watercraft will lead to a decrease in its tightness and maneuverability.
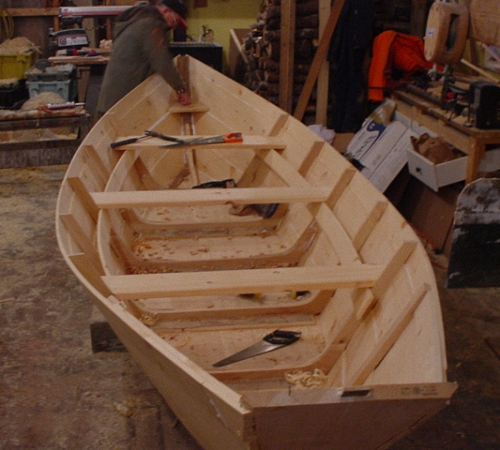
Bottom manufacturing
Several boards are placed close to each other, the contour of the bottom is drawn on them with a marker according to the dimensions of the drawing. From the bars, 5 crossbars are made, the length of which is equal to the width of the bottom in the middle, aft and bow parts. The laid boards are sewn together in the middle with the longest cross-piece, after which, using a jigsaw or a manual circular, the bottom is cut out along the outlined contour, leaving the sections at the bow and stern uncut.

In the bow and stern, the bottom blank is additionally fixed with boards and a nylon cord.

By tightening the bottom with crossbars, they achieve minimal gaps between its boards
Mounting the bow and stern
After the bottom is sawn to its bow with the help of ragged nails or self-tapping screws, a bar is fastened under a close to a right angle - a bow board. Then, several boards are attached to the back of the bottom, from which the feed (transom) is formed.

Close to a right angle of attachment of the bow board will allow you to evenly distribute the force of the oncoming water flow acting on the bow when the boat is moving
Fastening to the bottom of the boards
The first two boards of the right and left sides are first nailed to the bow board, then they are bent along the contour of the bottom and pulled together with a strong cord at the stern. After that, they are attached to the ends of the bottom with nails.

When attaching the first side boards, it is better to fix them at the stern with a strong nylon cord
To fasten subsequent boards, bulkheads are nailed to the bottom parallel to the crossbars.
To prevent the sides from “leading”, the boards of the right and left sides are nailed to the bulkheads at the same time, without first collecting the right or left side completely.

With a boat length of 3.5–4 meters, at least 2 bulkheads are required, to which side boards are sewn
Bottom and side processing
All the cracks in the bottom and between the boards of the sides are caulked with tow. To protect the bottom wood from decay, as well as to prevent leaks, the bottom and sides are well coated with resin.
plywood flatboat
A ring for a chain or a mooring cable is installed in the bow.
A flat-bottomed boat can be made not only from boards, but also from moisture-resistant plywood of the FBS or FSF brands.
A punt boat is made from plywood using a simpler technology than an analogue from boards. First, two boards 30–40 cm high are cut out of a sheet of plywood with a jigsaw in the form of rectangular trapezoids, a rectangular stern and bow. Then, with the help of special glue, the starboard side, then the stern, the left side, and the bow are sequentially attached to a whole sheet of plywood (bottom). In this case, the stern is attached to the bottom at a right angle, and the bow is at a blunt angle (120–130°). All elements, in addition to glue, are fastened together and the bottom with bars located inside the watercraft. After assembly, the outside of the boat is covered with two layers of waterproof paint or resin.
Such a boat, in comparison with that made of boards, has such advantages as low weight, low costs for the purchase of materials, and ease of manufacture.
The following video will tell you more about how such a punt boat is made with your own hands:
On a note. Punts are not only home-made, but also factory-made. Among them, such models as "SAVA" 270, "SAVA" 370, Liman, "Tortilla-2", "Kazanka 6M" are popular. The cost of budget boats is 18,000–20,000 rubles, while the purchase of more spacious premium models will cost 25,000–30,000 rubles.
Thus, a punt boat is a watercraft slightly inferior in its characteristics to keel boats. It is made both from boards and from moisture-resistant plywood. In addition to homemade boats, there is a large selection of factory models of plastic and aluminum punts on sale.