How to sew curtains with your own hands samples. We sew curtains with our own hands: a master class from professionals. Step-by-step instructions: choosing a design
Good afternoon friends! Today we will learn how to sew classic curtains. In fact, this is one of the simplest types. curtains, which can sew with your own hands. Thanks to the step-by-step scheme with detailed photographs, it will be quite easy even for beginner craftswomen.
So let's get started.
1. What do we need for sewing classic curtains:
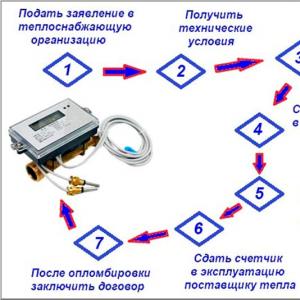
- curtain fabric (I took a piece 2 m wide, the height of the fabric is standard - 2.80 m)
Curtain tape (in this case wide)
– threads: white and the color of the fabric
- tape measure and ruler
- scissors
- pins
- sewing machine
2. First we need to cut the fabric. We have a piece in width - 2 m, the height of the finished curtain will be 2.50 m. We add 10 cm to hem the bottom and 6 cm will go from above under the tape. Accordingly, the height of the curtain pattern will be equal to: 250 + 10 + 6 \u003d 266 cm. Set aside this height along the side cut of the fabric and make an incision.


3. We pull out the thread and cut off the excess fabric along the formed scar.


4. Processing the sides. Side processing width classic curtains You can choose yourself. Usually it is from one to three centimeters. It all depends on your taste, some people seem to like a wider treatment, some narrow. I made a hem with a width of 1.5 cm. So, we bend the side edge to the wrong side by 1.5 cm and iron it. Then we bend one more time by 1.5 cm and pin it with pins.


5. We build up the sides.


6. Processing the bottom. Iron on the wrong side 5 cm, and then again 5 cm.


7. We stab the double hem with pins and sew it on the typewriter. The bottom edge is done.


8. There is very little left - sew on curtain tape. We have an almost finished curtain face up. At the curtain tape, we bend the side cut to the wrong side by about 1-2 cm. We put the curtain tape with loops up on the front side of the curtain. We combine the upper cut of the curtains and the curtain tape.


9. We pin the curtain tape to the curtain with pins in a checkerboard pattern so that the fabric does not move relative to the tape, that is, alternately one pin is closer to one edge, the next is closer to the other edge. Having reached the end of the curtain, we cut the tape about 2 cm longer than the curtain and bend these 2 cm inward so that the edge of the curtain and the edge of the tape coincide.


10. Change the color of the threads on the typewriter: the upper and bobbin threads should now be white. We attach the curtain tape along the inner edge, retreating 1 mm from the edge of the tape.


11. We take out the pins and bend the tape to the wrong side of the curtain. The stitch we just stitched should be on top. We pin the tape to the curtain with pins.


12. We change the shuttle thread again to the color that was at the beginning, the upper thread remains white. We attach the tape along the bottom edge, retreating 1 mm from the edge of the tape.


13. Do not forget to sew the side edges of the tape to the curtain, after releasing the threads.

Stylish curtains in the interior - a dream come true! Thanks to the abundance of fabrics, it is easy to choose any fabric to decorate the interior in a single style. Ordering tailoring in the atelier is expensive. If the hostess wants to decorate the house and save the family budget at the same time, she can sew curtains. To do this, you need a sewing machine and the ability to handle it.
Before starting work, you need to purchase:
- tool - sewing machine;
- fabric and threads suitable for it;
- a set of needles and pins;
- measuring ruler and centimeter;
- tailor's scissors;
- iron.
How to sew curtains (step by step instructions)
To sew quality products, you need to prepare a pattern and check how the sewing machine works with the fabric you need.
- sewing machine a few stitches on a small piece of fabric to make sure the stitching is even.
- Sketch the future curtain on paper. The simplest model is 1 or 2 pieces of rectangular material.
- Patterns are applied to the fabric and circled.
- Scissors cut off a piece of fabric.
- To sew the top edge. Fold in the allowance at the top and stitch the curtain ribbon.
- Tuck and finish the side cuts. Inside the seams, remove the edges of the ribbon so that, if desired, you can pull the edges and tuck the curtains.
- Fold the bottom of the product and sew. Fasten the threads and iron the finished curtain.
- Iron finished products.
Material selection
You can safely sew from taffeta: real material almost does not fade at all and is well washed. Silk will reflect excess light. When choosing, give preference to cream or pastel colors: brighter shades may fade. polyester can withstand multiple washes. Linen is the perfect choice for a child's room: it won't fade, just like viscose or velvet.
The color scheme of products designed for rooms that face south should be cool. This palette may include blue, blue, green, gray. The denser the fabric, the better. In the summer heat, curtains will save you from the heat. When there is not enough sunlight in the room, it is better to choose fabrics painted in light shades: orange, yellow, beige and red. Here, products made of light fabric of transparent color look great. When choosing a fabric and sewing curtains on your own, you can adjust the interior space: vertical stripes will visually make the room taller, and horizontal stripes will make it wider.
Practical organza products are popular: they are easy to wash and do not require ironing. For the kitchen it is recommended to use natural fabrics:. However, on the sunny side, cotton fabric quickly fades and loses its attractiveness. Blinds will help protect products from the sun.
Measure and cut
If we sew curtains ourselves, then we calculate the amount of material on our own. We determine the consumption of fabric and curtain tape. It is better to take it with a margin of 50 cm. Measurements are made from the eaves to the bottom edge of the products. Consider the consumption of material for the hem. Curtains are either long or short. You can sew beautiful curtains that cover radiators or barely reach the windowsill.
Measurements on the fabric should be marked on the edge. Measure the width and pull a couple of threads out of the fabric to outline where to cut. Cotton and blended fabrics should be moistened and ironed so that they do not sit in the product.
Sewing
Before sewing curtains, it is necessary to adjust the equipment. It is better to insert a new needle into the sewing machine. Pre-adjust the mode of its operation. The optimal stitch length is 4-6. You need to adjust the thread tension with the presser foot. The desired height of the rack teeth is also set so that the seam does not tighten the fabric. Curtains can not be altered several times: visible traces remain from the seams.
 Tailoring of curtains
Curtain tape is sewn as follows:
- Align the curtain and on the wrong side, hem about 2 cm.
- Heat the iron slightly and iron the hem.
- To prevent the tape from moving out, tuck it in 1.5 cm and pin it with a pin.
- First make the top stitch at a distance of 0.3 or 0.5 mm from the edge of the tape. In this case, the braid must be hidden.
- Run the bottom line.
- Pull the cords and tie them in a knot so they don't run away.
- Cut off excess pieces of tape.
Making curtains on eyelets
Adaptation - grommet greatly facilitates the process of hanging curtains and curtains. The new solution fits perfectly into the laconic interior styles. You can also sew curtains with rings for hanging at home.
Sewing curtains with your own hands is quite easy, with minimal skills in cutting and sewing technology.. Almost every housewife can easily master the technology of independent sewing of curtains. Having figured out how to sew curtains with her own hands, a woman is able to independently prepare and decorate a room for the whole family to live with original products that will give it uniqueness and can perfectly complement the interior of the living room. Unique curtains can surprise the guests of the hostess.
The design of the curtains can be chosen independently to your taste, and the technology of how to sew beautiful curtains should be studied thoroughly. There are a large number of different types of window curtains, all of these varieties are based on several basic models.

Having thoroughly studied the sequence of technological operations when sewing basic models of curtains, a woman will be able to sew any product with her own hands.

- What types of curtains can you sew yourself?
- How to sew curtains with a lambrequin?
- How to make Roman style curtains?
- Self-tailoring of curtains in the English style
- Sewing a simple and beautiful curtain - step by step instructions
- Making curtains on eyelets with your own hands
Solving the problem of which curtains to sew with your own hands, you should decide on the necessary style of curtains. There are a large number of different options for curtains, but the main ones are no more than 10. Many of the main styles are very similar to each other and differ in small design nuances. All the rest are slightly different from the 10 primary sources, so if you need to make adjustments to the design of the curtains, this will not be a problem.

For beginner seamstresses, before learning the process of how to sew a curtain with your own hands, you should familiarize yourself with the main types of curtains. The most common styles of window shades are:
After studying all the design features of each type of curtains, before sewing the curtains yourself, you should prepare the entire set of required tools and materials for work.

Before carrying out the curtain manufacturing process, you will need to prepare the following materials and tools:
- sewing machine;
- cuts for sewing curtains and matching threads;

- pins;
- pencil for marking;

- ruler and tape;
- nail polish;

- scissors.
Important! In the event that you are sewing for the first time, it is recommended to look for curtain patterns that match your tastes.
How to sew curtains with a lambrequin?
Very often, housewives are wondering how to sew a pelmet for curtains. Sewing curtains with a pelmet with your own hands is quite simple. This design has a simple design, but at the same time it has a sophisticated and attractive appearance. In order to sew curtains with a pelmet with your own hands, you must first prepare the appropriate patterns that will facilitate the implementation of all technological operations.

Lambrequins are an element of decor that fits perfectly into most of the most popular styles of home decoration. This element very well complements and organically forms the interior of the room.

In the manufacture of lambrequins, special attention should be paid to the selection of material. Most often, those women who decide to sew curtains make their own hands and all the decor elements for them. For the manufacture of all elements of the curtains, the same material is most often used, but if you wish, you can experiment using different materials to create different elements. For example, a plain material is used for the main part, and a lambrequin is made of patterned fabric. There are no special rules and requirements in this regard, the only condition is that the curtains with all the decorative elements on them must fit perfectly into the overall design of the room.

After choosing the main material for the manufacture of curtains for the room, everything should be calculated correctly. For a lambrequin, 1/5 or 1/6 of the total length of the material required for sewing curtains is required. When calculating the material, it should be remembered that a supply of fabric will be required for the manufacture of hemlines.
Before making curtains, you should consider whether folds are needed on the curtain, and in what quantity. The locations of the folds and their number can be marked using a ribbon.
At the initial stage, you should bend the fabric on top of the future curtain and make a pocket for the curtain beam. The size of the pocket must be somewhat wider than the beam. When making a pocket, the processing of the element should be carried out with a reverse seam.
Folds, if they are planned to be formed, need to be fixed with threads and processed with a high-quality iron. Before you fix the fold, you need to carefully sew the edge of the lambrequin.

In the process of making a lambrequin, certain efforts and accuracy should be made to make it original and unique. In the process of choosing decorations for curtains, you should focus on the material used in the manufacture of curtains.
On a note! Light fabric used for curtains can be complemented with beads and flowers made from organza, heavy fabric can be decorated with fringes.
How to make Roman style curtains?
Roman blinds are very popular, so very often housewives are interested in the question of how to sew a Roman blind. First of all, it should be remembered that these Roman blinds are sewn taking into account that they close the window tightly enough. For this reason, before purchasing the right amount of material for sewing Roman-style curtains, you should accurately measure the window opening, add 5 cm to the resulting width on each side for allowances. In addition, the length of the fabric web should be increased by 12 cm.

The fabric for making Roman-style curtains can be chosen to your taste. Today, fabric manufacturers offer consumers a wide variety of fabric options. Any housewife without any problems will be able to choose the fabric to your taste.
With the help of chalk or soap, you should mark the lines along which you want to sew the curtains.
An adhesive tape is fixed on the beam, a similar tape is also fixed on the upper edge of the curtain. At the point of attachment, the curtain fabric is attached to the beam.
After that, the bottom side is ironed and hemmed. The next step is the hemming of the finishing border. Rings to the curtain are fixed with wide stitches. Then the curtain is attached to the beam.
The final stage in the manufacture of curtains is threading the cord into the rings, after which the cord is pulled together and the excess ends are cut off.
The resulting curtains look solid and expressive.
Self-tailoring of curtains in the English style
Curtains made in the English style look sophisticated, light and airy. Curtains of this type are perfect for any room, the use of this element of the interior allows you to add a certain zest and uniqueness to the design of the room.

There is nothing difficult in the process of sewing this type of curtain and almost any housewife with sewing skills is able to sew such curtains.
For the manufacture of curtains, you should prepare the required amount of satin, natural muslin and satin ribbon. When calculating the length of the curtains, the parameters of the window opening should be taken into account. When preparing the material, be sure to take into account the material spent on folds and filing.

On the canvas of the curtains, you should mark the places where you plan to sew on satin ribbons. After that, the prepared ribbons are tucked one centimeter on each side, ironed and hemmed. Ribbons are pinned to the main fabric with pins and sewn on a sewing machine.
At the final stage, you should fix the upper edges of the satin ribbons. After the entire curtain is ready, its lower edge should be hemmed and steamed with high quality.

In order to decorate the curtain, you can put a few additional satin ribbons.
Sewing a simple and beautiful curtain - step by step instructions
If there is no desire to create complex and binding compositions, you should give your choice in favor of simple designs that can be decorated with delicate bows. Very often, such curtains are used to create a cozy interior in the kitchen. For this reason, very often from housewives you can hear the question of how to sew simple and beautiful curtains for the kitchen with your own hands. Simple curtains can have an unassuming appearance, they are both beautiful and ideal for decorating a kitchen space. If you want to decorate the curtains, you can additionally use a variety of decorative elements for this purpose, which will give the curtains a uniqueness and bring a special zest to the interior.

On a note! The fabric for the manufacture of canvases should be chosen with a width that corresponds to the window opening in the kitchen.
The length of the curtains in the kitchen is chosen by housewives to your taste. Depending on the general interior of the room, curtains can be made short or up to the window sill. If necessary, you can decorate the windows in the kitchen with curtains to the floor. If desired, for kitchen openings, they can be decorated with a narrow ribbon made of satin. Such a tape is sewn to the curtain fabric with the help of threads of the corresponding color.
Lightweight curtains for windows in the kitchen can be perfectly combined with blinds of various designs and with tulle. You can decorate the curtains in the kitchen with the help of bows that can give uniqueness and tenderness to even the simplest curtain.
Fabric for the manufacture of curtains for the kitchen, you can choose any, at your discretion. It should be noted that the best material for making curtains for the kitchen is a blended or cotton fabric.
This type of fabric is breathable, which creates an atmosphere of lightness in the room. Ribbons made of satin are recommended to be used as decor, it is advisable to give preference to contrasting colors when choosing a satin ribbon.

To sew curtains, you should take the fabric prepared for this and smooth it, and then outline the entire perimeter except for the upper edge.
After basting the entire curtain along the perimeter, the upper edge is hemmed in accordance with the width of the cornice on which it is planned to fix the curtain.
Making curtains on eyelets with your own hands
Curtains on grommets have recently become very popular. It is the popularity of this type of curtains that is the reason that housewives often began to wonder how to sew curtains on grommets with their own hands.

There is nothing difficult in sewing curtains, in which the eyelets will be the main and fastener. Subject to all the technological operations that must be performed when sewing curtains with eyelets, any housewife is able to make this element of the interior of the room.
To facilitate the implementation of all operations, it is recommended to use photographs of the step-by-step implementation of the entire process. Such photos can be easily found on the relevant sites dedicated to interior decoration and interior design.

Curtains with eyelets can be used to decorate rooms in a variety of styles. Such curtains can organically complement rooms decorated in such styles as:
- high tech;
- minimalism;

- Scandinavian;
- loft;

- madder.
The folds of the waves that form on the curtains, when used to fasten the eyelets, contribute to the fact that a person has associations with sea waves, as a rule, they are pleasant to almost everyone.
In order to fix the finished curtains on the grommets, the housewife will need to prepare:
- curtain fabrics;
- cornice;

- fixed rings;
- threads for sewing and hemming curtains;

- scissors;
- sewing needles;

- a hammer.
When fixing the finished curtains on the eaves, uniform and uniform folds are formed, which can be considered a feature of these curtains and their highlight. Such folds are formed due to properly carried out drapery.
With quality fabric and some sewing skills, you will get beautiful do-it-yourself curtains, photo-examples of which you will see in the article. Especially when you consider that simplicity, conciseness and strict geometry of lines have become world trends, which is very helpful for beginners to master sewing. We will analyze simple types of curtains, delicate curtains, as well as very popular roll designs of various types.
How to sew curtains with your own hands
To learn quickly how to sew curtains with your own hands, you need to understand what kind of them you want to see in your room. After all, there are a lot of varieties of textiles for windows, just like the methods of its fastening, drapery,. Do you need to learn all this art, unless you are planning to open a sewing workshop. For all other cases, choose one type from the available ones and experiment on it.

Decide why in each particular room you need this product. Somewhere it is necessary to decorate the light opening, to make it more attractive in appearance. In urban environments, it may be necessary to fence off prying eyes, especially if the houses are almost close to each other. And in the bedroom or children's room, it is very important to achieve good blackout so that, if necessary, the night can come even when the sun is already shining outside the window.

The most dense products are called curtains. They are sewn from fabrics such as jacquard, tapestry, velvet, some are supplied with a lining, which makes the structure even heavier. The curtains fall down in large folds, creating a very solemn appearance to the window. Previously, the purpose of such a fabric was to protect the room from drafts, which inevitably existed due to cracks in wooden frames. Now that the problem with drafts has been resolved with the advent of metal-plastic products, curtains are no longer an indispensable element of decor, they may not be used at all (if there is a beautiful shape of the openings and you don’t want to close it) or not closed, leaving it on the sides, on the outer edges of the eaves. These curtains are indispensable for lovers of long sleep, for shading children's bedrooms, but in the kitchen or in the bathroom, curtains will be completely out of place, they will get dirty and interfere. The place, the volume that they occupy, prevent them from being used on loggias and balconies. But for traditional interiors or for decorating a large open space, it is heavy fabric that is still very popular.

Previously, they were used in constant tandem, like a thread with a needle, but now their paths have diverged. We are talking about a curtain - a product made of thin, light, translucent fabric. With the help of this type are carried out. Since the fabric of the curtain is thin and has a transparent structure, even folds made with geometric accuracy on its surface cannot be achieved. Curtains can be draped, but with soft folds. Usually they either completely cover the opening, or place them on the sides, just like curtains. To process curtains, you do not need complex tools, additional devices, an ordinary sewing machine with a set of standard paws and needles will be enough.

New to us, but classic all over the world, curtains with lifting mechanisms. Developing from Roman and Austrian, in which the fabric was gathered into folds, to rolls and blinds, these types are considered the most practical and comfortable. They are the undisputed leaders in the selection of windows in the bathroom, the design of small interiors, where every centimeter counts and the active use of the window sill zone is planned.

However, all these types can be successfully combined in any combination, for example, curtain + curtain or curtain + roll. This will give you the opportunity to achieve maximum functionality from your curtains. For each type do-it-yourself curtains master class will be different, but it will not be difficult for you to combine them into a single ensemble.
Sewing curtains with your own hands
master sewing curtains with your own hands The easiest way is with the simplest model - draped fabric with ruffles. It can be two symmetrically hanging canvases or one wide one that will move to one side or the other. You will need to buy a piece of fabric, and for its width and length it is not enough to know the parameters of the desired finished product, because you need to take into account all the numerous allowances.

For normal weight fabrics, the width of the finished product is usually doubled, but it is also necessary to allow for a hem allowance of about 4 centimeters on each side. If the fabric has an even denser structure, then to form folds you need to take an even greater width, already a multiple of not two, but three. The same calculations are made when determining the length. There will be no horizontal folds, but you need to take into account the room for maneuver. In addition to the length for possible hemming from below, sewing on any fastening system and insurance in case the curtain shrinks during washing - about 25 centimeters are usually laid on all these nuances. You must determine the length of the finished canvas yourself, floor-to-ceiling curtains will look good for some interior, and short cafe-style curtains will be appropriate somewhere.

There are no difficulties and difficulties in this method, you can do without master classes on do-it-yourself curtains (video you definitely don't need it). So, our piece of fabric is ready, and first we will deal with the processing of the sides. On each side, we make a hem about 1.5-2 centimeters wide, we baste it with large stitches or do not do it at all, but most importantly, we iron the fold well. After that, we wrap it again by the same amount, fix it and make a machine stitch along the entire length. After that, you can start processing the bottom - we bend 5 centimeters to the wrong side, also iron it, and then we make a second bend, also 5 centimeters and sew it. With the top, we need to do something a little differently, for its processing we need a special curtain tape, which we need to buy at the hardware store. We lay out the curtain face up, put a ribbon along the upper edge, wrap the side edge of it slightly inside out. Pin the tape along the entire length, top and bottom with pins, or, to save in a checkerboard pattern, cut off the excess tape at the end, and also wrap the tip inside out. With threads matching the color of the ribbon, sew it along the bottom edge, retreating about 1 centimeter. We also stitch the edges that we so carefully folded. Now we make a trick and bend the tape to the wrong side so that this line is now at your very top. In order to fix it with a line below, you need to change the shuttle thread in the typewriter to the desired color, and leave the top thread white, then you will have a colored line on the front, and white on the tape. In the middle of the tape, you also need to stitch, but make sure that the line does not get into the places where special guide threads are sewn. Now we just have to pull them and a miracle happens - the fabric will gather into neat folds. We iron all the seams well, iron the fabric of the curtain itself and we can fasten it to the cornice - it is completely ready.

To create without lambrequins or complex draperies, you can use an unusual type of attachment to the eaves - eyelets. They are metal rings that are sewn into the upper fold of the fabric, so that later the fabric can be easily strung on the beam of a narrow cornice with their help. Since they are strung perpendicular to the cornice itself, wide, solemn folds will form on their own (subject to sufficient density of the fabric).
DIY curtains for the kitchen
unusual views do-it-yourself curtains for the kitchen are used more and more often. Ordinary textiles often do not withstand difficult technological conditions in those kitchens whose housewives devote a lot of time to cooking. For this, fabric upholstery is not used in the kitchen, or you will have to work closely. What options can be offered not from textiles, which are perfectly washed and cleaned?
It can be bamboo curtains, which are made from thin twigs. This material will perfectly fit into the oriental style of the kitchen. We string each straw on a fishing line or woolen thread along, and when the length is already enough, we fix all the finished threads on the eaves. For a glamorous interior, you can offer very popular bead pendants that will create a special mood by refracting sunlight and filling the room with colored sunbeams. By the same principle, you can make jewelry by replacing the beads with animal figurines, your own plastic crafts, buttons.

It will be easiest to work with a thick fishing line, but there are options with beautiful satin ribbons or elegant cords, which themselves add the desired texture to the curtains. We fix each strung part either on carnations, or, so that you can move the structure, on the cornice rings.
DIY Roman blinds
Do DIY roman blinds can be from any fabric. But if you want complete blackout, then choose a special very dense material, it can be ordered on specialized sites. It is also worth taking care of the exterior of your home and making this type of curtain double-sided.
If you have an interior roman, do-it-yourself curtains must match it in texture and color. However, for country or Provence, this option is considered the most suitable.

To create you do not need complex patterns and even a large number of additional materials. You can use fasteners from old blinds or make them from a wooden cornice with holes for the threads. Guide horizontal strips are sewn into the canvas at an equal distance from each other, threads are sewn vertically through the entire canvas, which, when pulled together, raise the entire structure with beautiful folds.
DIY roller blinds
Roman varieties are roller blinds. DIY they can be made very simply - they are sold with a special kit, which includes a canvas and a fastening system - a cylinder on which the fabric is wound, opening and closing the window.

The beauty of this species is that for such do-it-yourself curtains patterns are not needed at all, it will be enough to cut off the rectangle, fill it with fasteners, and screw the entire system to the sash (for opening windows) or to the frame (for blind windows). An ideal version of the room, they close with just one movement of the hand, and look very decorative.
Often, when a person has built his dream house or furnished an apartment, some unique zest is still missing. The way out will be the right accent on the curtains. Simple curtains can enhance the view outside the window or create a contrast with the rest of the room. And if you add to this that the curtains will be made by yourself, then this comes out a double pleasure. It is generally accepted that it is difficult to sew simple curtains with your own hands, but we will show that this is not so. In fact, making a pattern and sewing curtains is not as difficult as it seems.
Window with curtains
Decide on the type of curtains
Before you sew curtains yourself, you need to decide on the type. There are many, but the most commonly mentioned are:
- Austrian;
- Italian.

In Austrian, the base is folded, and the rings and fasteners are put on from the inside so that it is not visible. In addition, thanks to this solution, it is convenient to mount them at any height or to assemble each curtain into a sleeve. The design of simple Italian-style curtains is a great solution for a nursery or small kitchen. They have a flat canvas, which is tied with a cord at the ends of the eaves. In addition, often such curtains are decided to be used instead of tulle.
It is better to sew simple curtains following a simple cut, you should not take on a complex option right away. If this is the first work, then at first it is better to try to make curtains for the summer kitchen or some insignificant window in the house, and it is better to make the canvas itself without lining and frills, so it will be easier to learn. If the hand is stuffed, then you can make homemade light curtains for the kitchen from beads. Although, they are more like a decorative element, but with them the window looks at home.

Decide on color and size
After the style is selected, you need to choose the appropriate color and take measurements. The fabric can be combined in different colors, it depends on the room and the color of the walls. The shade of the curtain can significantly change the illumination of the room: from too dark to illuminated and vice versa. In small rooms, it is better that the curtain is light in color, then the room will visually become larger. And if you choose darker fabrics, you can make the room more calm and peaceful.
If you need simple curtains for the living room, then you can choose curtains with a pattern, but if you sew for the kitchen, then you need to do without it. The motif of the picture should be chosen neutral so that it does not attract attention, otherwise people will be constantly distracted. After you need to take a sheet of paper, a pencil and sketch a sketch.

Above the figure, the following dimensions should be noted:
- The length of the cornice;
- Window, height and width;
- curtain length;
- Length from mount to hem.
After that, it remains only to look at the room and imagine how the material will be combined with the interior of the room - if it’s good, then we proceed to the next stage.

Preliminary fabric calculation
Taking external measurements, you need to apply measurements on the fabric. The final length of the curtains is selected to the windowsill or to the floor, depending on the specific case. Since we need to put off the final length on the fabric, we need to do it carefully and accurately.
When we sew simple curtains for the kitchen, we should not forget about seam allowances, leave 10 cm from the bottom and top, so that when we bend, beautiful stripes remain.
If we want a curtain with pleats, then the length of the cornice should be multiplied by 1.5. And 6 cm on each side for a seam. If you need a curtain with a strong drapery, then multiply the length of the cornice by two. When calculating, it is important to take into account that each fabric has an individual width.

Getting ready to cut
So, the preparation is almost finished, it remains to cut the fabric, you can also choose a decor. To finish sewing, we need the following tool:
- Ruler;
- Scissors;
- Electric sewing machine;
- Threads;
- Iron and ironing board.
We start by putting the ironing board and setting the temperature on the iron according to the type of fabric. Also, on a piece of fabric, you need to check how the machine scribbles and, if necessary, adjust the stroke of the machine. After all, you can sew beautiful curtains, but the crooked line of the machine will spoil the result. The tension of the threads and the thickness of the needle are adjusted, the latter is selected based on the thickness of the fabric. Now it remains only to make simple curtains with your own hands.

We cut curtains
First of all, simple curtains for the kitchen need to be ironed along the length. In this case, it must be borne in mind that the cutting goes against the pattern or embroidery, along the transverse lines. If it is difficult to orient the cut and sewing of curtains by eye, then you can make marks on top of the curtains with soap or chalk.
It is better to get down to business from the sides, cutting and sewing curtains for beginners is easier this way. With each of them we measure an allowance of three centimeters and rationally fasten along the length with sewing pins. We iron it so that later it is convenient to scribble on a typewriter. On a typewriter, it is advisable to make seams every 5 mm, you should not cut too much. Along the way, do not forget to pull out the pins.

Where long seams can be carried out over ironing with a wooden board, then the fabric will be pressed harder. Periodically, you need to do this while sewing, because no matter how simple the machine is, it pulls the fabric together during operation, and it doesn’t need to warp. With the help of an ordinary flat piece of wood, you can pull the stitch into a line and the fabric will not stretch. With the lower and upper edges of the hem, we repeat the same procedure, with the difference that the width will be at least 5 cm. It is better to make the bottom edge with a double hem so that it is denser. As you can see, sewing curtains on your own is not so difficult, the main thing is to imagine the end result.
WATCH THE VIDEO INSTRUCTIONS
Next in line is the top edge of the canvas. Having repeated the manipulations with the hem, we look: if the canvas is fastened on a tape or ties, then you can not scribble, but immediately fasten it. This will save time and thread. But if the mount is some other, non-standard, then it is better to repeat the same work as with the bottom edge.

After that, it remains only to iron the resulting canvas and the simplest curtains are ready for use.