What kind of glue to glue baguettes on wallpaper. How to glue a ceiling baguette: a guide to independent work. The finishing touch
With progress, everything changes, even the purpose of things. The most common baguette in ours has more extensive areas of application.
Back in the last century, wooden planks were used to create various types of frames and cornices.
But over time, the scope began to expand, and the products received names: molding, plinth, fillets, platbands.

All of them rightfully deserve their unique name, because each product refers to a certain part of the room, such as the ceiling or floor.

What are baguettes?
Nowadays, there are no longer old manufacturing technologies and many substitutes from another material have appeared. Baguettes can even be made of plastic and in the style of space wars.
Many models of baguettes are very necessary, for example, aluminum or steel allow you not to worry about mechanical stress and last much longer than wooden ones, but they are hardly suitable for rooms with a humid environment.

The best material for a baguette is still wood. Even today there is no more acceptable material for the design of paintings. It is worth noting that many frame structures are created by hand and convey a touch of the unique skills of the master.

Country and Provence styles cannot do without wooden baguettes at all, but its capriciousness and difficult conditions of detention leave the material behind its competitors.

Wooden baguettes are not only elegant and unique, but also emphasize respectability in the room. Still, this is not enough to lead the sales market. Even plastic baguettes can easily replace these leaders of their time.

In addition, they are very flexible and lightweight, which allows you to mount the structure independently and to uneven surfaces. As for the assortment, all that remains is to enjoy the extensive color palette and variety of models.

Plastic models are used to install stretch ceilings and other ceiling structures.

In appearance, they look like skirting boards with places for locks, most often in white tones. For special connoisseurs and those who do not mind the money, there are even decorative models.

The most natural models made of wood and plaster. The most durable models are made of aluminum, and the cheapest and at the same time the lightest models are made of foam.

ceiling design
A baguette is used to hide joints and complement the overall design of the room. Fastening the entire structure is short and simple enough. In most cases, a special adhesive is sufficient.

You can even attach baguettes to the clock on the wall. Simply put, all work with baguettes is limited only by imagination and ingenuity. The main thing is to follow all the rules and be able to correctly dock baguettes, for example, in the corners.

If everything is connected correctly, then the whole room will have smooth transitions, and this is important for a comfortable design. But if you need to attract attention, then it is better to use contrasting models and curtains in addition to them.


Framing works for small-sized elements
A designer who knows his business will not miss even such trifles as mirrors and posters on the walls.
Correctly using baguettes, you will create an interior with a twist that is rarely found or not repeated at all in other design projects.

A decorative type baguette will allow you to change the accent and bring a new sound when using old attributes.

Bringing everything to perfection
Here are some more tips from experienced designers:
- a narrow ceiling molding visually increases the height of all walls, and this, in turn, creates the impression of a high ceiling
- vertical thin lines give the impression of austerity, and the horizontal model will add dynamics

- wide models are suitable for large rooms, and they make small rooms heavier. There may even be a feeling of tightness, and hence discomfort.
- when choosing a color, do not neglect white tones. They tend to fit in anytime and anywhere, but this does not mean that this particular color will look the best.

It's always best to experiment before making a final decision. In addition, the palette of shades and types of models allow you to choose exactly what you like.


Combine all the moments correctly so that you feel both the measure and the style and other nuances of design. Then you will be able to achieve the most acceptable result for you.

Photo of baguettes in the interior


Reading time ≈ 3 minutes
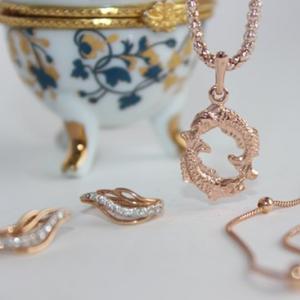
A baguette is a plank for framing paintings, photographs, mirrors. It is also used as wall and ceiling decoration. This decor item can be single or consist of several elements, which makes it possible to use various types of ornaments.
In construction (depending on the purpose of use), baguettes are divided into decorative and fixing. Let us dwell in more detail on the use of decorative baguettes in interiors.
Even in ancient times, in temples, palaces and houses of wealthy people, mosaic drawings on the walls and ceilings were framed with a decorative baguette. To date, the use of a baguette in the interior of an apartment or house is not a luxury. Designers often use it to decorate interior elements and give the room a personality. Baguettes are made from various materials. It could be:
- gypsum;
- plastic;
- wood;
- aluminum;
- polyurethane.

The price depends on the quality of the baguette and the material from which it is made. With such an abundance, the flight of fancy is simply limitless. Consider several ways how you can organically use a decorative baguette in the interior.
Mirror decoration
Most often you can find mirrors in a baguette. In the interior of any home, this is the easiest way to decorate. As you can see in the photo, the size of the mirrors is different, there are thousands of variations, so anyone can afford this type of decor. To give the interior gloss and high cost, massive frames made of expensive woods are used, the baguette is covered with gold leaf.

Making mirrors with a plastic baguette is the most affordable. To date, their color range is very wide, which allows you to choose the color and texture for the brightest interior. Mirrors in an aluminum baguette are most often found in the interior of bathrooms.

Recently, decorating with a baguette of paintings, engravings, tapestries, photographs is gaining popularity. This process is similar to decorating mirrors. The materials from which a baguette is made for such decor are practically the same.
Ceiling decoration
A special place is occupied by the use of a ceiling baguette in the interior. Today, a baguette instead of a plinth in the interior can be found enough. Also, this element of decor replaced the classic ceiling cornices and slats.

The most commonly used ceiling baguette made of polyurethane. Such material is produced in various widths and has a different relief. You can paint it in any color. It is very easy to install, attached to silicone glue or alabaster.

Gypsum baguettes, when decorating the ceiling, are used less frequently. They are more fragile, expensive, heavy. However, they also have their advantages - the compositions of gypsum baguettes look richer and more massive.
The most expensive is a baguette made of natural wood. It is used in the design of wooden ceilings. It has become very popular in country houses, as they try to use only natural materials in their decoration.
With the help of a baguette, geometry is emphasized, which can be very diverse.
If earlier the joints between the walls and the ceiling were covered with a panel or a strip of embossed paper, now the curvature smooths out the baguette or baseboard better. It gives the room a unique look, hides some mistakes during repair work. This article will tell you how to glue baguettes, how to cut them and mount them in corners.
Features of use

Sticker. How to attach a baguette
When installing ceiling plinths, there are several of their advantages:
- Ceiling baguette hides visible defects:
- small irregularities;
- some roughness;
- grade fluctuations.
- Decorates.
- Simple and easy to install, no special skills required.
- The material is lightweight and sometimes flexible.
- Wide design choice.
- Affordable price.
Tip: Before gluing, you need to know that different materials are used to make them. Products come in different textures, widths, smooth or patterned. This affects the cost, purpose and application features for different interiors.
For the manufacture of molding, ceiling plinth or frieze, the following are used:
- Styrofoam.
- Gypsum.
The most popular products are made of foam and polyurethane. As for plastic products, they are used only for stretch and PVC panel ceilings. Wooden baguettes - with a wooden structure device.
What glue is used for mounting
Before gluing ceiling moldings, you need to think about the adhesive composition. For each master, during installation, there is a glue that has been tested in the work.
He can be:
- Polymeric. Such a composition has a weak adhesion. In order to glue a foam baguette with polymer glue, it will need to be held in the required position for a sufficiently long time, which is not very convenient for a two-meter product.
- Acrylic.
- Based on silicone.
Acrylic and silicone adhesives allow you to quickly and conveniently mount the ceiling plinth. They go on sale in tubes for a pistol. The composition is applied quite easily, and the diameter of the outlet nozzle controls its consumption.
How to glue a ceiling baguette with one or another composition, the detailed instructions attached to the material will tell you. The disadvantage of such adhesives is the high cost, this is especially noticeable when performing work in a large apartment or house.
Note: The cheapest do-it-yourself gluing option is regular finishing putty or drywall adhesive if used during repairs. Such a composition is more reliable, hardens faster, which allows you to paint the ceiling and baguettes in half an hour, without fear of damaging them with a roller.

The disadvantage of using putty as an adhesive is the lack of convenience when working with it. It is not very convenient to apply such building mixtures with a spatula in a thin layer on a baguette.
After gluing, the remaining putty or drywall adhesive will need to be carefully removed with a wet brush. Otherwise, clots of dry mixtures will become visible from under the paint.
How to glue the skirting board on the ceiling
Tip: Installation of the plinth should be started from any corner of the room.
Ceiling baguette can be attached in two ways:
- over wallpaper.
- Before wallpapering the walls.
Tip: Baguettes are usually white in color, so be sure to wash your hands well with soap and water before handling to prevent product contamination. Or, you need to work in clean gloves.

The gluing process is quite simple, but problems arise with trimming corners.
The subtleties of the technology of work:
- Particular attention should be paid to cleaning the ceiling and walls from the presence of traces of glue. Acrylic and silicone compounds are removed with a rubber spatula and a damp cloth. When sticking a baguette on putty, the excess is removed with a small brush, well moistened with water.
- All gaps between the baguette, ceiling and walls must be carefully filled with glue. The same should be done with the connections in the corners of the ceiling plinth.
Tip: You can’t expect that such cracks can be masked with paint or gluing wallpaper on the ceiling, this will not work. The glue smeared on the ceiling and walls must be carefully removed, as shown in the photo.

- When joining straight sections, often when the glue dries, the edge of the baguette floats down and a step is formed. To avoid this, the joint of two adjacent skirting boards must be chipped in the desired position with needles, or fixed with masking tape.
- After the glue dries, the needles are removed, and the resulting small holes and dents are carefully covered with the same glue or putty.
- Baguettes are painted several times. The first layer - primer, allows you to hide all putty joints, and all other decorative layers are performed simultaneously with painting the ceiling. Finally, the excess glue on the baguette is cut off.
How to glue baguettes on wallpaper

Work procedure:
- On the surface of the baguette, which are adjacent to the ceiling and wall, a thin layer of glue is applied.
- The plank is applied to the wall and held according to the instructions for the adhesive.
- Excess glue is removed with a clean rag or sponge.
- All joints are carefully sealed with white sealant.
- If necessary, the entire surface is painted with acrylic or water-based paint.
Tip: Painting the ceiling cornices should be carried out very carefully so as not to damage the glued wallpaper. It is best to do this before installation.

The main advantage of this method is that there is no need to adjust the wallpaper to fit the baguette. Framing will hide all existing burrs, distortions in the upper part of the wallpaper.
How a baguette is attached before wallpapering

This option can be found quite often. It is preferred by many professionals.
The order of work is as follows:
- The walls and ceiling are carefully prepared, the surfaces are leveled with putty.
- With the help of a miter box, the ends are cut.
- A baguette is attached to the putty or drywall adhesive.
- All the gaps formed between the baguettes, the ceiling and the walls are rubbed with putty.
- Excess material is removed with a clean rag.
- Subsequent work is stopped until the putty dries.
- All surfaces are primed.
- Painted in selected color.
- Wallpaper is glued. At the same time, the overlap in the upper part is removed by applying a spatula and cutting off the excess with a clerical knife.

Tip: Painting a baguette with the same color as the ceiling gives the visual effect of a monolithic structure.
The main advantage of this method is that all defects are easy to fix, the frieze is painted at the installation site, and there is no fear of damaging the wallpaper.

How to glue a baguette in the corners

Preparing corners and joints is the most difficult and painstaking job of installing a frieze on the ceiling.
For work you will need:
- Small spatula.
- Sealant or putty in a suitable container.
- Miter box.
- Stationery knife or hacksaw.
Tip: Fitting the last plank should be done by cutting out the corner to avoid damage to the material when an error occurs.
For the correct trimming of the ceiling plinth in the corners, you must follow some rules.
If in the room all the angles are even and make up 90˚, then:
- Right angles should be all:
- between adjacent walls to each other;
- between walls and ceiling.
Only in this case it will be possible to carefully cut the corners with the help of a miter box.
- With the help of a miter box, the ceiling plinths joined in the corner are first cut.
- Their ends are brought to the desired size with an ordinary construction blade.
- The gap is evenly distributed over the two lengths of friezes to prevent tooth defects.

Order of cutting corners:
- In the absence of work experience, it is better to practice using small pieces of fillets.
- The plank in the miter box is placed in such a way as it will be located on the wall.
- The lower part of the baguette is tightly pressed against the wall of the miter box.
How baguettes are glued to the corners

The order of work is as follows:
- The end is cut at the desired angle. For this, a knife or a saw is used; strong pressure on the surface of the baguette cannot be done, this can crumble the material. Typically the angle is 45°.
- The cut edges are applied to each other.
- The absence of gaps is controlled.
- With a knife, if necessary, interfering parts are cut.
- Fillets are applied to the installation site.
- The final adjustment of the elements is in progress.
- Parts are being installed.
The corners of the ceiling plinth are glued, as indicated on the product label, in the same way as the main profile. For those who are interested in gluing baguettes to the ceiling, the video presented in this article shows in detail the entire process from start to finish. After mounting the baguettes, you can give them an original decorative look using spray paint.
Molding indoors on the walls. Step-by-step instructions for attaching the molding. Is it possible to glue planks on wallpaper and how to fix wood molding.
Molding on the wall
There is a large selection of design styles for decorating the room. They combine materials that can darken or enlarge a room. The use of molding has become popular because it is suitable for all rooms.
Molding on the wall is glued just quickly. However, there are nuances when choosing a design, choosing a material.
Molding on the wall or framed wallpaper: application in the interior
Applying molding in the room, the room acquires originality, sophistication. You can separate 2 types of wallpaper with decor. By combining and selecting the colors of the wallpaper, the molding will complement and make the wall decor richer.
Designers using moldings combine inappropriate decor elements, various types of wallpaper and paint or other wall and ceiling decoration into a single picture.
 Apply decor in various rooms - kitchen, bathroom, children's room. And the ceiling height or square meters are not taken into account. It emphasizes the interior both in large rooms, highlighting the special wallpaper in the frame, and in small rooms, creating a window frame or an entrance to another room.
In addition to highlighting other wallpapers, they frame a mirror, wall painting, a picture.
Properly selected selection performs the functions of zoning, visual increase or decrease in space.
When can
 It is possible to glue the molding in many cases, doing wall and ceiling decoration. It is used for:
- hiding defects on the surface;
- decoration of the joints of the wall and ceiling;
- smoothing surface irregularities;
- give the room an attractive look;
- zone the room;
- visually expand or reduce the space.

The use of vertical molding increases the height of the ceiling. Horizontally glued strips will visually expand the room.
In large rooms, wide stripes with an expressive pattern are used. This gives some historical value, brings a touch of art and aesthetics. However, such stripes in a small room look ridiculous.
When not to
You can not glue the molding on the wallpaper. If this is done, there is no guarantee that it will last long. And you also need to be very careful with the glue, because if it stains the finish, then it is unlikely that it can be removed. Most often, the glued molding needs to be painted.
If you need to glue the molding on the wallpaper, then you need to choose the option of lightweight material - polystyrene foam, polystyrene.
Varieties
 Molding is different in shape, texture pattern, material. Each type has its own characteristics and characteristics. There are wide stripes with an applied relief pattern for large rooms, as well as thin light floors used in the interior of small rooms to brighten and visually enlarge.
Wooden
Wood molding is valuable because of the material. Environmental friendliness and appearance make it an expensive finish. It is heavy, so the slats are fastened with self-tapping screws.
Planks made of wood are not mounted in rooms with high humidity.
However, having treated with antiseptics and water-repellent mixtures, the finish is used in the corridor, on the balcony.
Polyurethane decorative overlays
 Polyurethane finish is value for money. It is popular because it has the following benefits:
- strength and long service life - for about 30 years, polyurethane molding will decorate walls and ceilings;
- ease of installation - fastening is carried out on glue;
- ease of cleaning;
- they are not affected by temperature changes;
- are offered for sale in a wide range of colors.
Planks are used in the kitchen, in the bathroom, for zoning the room.
Metal decorative strips
Decorative trims in silver, bronze and gold embellish the walls. They create an expensive beautiful interior of the room. With such a finish, the room looks rich, so precious metal strips and ordinary paper wallpapers are incompatible.
Finishing is done for mirrors, fireplaces, niches. To choose a color, you need to consult a designer.
Foam baguette wall
 The material is lightweight and has the following features:
- relatively low price;
- the weight of the bar is light;
- installation is carried out quickly;
- moisture resistant - can be used in bathrooms.
Finishing for those owners who want to hide wall defects and make the design of the room unique.
Gypsum baguettes for a niche
Gypsum finish has the following advantages:
- appearance;
- there is a possibility of restoration;
- environmental friendliness;
- does not lose its color over time;
- do not burn.
The downside is the price - they are relatively expensive. And a lot of weight, which leads to complex installation.
Gypsum is not desirable to glue in wet areas.
Plastic wall baguette
 Plastic baguettes are popular for several reasons:
- ease of installation;
- it is possible to paint it in the desired color;
- ease of care;
- not afraid of temperature changes and high humidity.
The disadvantage is the grainy surface.
How to make a DIY wallpaper border
Strips for separating wallpaper are used in the following cases:
- Differentiation of a canvas from the same material, but with a different pattern or color.
- In large rooms, as well as studio apartments, there is a delimitation of wallpaper as a demarcation between the kitchen and the bedroom.
Space zoning is one of the important functions of wallpaper edging.
Materials for the manufacture of decorative baguettes
 Basically, the decoration is glued to the wall. In rare cases, self-tapping screws are needed.
The choice of adhesive mixture depends on the material from which the bar is made and the premises in which the installation will be carried out.
- For light slats, PVA glue or wallpaper glue is suitable.
- Gypsum strips are fixed on a gypsum solution.
- Planks made of wood on glue do not hold for a long time.
Some types of adhesive for mounting:
- Loctite PL 355 is a moisture resistant adhesive made in Germany. Glues light skirting boards and moldings.
- Decomaster 250 is resistant to moisture. Designed for gluing ceiling plinths and moldings.
- Stayer Professional is a moisture-resistant adhesive mass made in Germany. Glue the finishing material at a positive temperature.
All types of glue are used for light finishing materials.
Work progress
 preparatory process. The walls must be even. If there are strong differences, the finish will peel off over time and a gap will be visible.
- clean the walls from dust, cover with a primer;
- perform markup using a level or plumb (vertically);
- if the slats are wide, self-tapping screws must be used. To do this, holes are made in the molding.
You can paint the finish only a day after the glue has dried.
Mounting Methods:
- To stick the finish on a bare, cleaned wall means to designate a long service life. Even when replacing the wallpaper, the strips will remain in place. In some cases, it is difficult to fit the wallpaper according to the pattern.
- Sticking strips on wallpaper has negative sides. This is short-lived, but you do not need to do wallpaper trimming.
Tools needed for installation:
- hacksaw for cutting planks;
- miter box for cutting the finish at a certain angle;
- construction glue gun;
- spatula (in some cases);
- sandpaper for grouting excess.
Molding installation
 Before starting work, you need to measure the desired length of the planks and cut them. Cut corners with a miter box. After that, according to the markup, the elements are glued in the corners. After that, even strips are fixed according to the markings. If gaps remain after gluing, they must be covered with the same glue. All work is left for 24 hours to dry completely.
Wallpaper finishing
After the glue dries, the strips are painted in the desired color. Along the edges with sandpaper, grout from excess glue.
After the work is done, wallpaper is finished. To do this, you need to measure the height and width of the canvas and carefully stick it end-to-end with the bar. It is necessary to ensure that the edge of the wallpaper is perfectly even and evenly fits the finish. The canvas is not allowed to enter the molding. It is then difficult to cut it off, there will be uneven edges and traces of wallpaper glue.
If the finish is carried out near the corner, it is necessary to carefully bring the edge of the wallpaper to the molding, and then turn it to the corner.
Molding in the room: how to decorate the space with decorative skirting boards

- White planks on a dark wall. For this, finishing is used not only on the wall, but also on the ceiling-wall, framing windows and door entries, and furniture. This will make the room spacious, brighter.
- Light colors of planks on cream-colored walls. In most cases, pastel colors are used in large rooms, halls. For wall decor, framing paintings and mirrors, light-colored strips are applicable. They give a slight shade of sophistication, sophistication.
- Colored strips - for children's rooms, corridors. The selection of objects on the walls of the molding is painted in a contrasting tone or tone 2 darker.
It all depends on the appearance of the room, what exactly needs to be emphasized with molding.
How to glue decorative frames in the bedroom
 Gluing the frame does not differ in special nuances from the general stage of work. In the room, light colors are used to decorate niches and mirrors. You can make a picture if it will emphasize the interior and be a calming element.
Finishing in the kitchen: decor
In the kitchen, molding is used to finish the furniture set. Looks beautiful white finish on a light background. To do this, use furniture strips of various widths. They are lightweight, mounted with waterproof glue.
Also in the kitchen, ceiling plinths are applicable. If the hanging cabinets are suspended under the very ceiling, then the border between the cabinets and the ceiling is closed with a molding.
Decorative inserts in the living room
 In the living room, the decor can be on the walls, ceiling, doorway. But we must remember that if wooden doors are being finished, then the molding must also be wooden, and the plastic window is decorated with plastic.
Frame of baguettes in the hall
Frames are made from wide planks. Sometimes they use metal with gold plating. Wallpaper is glued in the center of the frame, and the border between the baguettes remains white. This gives uniqueness, visually enlarges the room.
Interior decoration with molding: features of work
When decorating the interior, there are a number of features, nuances that you need to get acquainted with. This will eliminate a number of errors, make the appearance of the room unique, and extend the service life.
How to paste under the wallpaper
 Basically, the color of the molding is chosen not only to match the wallpaper, but also to emphasize the design of the room.
If the wallpaper is in light colors, the room is large, spacious, then light colors of the planks are used.
However, when dark colors are introduced into the design, for example, furniture, they make a contrast - highlighting light wallpapers with a dark finish.
When and how to glue wallpaper
Wallpaper is glued when all finishing work is completed. That is, a day after gluing the plank, it is painted in the desired tone. After drying, grout is made, removing all excess. Only after that wallpaper is glued. They must be glued neatly end-to-end with the molding. It is necessary to ensure that the edge of the canvas is even and does not go over the bar. Otherwise, the whole appearance will be spoiled.
How to glue frames from different materials
 Almost all planks are glued to the base, with the exception of wood. It is fixed with self-tapping screws. After the markings are made and the planks are cut, according to the dimensions, the corner parts are glued first. You have to make sure the angle is even. After that, horizontal and vertical strips are attached to the corner elements.
For strength, holes are made in the slats for self-tapping screws. After drying, the screws are removed, and the holes are sealed with putty.
How to fix metal and wooden baguettes for decoration
Planks made of metal and wood are heavy. They are not mounted with glue. To decorate a wall or doorway, the planks are fixed with self-tapping screws and dowels. The step between the screws is determined based on the size of the bar, as well as its width, weight.
How to glue polyurethane frames from the plinth under the wallpaper
Polyurethane strips are glued to the base using:
- White liquid nails.
- Glue for polyurethane, let's say "Oras".
- Polymeric universal glue "Dragon".
All adhesives have good adhesion and a number of features.
In what cases the baguette is not attached to the wallpaper
 Masters do not recommend attaching the molding to the wallpaper. However, if the wallpaper has been glued recently, it is good to stick to the surface, then the planks are attached to the canvas. But, there is no guarantee that the decor will be in place for a long time. Under its weight, it can peel off, while tearing the wallpaper.
Care
Molding does not require special care. Dusting with a damp microfiber cloth once a week is enough to maintain an attractive appearance.
Depending on the material from which the slats are made, chemistry may or may not be used. Let's say plastic can withstand a general cleaning product, but for wood, a beeswax-based polish is used.
The steam generator must not be used. Under the pressure of hot steam, the bar can be deformed, change its color or fall off.
Molding makes the interior of the room more expressive, bright, visually expanding the space. There are many ideas for the use of molding and they all differ in their individuality. Planks are easy to install and maintain.
Useful video
Baguettes visually look like skirting boards and are used to decorate the joints of walls and ceilings. They can have different shapes, colors, finishes and are glued end-to-end or on wallpaper. They are easy to paint with water-based paint, depending on design tasks.
There are a lot of options for creating a variety of style solutions, you just need to choose the right baguette, as well as choose good glue and carefully fix the products on the ceiling and wall.
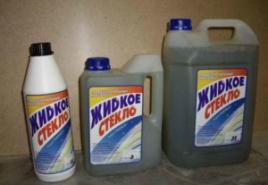
Glue for baguettes - the choice of professionals
Modern baguettes are most often made not from gypsum, which is difficult to glue, but from polystyrene. This material is lightweight, easy to cut, transport and glue. Masters use special adhesives for polystyrene.
- Styropor Kleber.
- Decofix Pro.
- Titan S.M.
Glue is applied using a special mounting gun, which allows you to carefully apply liquid nails in inconvenient places with minimal excess.
Also use transparent glue for polyurethane, produced in tubes. It securely glue baguettes, but you need to work quickly and accurately.
If the choice was made in favor of silicone sealants, you should know that after drying, painting them with water-based paints will not work.
Adhesion will depend on the quality of the glue, but you also need to work with it correctly, so be sure to read the instructions before starting work.
How to glue baguettes on the ceiling
- Work begins with leveling the surface. Walls and ceilings with defects are carefully puttied, after which a primer is applied.
- Start gluing the baguette from the corner. The end of the baguette is cut at an angle of 45 degrees to get a smooth, neat joint.
- Glue is applied in an even layer along the entire length, as well as on cut corners.
- Next, the product is applied to the surface and pressed tightly. The 45-degree cut corners must meet exactly to form an angle. The joints are also carefully glued.
- After the glue dries, you can start painting.
Question: glue baguettes in the corners
The masters answer - when connecting the parts of the plinth end-to-end, it is necessary to add glue and carefully press it against the wall in order to squeeze out the remnants of the adhesive. It is better to press down with the edge of the palm so that there are no dents from the fingers.
Residual glue is removed with a damp cloth.
RELATED VIDEO
This method is used when wallpaper is already pasted and baguettes need to be fixed on top.
In this case, the workflow is as follows:
- first, the ends must be cut with a miter box,
- then apply a thin layer of glue on the surface,
- attach a baguette to the wall,
- press it down and hold for the time specified in the instructions,
- remove excess glue with a napkin,
- seal the joints with sealant,
- the surface is painted with acrylic or water-based paint.

It is very important to be careful when painting so as not to touch the wallpaper, and it is even better to paint the baguette before starting its installation.