What is laminate flooring on: installation instructions. What is the best laminate flooring? What is the laminate
Can flooring be inexpensive, durable and easy to install? There is a material that combines these incompatible properties. This is a laminate floor. Therefore, it is the most popular among other types of coatings. To lay a laminate with your own hands, you need to know the features of the material and the subtleties of working with it, so that the service life is as long as possible.
The main question that arises when choosing a floor covering is whether it is possible to lay it yourself? Yes, and very easy! You just need to know the technical features. We will tell you how to lay the laminate with your own hands, with step-by-step instructions. You will be able to carry out the assembly yourself with high quality, without resorting to the expensive services of professional craftsmen. Our detailed article will introduce you to all the secrets and features of laying this flooring.
Buying a laminate
Before buying a laminate, you should familiarize yourself with the parameters that affect its quality and cost. It happens that a laminate of the same quality and characteristics differs significantly in price. This is because some manufacturers include brand markups and marketing gimmicks in their prices.

So what should you pay attention to? The laminate differs in classes, 21-23, 31-33, and thickness, from 4 to 12 mm. The optimal thickness of this floor covering should correspond to the type of room where it is supposed to be laid. The laminate class is indicated by two numbers, where the first indicates the type of room, and the second is the wear resistance coefficient, which implies impact resistance and moisture resistance. For example, if a laminate of minimum thickness and light load is suitable for a bedroom, then it is better to choose a higher class for a kitchen.
For a clear understanding, let's take a closer look at the classes:
| Laminate class | Wear resistance level | Room type | Thickness mm |
| 21 | Light | Bedroom | 4 |
| 22 | Average | Hall, living room | 5 |
| 23 | High | Kitchen, hallway, children's | 5 |
| 31 | Light | Utility rooms | 6 |
| 32 | Average | Office rooms | 6-10 |
| 33 | High | Cafes, shops, gym | 12 |
The table shows:
- classes 21, 22, 23 are for domestic use, and 31, 32, 33 - commercial purpose;
- the greater the thickness, the higher the load level.

The class of the laminate affects its cost. Therefore, the choice of increased thickness for home use is not always justified. Yes, class 33 has maximum moisture resistance, wear resistance and shockproof properties. But its main purpose is public places with high traffic, and for the same kitchen in the house, a class 23 laminate will serve perfectly.
Another nuance is the manufacturer's warranty. Manufacturer warranties may vary. from 15 to 30 years. Sellers may cite this parameter as a strong argument in favor of coverage at a higher cost. You should not delude yourself. The plant guarantees the service life of the coating, the installation of which was carried out by certified craftsmen.
What type of flooring can laminate flooring be laid on?
The basis can be any previous coating - cement, tile, wood, linoleum. It is only necessary that the surface be firm and level. Therefore, you must first make sure that it is sufficiently even. After that, you can start assembling the laminate. A deviation of 1 or 2 mm is permissible, no more. Only under this condition, the board will not bend, but will lie flat and tight. With a larger difference, cracking or breakage of the laminate board is possible. Check if there is a deviation using a rule or a profile.
Important: laying a laminate flooring is possible only on a cleaned, leveled base without cracks, bumps and other defects.
Laying on concrete floor
It is best to lay laminate flooring on a concrete floor. The pour base is perfect. If there are irregularities on the concrete floor that exceed the permitted norms, they must be leveled. In the case of a cement floor, everything is easy - just fill in a special screed. Concrete is therefore considered the best base for flooring.
If the concrete floor is level and clean need to put underlayment. What are laminate flooring underlays?
- foamed polyethylene, budget option;
- expanded polystyrene;
- durable cork material;
- multilayer substrates of different materials specially designed to perform this function.

If there is a need to level the base, it must first be prepared for pouring with a self-leveling mixture - cleaned and primed. The thickness of the first poured layer must be at least 10 mm. When the surface dries, re-priming is carried out, and another layer is poured. It is better to close the room for a day or two to avoid the appearance of defects on the surface of the screed.
Laying of the floor board should be done after the grout reaches at least 50% strength. I would like to note that the screed dries completely in 70-80 days. You can not wait for 100% drying if you use a plastic film under the substrate.

After reading the material in full, you will know how to lay the laminate on the concrete floor yourself.
Laminate flooring on wood floor
One of the most frequently asked questions is: can laminate flooring be installed on a wooden floor? Actually, it's risky. Especially if the wood flooring is aged. According to technological standards, it would be more correct to remove it, then replacing it with a full-fledged concrete base. In this case, it will be necessary to do all the necessary work on backfilling, thermal insulation, and preparation of the reinforcing belt. Only after that you can make a concrete screed. When the mixture hardens, you can start laying laminate panels.

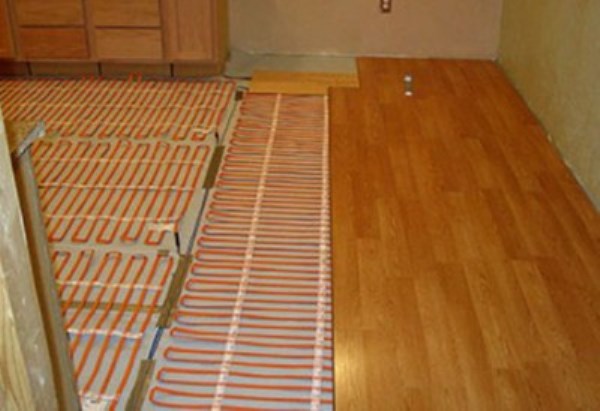
Until the filling is done, it is possible to install a floor heating system. Can laminate flooring be installed on underfloor heating? Yes, if a special type of laminate board is used. It does not deteriorate from heat.
The complete replacement of an old wooden coating with concrete is a very costly undertaking, both in terms of cost and time. Therefore, it is common to prepare a wooden surface for the installation of a laminate flooring without replacement. Unless, of course, the floor is not quite old. If the logs with the boards are damaged, it is better to re-lay them again or still make a screed.
Minuses wood flooring as a base:
- details can "walk" in height;
- high probability of creaking when walking;
- the lags dry out.
No need to lay laminate on a creaking base. It is necessary to find and fix loose planks. They can be additionally screwed or nailed.
Preliminary preparation of a wooden base begins with squeezing off excess pieces protruding above the surface. The cracks need to be patched.

Before laying a laminate on a wooden floor, it is necessary to lay a leveling material on it. Usually plywood is used for this. The optimal thickness of the plywood sheet for leveling is 10-12 mm. Plywood sheets are screwed with self-tapping screws. If there are differences more than allowed, you will need slats of various thicknesses, already to level the plywood.
It will be better if the joints of the plywood sheets do not match the corners. So the load on them will be distributed evenly. More you can not fit the sheets closely. Wood has the ability to change. Temperature, air humidity affect the condition of the tree. Therefore, there must be small gaps between the plywood sheets. They are needed to avoid distortions if the tree starts to "move" - shrink or expand.
If the wooden floor has not been damaged and the plywood sheets are laid flat, such a laminate floor will last a long time.
Laying on linoleum
Many apartments have linoleum on the floor. And when it comes time to change the flooring, a quite reasonable question arises: is it possible to lay laminate on linoleum. Usually there are no contraindications to this. Even there is some positive moment. Linoleum provides additional sound insulation.

But there are cases when should not be used linoleum as a base:
- Uneven floor. If there are pits, swellings, large drops, it is better to remove the linoleum and pay attention to leveling.
- The cover is very old. Linoleum that has begun to break down will swell. This can ruin the laminate flooring, not to mention the aesthetics.
- Linoleum of increased softness is undesirable as a basis. This is fraught with the appearance of squeaks on the laminate when walking.
Substrate for laminate
On the prepared base, leveled and cleaned, you must first lay the substrate. The main role it performs is to protect the interlocks of the laminate from the damaging effects of external loads. This is achieved by cushioning steps on the floor and redistributing pressure on it.

The substrate also has additional properties:
- hides small irregularities of acceptable sizes;
- drowns out the noise;
- warms.
Substrate types
Foamed polyethylene. This is the most affordable type. Therefore, it is very popular. The advantages include increased moisture resistance and low cost. The polyethylene foam substrate is produced in rolls, which simplifies the work with it. The low price justifies its obvious disadvantages: low thermal conductivity, sensitivity to ultraviolet rays, lack of sound insulation.

Polyethylene foam short-lived. He quickly loses shape. The level of damping, or damping, in other words, decreases over time. Because of this, the lock connections quickly loosen. In a word, foamed polyethylene significantly reduces the life of a laminate floor. Therefore, it is desirable to use it only under a cheap coating with a service life comparable in time.

Important: polyethylene foam underlay is only suitable for cheap laminate.
Styrofoam. This type of substrate is average in terms of cost and quality. Expanded polystyrene has the ability to keep its shape well and muffle noise. The surface of the substrate has a high density, so it smooths out small irregularities well. At a cost, expanded polystyrene is more expensive than polyethylene, but more affordable than a cork substrate. Release form - plates and rolls. Due to its reasonable cost, combined with good properties, this material is used more often than others. The only argument against is the impossibility of laying on a warm floor.

It is recommended as a substrate if there is a floor heating system. Possesses the best properties necessary for a substrate. For the price - a little cheaper than cork. The properties of the substrate directly affect the life of the laminate. Therefore, buying a good substrate under an expensive laminate is a justified investment.

Important: for underfloor heating, a polyurethane foil laminate underlay is suitable.
It is made from natural cork chips. Release form - rolls. This is probably the best underlay for flooring. Unconditional advantages: durability, resistance to loads, high thermal insulation properties, good sound insulation. There are also disadvantages. The cork substrate does not like heat and moisture. In addition, it must be laid on a perfectly flat surface due to its low leveling ability. Places of joints during laying must be glued with adhesive tape so that there are no gaps.
The type of premises where cork can be used is living rooms, without underfloor heating, where humidity is low or normal and there is no risk for the coating to be flooded with water. Despite its excellent properties, natural cork underlayment is rarely used. This is due to the high price.

Bitumen-cork on cellulose. The cost is close to cork. Can be used with underfloor heating system.
Important: the best and, at the same time, the most expensive substrate is natural cork. But it is not suitable for underfloor heating.
In addition to the above types of substrate, many new products appear on sale. Basically, these are little-known materials that have not passed any tests. Therefore, it is better to follow the manufacturer's recommendations. They are usually listed in the instructions on the package.

Do I need a plastic film under the laminate?
The main purpose of the polyethylene film under the substrate when laying the laminate is moisture protection from within. If there is a basement with high humidity under the floor, the use of a film is simply necessary. It is laid under the substrate with an overlap and glued with adhesive tape.

Polyethylene film under the laminate
There is also a risk of moisture from below when laying on an incompletely dried cement screed. This is a problem of almost all modern new buildings made of monolithic concrete. The screed dries for more than 2 months. Many people are not willing to wait that long. Even an expensive, high wear-resistant laminate deteriorates from moisture, begins to swell and creak. Therefore, the use of a polyethylene film is desirable.
Important: Many laminate flooring manufacturers recommend that you always use plastic wrap when installing.
How to lay the underlay
Now consider how to properly lay the substrate under the laminate.
It is necessary to start laying out or rolling out the false material along the wall from which the laying will be carried out. As a result, the underlay should cover the entire length of the floor along the desired wall. It is better not to immediately cover the entire floor of the room with a substrate so as not to walk on it. The next strip along the wall should be laid as needed.

The joints must be tightly combined and glued with tape. If there are small gaps between the joints, it's okay. Not allowed laying the substrate overlap, so the laminate must evenly adhere to it.
To speed up the process, the edges of the substrate are sometimes fixed with a construction stapler. But it’s better to spend a little more time taping than to listen to the not-so-pleasant sounds of staples rubbing against a laminate board later.
Important: it is forbidden lay down the underlayment.
Do-it-yourself laminate laying tools
Before starting the installation work on laying the laminate, it is necessary to prepare all the necessary tools.

Tools
- Hammer and doboynik. They are needed to fit the laminate panels to each other. A block of wood is suitable as a doboynik. Do not knock directly on the panels, because the locks may be damaged.
- Stationery knife. Needed to open packages.
- Square, pencil, tape measure. Needed for marking.
- Wedges. They will be needed to maintain the required gap between the wall and the coating.
- Montage. With the help of a special bracket, the boards of the last row are laid.
- Electric jigsaw. A jigsaw is needed for sawing boards. You can even cut laminate with any hand saw that is at hand. Small cuts are required - the board is sawn across.
How to cut laminate
Laminate should be cut face up. This will prevent the formation of burrs along the edges of the front surface.
To make the cut line even, use metal guides - rulers and squares.

The last row requires special attention. Boards for this row almost always have to be sawn lengthwise.
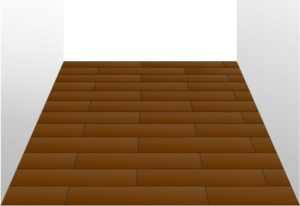
Laying scheme
A frequently asked question is how to lay the laminate, along or across the room. There is no special rule in this regard. There is only one subtlety, the observance of which is recommended, and that is for the visual effect. When laying laminate flooring perpendicular to the window opening, then the light will fall along the seams, and they will become less noticeable. Laminate can also be laid across. In this case, the joints of the boards will simply be more visible. It looks very nice and visually expands the room laying diagonally. But this option is more complicated - skill is required, and there will be more waste.

In general, during installation, the assembly of the first and last rows is the most difficult. When laying the first, it is necessary to observe the gaps along the wall. In the last row, it will take a lot of time sawing the boards and joining in a coated doorway in another room.
The main rule for the correct laying of the laminate is the displacement of the seams. Each transverse joint must be 400 mm from the next. So the load will be optimally distributed over the entire surface, and the coating will be more wear-resistant.
The assembly of the next row always begins with a segment of the previous plank. With such an incomplete piece, every even row should begin. This assembly option is considered traditional. It is called "layouts with a half-board offset." Odd rows with this option always start with a whole panel.
Important: the distance between the transverse seams of adjacent panels must be at least 40 cm.
You can also lay a laminate board with a ladder. With this laying, the minimum allowable joint displacement must be observed. Usually this parameter is indicated on the packaging. The first row starts with a whole plank, the next - with 1/3 of the full length, the third - 2/3. Get a kind of ladder.
Do-it-yourself laminate installation instructions
The very technology of installation of this flooring is always the same. There are only features when connecting boards, depending on the type of castle.

Now let's look at step-by-step instructions on how to lay a laminate with your own hands.
- First you need to prepare, vacuum and level the surface of the base.
- When the surface has been cleaned and leveled, if necessary, an overlapping film of polyethylene should be laid. The edges are secured with adhesive tape.
- Now the substrate is unfolded or rolled out, in strips along the desired wall. Joints must be tight. Also sealed with adhesive tape.
- Wedges are placed around the entire perimeter. Their thickness is 10 mm. They will create a small indent between the floor and walls. This allows air to circulate around the floor covering. This will help prevent damage to the laminate when the room is extremely hot or humid.
- The first row must be laid from the side opposite the door. All panels of the first row must rest against the indentation wedges. Each panel is connected to the next one.
- The last plank of the row may be too long. It needs to be trimmed, taking into account the prepared indents.
- The next strip of panels should start with half or a third of the board, according to the diagram.
- All rows are laid consecutively.
- The planks of the final row will need to be cut lengthwise. The main thing is not to cut off the spike.
If the shape of the room is geometrically correct, installation difficulties should not arise.
Important: the laminate must be adapted to the temperature and humidity of the room before installation. Therefore, a couple of days before the intended laying, it is necessary to bring the packages with flooring into this room.
How to eliminate joints between multi-level coatings of adjacent rooms
We looked at how to properly install laminate flooring. But there is another important point.
Often, during installation, multi-level joints are formed between the laminate and the threshold or flooring of adjacent rooms. How to deal with them?
They are easily neutralized with the help of thresholds. If you need a straight joint, a metal threshold will do. It is the most durable. For joints that are curved, there are flexible sills.
Threshold types:
- single-level- the most common, designed for joining laminate flooring in adjacent rooms;
- multilevel- used for joining a laminate floor with another surface, the level of which differs in height;
- unilateral- it is applied to docking with doors;
- angular- for connection of coverings under an inclination of 90 degrees.
Laying methods depending on the type of lock
Laminate flooring installation methods depend on the type of lock on the board, Click or Lock. It is impossible to confuse them, because the manufacturer indicates on the packaging which connection is used.
Laying method with key connection Click
This technology involves assembly without a hammer. The boards are assembled sequentially. Each next panel must be brought to the already installed at an angle of 45 degrees. Then the spike must be inserted into the groove, pressing lightly. The castle got its name because of a characteristic feature. When the spike enters the groove, it makes a click. With this technology, the panels are first fastened with side joints, and then with longitudinal ones.

Lock-in installation lock
This method has some differences from the previous one. The spikes are inserted into the groove from the side, and you can’t do without a mallet with a finisher. This technology involves assembling rows first, and then connecting them. Boards of the same row must be laid out evenly on the floor, parallel to each other.

So, we examined in detail how to lay a laminate with our own hands. It remains to clarify one more point. Connection " tenon-groove» does not seal the floor surface. Water can still get in between the seams. However, a special adhesive can significantly reduce the chance of water getting inside the coating.

Glue is applied to the spikes immediately before assembly. But this method has a significant drawback. The resulting floor covering will become monolithic. It is no longer possible to replace several boards if necessary.
Laminate floors are considered one of the most practical, cheap, beautiful and easy to install. And this is true - you can cope with the task of laying them yourself, without even resorting to the help of specialists. The main thing is to have a desire and set aside time for work. But how to lay laminate? Let's analyze this issue in practice.
Laminate is a finishing floor covering, although it is considered easy to install and maintain, it is quite delicate. It is demanding on operating conditions, on the laying process. If you neglect some of the features and rules for working with it, then the coating will not last long.


In the photo - the process of laying the laminate
Therefore, before starting work, it is worthwhile to ensure the following conditions in the room:
- temperature range - 15-30 degrees above zero;
- air humidity - about 40-70%;
- smooth, cleared of debris and dried base;
- the room must be dry. If the humidity is high, then you will have to buy a more expensive moisture-resistant material;
- heaters and other heating devices cannot be switched on while working with laminate;
- windows should be closed to avoid drafts.

Attention! Laying laminate cannot be done on sagging floors, cracked screed. Otherwise, the material will not last long. The locks connecting the coating elements will break when the material deflects, due to which the integrity of the base will eventually be violated.

It is also important to remember that the laying of the laminate can only be done 2 days after the material was brought to the place of work. This time is necessary for him to "get used" to the new operating conditions - the laminate will gain the necessary humidity, adapt to the temperature, so that during operation it will not change its dimensions excessively. It reacts sharply to changes in conditions in the room - the effect of thermal expansion may appear.

It is necessary to leave the purchased laminate in the room where the installation of the floor is planned. This is necessary for acclimatization. This process takes about 48 hours.

Choosing a laminate, you should focus not only on the color, but also on the quality of the material. It is not worth buying low-grade products that are too thin or not suitable for the operating conditions. Such a coating will serve too little, quickly lose its appearance. Laminate packages must be sealed, and before installation, it is important to inspect all boards for damage, chips. Damaged laying elements must not be used.

Prices for laminate "Tarkett"
tarkett laminate
The process of laying the material may differ depending on which type of lamella is used. For example, there are three installation methods, each using a different type of material: laminate with joints Click or lock, as well as the type of coating that is mounted using glue.


Installation of laminate flooring with a click-type lock
In the case of using the adhesive method, the laminate is glued to the rough base using special compounds. The technology resembles parquet laying. Also, glue can be applied to the joints between individual planks, which are then tightly joined to each other. But this method is now practically not used, with the exception of the design of rooms with very high traffic or high humidity. It is impossible to disassemble the laminate if necessary.
Installation of cover with type locks lock involves the connection of individual strips by the impact method. That is, during operation, the spike on one side of the lamella is driven into the groove on the other lamella. Such a coating is already losing popularity due to its shortcomings - the laboriousness of work and complex analysis if necessary.

Important! If material with this type of locks is used, then work should be done carefully - control the force of impact and use a special rubber or wooden block, placing it at the site of impact.

Now most often for laying this type of floor, a laminate with joints is used. Click. Here, docking occurs due to a spike and a groove, but of a special shape, in which the elements are securely joined and connected to each other without the use of shock technology. Docking of panels occurs at a certain angle, after which the lamella falls to the floor - at this moment, snapping occurs. This connection allows, if necessary, to easily disassemble the finish and re-lay it.


Ways of locating lamellas
You can lay the laminate in different patterns, according to the schemes. Here you can choose any option that you like, the main thing at the same time is to follow the pattern. There are some of the most popular layout options. The material consumption will also depend on the choice of method.
Table. Laminate layout options.
| Layout option | Description |
|---|---|
| This is the most economical option, since the amount of scrap and waste here will be minimal. The first row is laid first, and the remaining trimmings of the last plank can be used to start the second. The main thing is that they are at least 30 cm long. The amount of waste in this case usually does not exceed 5% of the material. |
| If you look at the laminate laid in this way, then the joints will form a special pattern that resembles a chessboard. In this case, a new row always starts with a cut length so that the panel is offset to the side by 1/2 from the previously laid one. The amount of waste in this case increases to 15%. |
| Reminiscent of the classic version of laying, only performed at an angle of 45 degrees relative to the walls of the room. It looks impressive, but the amount of waste becomes even greater - more than 15%. |


![]()
To avoid possible mistakes during the creation of a drawing, it is better to design the entire work in advance by sketching a laying pattern on a piece of paper. And keep in mind that the minimum offset of the joints should be 20 cm relative to the lamellas laid in the previously mounted row.

Important! Regardless of which laminate is laid and according to which scheme, there should always be a compensation gap of about 1.5 cm between it and the wall. Otherwise, the material will deform. The area of 1 m 2 of laminate under the influence of humidity and temperature can increase by about 1.5 mm.
When installing a laminate floor, it is important to take light sources into account so that the gaps between the planks are less noticeable. That is, the laying is done so that they are perpendicular to the light source (for example, a window).

Also, pre-laying planning will make sure that the planks in the last row will have sufficient width (100 mm). If it turns out that they will be smaller, then it is better to narrow the first row a little.
Laminate is one of the most popular and preferred types of flooring. With a strong desire, you can lay it with your own hands. You just need to figure out how to properly lay the laminate. The existing varieties of material and laying schemes make it possible to do everything so that the finished coating fits best into the interior of the room. If you follow the instructions in everything, you can lay the laminate no worse than an experienced master.
Laying laminate in a diagonal way visually expands the space.
What do you need to know before installing laminate flooring?
It requires compliance with a number of rules, without which the coating is unlikely to serve as it should. Laying laminate can not be carried out in rooms with humidity below 40% and above 70%. The air temperature in the room should be between 15-30°C.

Before work, be sure to check the horizontalness of the floor. This can be done using a building level or a rule. The permissible deviation is 2 mm per 1 m of space. It is important that the surface on which the laminate will be laid is rigid. Do not lay material on creaking wooden floors and carpet. If there are significant irregularities or the wooden base has lost the necessary rigidity, you will have to additionally level the floor.
If you are laying a laminate with locks, you need to remember that its rigid attachment to the base is unacceptable. Glue, screws, nails - you won't need it. Finishing should be "floating". The same requirement also determines the need to leave gaps of 1-1.5 cm around the perimeter of the room.
Laying a laminate can only be carried out on a special substrate. Due to it, the sound and heat-insulating properties of the floor will increase. To provide additional moisture and vapor barrier, a thin polyethylene film should be laid under the substrate.
Laying laminate flooring will require the use of the following materials and tools:

Mistakes when laying laminate flooring and their consequences.
- Substrates.
- moisture insulating material. It will be needed only if the laminate flooring will be laid on a concrete base.
- Jigsaw.
- Scotch.
- Marking pencil.
- Square.
- Hammer.
- Special assembly kit for laminate.
Back to index
Substrate Preparation Guide
Laminate is a material with excellent performance characteristics. And so that they do not decrease over time, you need to properly prepare the base before laying. The panels can be laid on concrete floors, wooden structures, floor tiles and linoleum.

As for concrete, a new screed can only be covered after it has completely dried, i.e. in about a month. If the laminate will be laid on a ready-made screed, you first need to make sure that it is intact. Minor cracks and unevenness are eliminated with a self-levelling compound. To repair significant damage, you will have to make a new screed.
The concrete base must be covered with plastic wrap. Use tape to secure the seams. The film is overlapped, with an overlap on the walls. Dry screed does not require this layer.
If laying the laminate is done on the floor from the boards, it is important to make sure that they are even and rigid when fastening to the logs. Boards must be fastened with self-tapping screws. If the logs are poorly fixed, then you will have to lay a new floor. If the boards themselves are uneven, you will have to work with a scraper or planer. It is important that the surface does not protrude anywhere. Remove all protruding elements in advance and replace damaged boards.
If desired, you can level the wooden floor with plywood. Sheets with a thickness of at least 6 mm are suitable. It is also possible to use other sheet materials, for example, fiberboard and chipboard. However, plywood is the best option in terms of quality and cost. Before work, be sure to calculate the total thickness of plywood, underlay and laminate panels, so that as a result it does not happen that the doors to your room cannot be opened. It is for this reason that when repairing, the installation of interior doors is carried out at the very end.
Laying laminate can be done on tiles or linoleum. The technology allows you to lay the material on any hard and even surfaces. So if before that the tiles and linoleum were laid according to the rules, you can not waste time dismantling them. It is not necessary to use vapor barrier in such situations, the substrate will be enough.
Back to index
Features of different ways of laying laminate

Laying a laminate can be carried out using 3 main methods of fastening panels, namely:
- Glue method.
- With the help of the Lock.
- With Click lock.
Adhesive bonding resembles the laying of simple parquet. The edges of the 2 panels are covered with glue, after which they are pulled together quite tightly to each other. This option is suitable for rooms with a large load, when you want to create a moisture-proof and durable connection. The method is used quite rarely, because. it has significant drawbacks: the greatest labor intensity, fragility and the exclusion of the possibility of disassembling the coating.
The most popular is the Click joint. The panels are fastened using the tenon-groove method at an angle of 30°. The laminate panel is lowered and fixed with a lock. This is the most convenient, fast and modern type of fastening. If the quality is good, the joints are almost invisible.
As for Locks, they require some experience. In addition, such a connection is more demanding on the evenness of the base. Locks are easily damaged if mishandled. Yes, and disassembling them is more difficult than Click, and assembly requires additional docking of the panels with a hammer.
Back to index
What types of laminate flooring are available?
In most cases, laminate flooring is laid parallel to the sunlight, but if desired, the panels can be laid perpendicularly or diagonally. The existing schemes are shown in fig. one.
In addition, laying schemes are further divided into the following:

Figure 1. Ways of laying out the laminate.
- Classic scheme. It is most often used when laying such flooring, because. it is the most economical. The panels are laid from the window opening, parallel to the sunlight. If the length of the scraps is more than 30 cm, they can be used at the beginning of a new row. With the correct implementation of all stages of installation, the waste is a maximum of 5-7%.
- The brick scheme got its name due to some similarities with brickwork. The flooring of the new row is carried out with a half-shift of the laminate panel. This laying method provides the highest strength. The main disadvantage is that the consumption of finishing material increases by 10-15%. Laying according to the "brick pattern" looks especially beautiful if there is a chamfer on the ends of the panels.
- The diagonal scheme is one of the varieties of classic installation, but in this case, the panels are mounted at an angle of 45 °. The method allows you to get a very beautiful coating. The main disadvantage is the large amount of waste (about 15%), which becomes even greater if the room is long and narrow.
Regardless of which scheme the panels will be laid in, each new row must be laid with an offset of the end locks. This technique allows you to increase the strength of the connection. The minimum allowable offset is 20 cm in relation to the previous row.
Laminate is high quality floor covering that has an extremely beautiful and stylish appearance, as well as unique characteristics.
Well, not everyone knows how to lay it on their own. If you decide put in your house or apartment laminate, then we will give you advice on how to do it right.
How to lay laminate flooring correctly (preparation)
So, if you have decided on the class and color of the laminate, then you can start. Let's start with counting how much laminate is required for laying a particular room.
By the way, the room should be with moderate humidity, and in no case should it be a bathroom, because laminate is afraid of strong moisture, because of which it quickly falls into disrepair.

Usually there are 10 boards in one pack of laminate. This The pack is designed for an area of 2 square meters. m, but only if the laminated boards are laid parallel or perpendicular to the window.
If you wish to lay the laminate at an angle relative to the window, then you need to 15% margin, and with laying perpendicular to the window, make a margin of approximately 7% .

However, you should be aware that it is better to buy material with a margin in any case, since all measurements with subsequent cuts are unlikely to be done perfectly, especially if you are new to this business.
Laminate can be laid at any angle. But: if the floor is paved perpendicular to the window then the seams will be less noticeable. This method is the most popular.
If a parallel, then the seams will be "highlighted" by the drop shadow, and a visualization of a wide room will be created. Well and laminate correctly laid at an angle, optically increase the area of the entire room.

Before starting work, you must prepare the surface on which we will lay the laminate. The main condition in this case is flat floor. In principle, it does not matter what you have on the floor now: an old wooden floor, a laminate or just "bare" cement.
In order to find out if your floor is even, just take the building level and walk around the room, measuring the slope. If the level of the floor in the room is acceptable, then you can safely lay the laminate.

For small irregularities, you can use cement mortar. In the lowlands, you need to raise the level. Places that are too high should be removed. On an area of 2 sq. m level difference should not exceed 2 mm.
Well, if the level of the old floor requires drastic changes, then it is necessary to make a screed. Screed is ideal for leveling the floor. In addition to the screed, you can also lay out the floor plywood.
After buying the laminate, it is better to unpack and let it lie down for at least two days for adaptation in the room where it will spread.

Sometimes there is difference in color shades on laminated boards. In this case, it is necessary to package the boards so that the differences after laying are as little noticeable as possible.
How to lay laminate

Before starting work, the floor should clean and vacuum thoroughly so that rubbish does not get into the locks of the laminate coating (it is small debris that often causes creaking).
Recommended first layer lay out a 200 micron polyethylene film. This flooring protects the laminate from water formations under it. We lay the polyethylene so that there is a surplus of about 20 cm, which can be cut off after all work is completed. For convenience, we fasten the entire flooring with adhesive tape.

The next layer should be EPPS(extrusive polystyrene foam). This underlay is used for depreciation, as well as heat and sound insulator. It is necessary to lay this material butt, to avoid thickening. The joints are also fastened with tape.

All layers: polyethylene, XPS and laminate crosswise.
If we have a plywood or wooden base instead of a concrete base, then nothing needs to be laid under the laminate.

Now let's prepare necessary tools:
- Electric jigsaw
- A hammer
- wooden plank
- Roulette
- Pencil.
How to lay laminate flooring

During laying laminate flooring it will be necessary to displace the end joints in order to get a masonry similar to brick. Joints must be displaced by at least 30 cm and if allowed by the manufacturer, then not less than 20 cm. Such masonry helps to strengthen the entire future structure and does not allow the laminate to "walk".

You need to know in advance what size it will have last row of laminate which is sure to be torn apart. This cut should not be less than 5 cm If the cut will be less than 5 cm, then you will need to reduce the first row.
The best option would be if the first and last boards match in size.
How to lay laminate with your own hands

You can start laying laminate flooring with any side of the room.
You need to fasten the boards by snapping them into their special lock, as shown in the figure. In this case, the main do not confuse from which side the laminate boards should enter the puzzles, because on the one hand the boards have hollow holes, and on the other - extensions, which should go into the holes.

Thus, we put the laminate over the entire area of \u200b\u200bthe room with our own hands. In order to make sure that the boards fit snugly, they hit with a hammer, setting wooden plank by hitting her.

To tamp the last board, a special plank is required (as shown in the figure and in the video below).

The bar must not be applied to the lock of the board, otherwise it can be broken. Wooden plank should be applied to the top end laminated board. Along the edges of the entire room should be placed small supports about 1 cm thick, so that the laminate has room to "stretch" due to temperature changes.
You can connect as single laminated boards, and in advance bonded row, but in this case you will need a partner, because the bonded row of laminate may be too long.
Obstacles when laying laminate flooring

When installing laminate You will encounter obstacles such as pipes, door frames, transitions to a different type of floor, etc. We will provide some universal advice on how to get around the obstacles that have arisen so that you can find the most suitable option for your floor.
Laminate is one of those materials that are often used as flooring. Beautiful appearance, additional insulation, pleasant to the touch texture and these are not all the qualities that cause love for this coating. However, the coating can please the owner of the house for a long time, only if it is laid correctly. To do this, you need to properly prepare the base.
Preparatory actions
A lot of hard work needs to be done before laying the laminate flooring. It all starts with checking the evenness of the floor, it must meet certain standards. For 2 m² of floor, the height should not change by more than 2 mm. Otherwise, the panels on four sides equipped with special locks will loosen over time, which will lead to their breakage. There will be ever-growing gaps clogged with debris and dust. The floor will start to creak.
If the base has a slope, it must be uniform and not exceed 4 mm per 2 m². It is better not to place furniture resting on 4 legs on these areas, it will lose stability, and the doors, if any, will stop closing. The temperature and humidity of the substrate should also be checked. Wood must have a moisture content of less than 12%, concrete 4%, floor temperature over 15°.
What could be the basis
Having dealt with the size of the permissible distortions of the "relief" of the floor, we proceed to the types of bases and their preparation.
- Concrete floor. It must be repaired, small cracks need to be slightly enlarged and filled with cement-sand mortar. Large detached pieces should be removed, and the resulting recesses should be filled with a self-leveling mixture. The hardened floor is sanded. Dust after this procedure must be completely removed, only then begin to lay the laminate.
- Wooden covering. All irregularities are removed with a planer, lagging floorboards are reattached with self-tapping screws, rotten areas are replaced with new ones. If the ceiling height in the room is more than 2 m, the floor is leveled with plywood sheets 5 mm thick.
- Linoleum. This material can not be removed, provided that the floor itself is even. The only thing that needs to be done is to bend the edges and check for mold. If present, treat with antifungal agents.
- Tile. With a sufficiently even surface with ceramics, you just need to remove dust and dirt.
- Insulating layer. It is used only when the material needs to be laid on concrete. The peculiarity of this floor is that it absorbs moisture. The material is made of paper and pressed woodworking waste, which means that if it lies on a damp surface, it will begin to change shape over time - it will swell.
- Substrate. According to all technological standards, it is recommended for use.
- Carpet covering. Under no circumstances should it be used as a basis. The pile does not hold its shape well, which will lead to loosening of the locking system and a creaking floor. The result is repair or replacement of the coating.
No less interesting: — stages of work, advice and choice of materials
A few words about the substrate and vapor barrier
A concrete floor, old or new, absorbs moisture and transfers it to the floor covering. To avoid such problems, an insulating layer of 200 micron thick diffusion membrane or polyethylene is used. It should be laid on the entire floor area and not fixed to the base in any way. To do this, pieces of polyethylene must be glued with an overlap using adhesive tape. Excess insulation, stepping on the walls, is hidden with the help of a plinth.
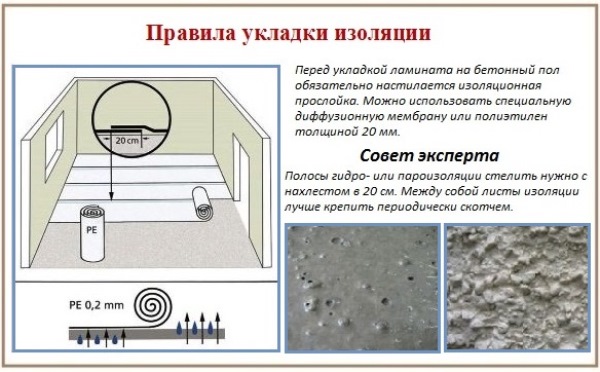 Rules for laying insulation
 Laminate flooring requires an underlayment that acts as a sound insulator and additionally protects against moisture. It is also designed to protect the bottom surface, the laminate will avoid abrasion when in contact with fine abrasive crumbs and ensure the immobility of the floating floor covering. So, what can be used as a substrate.
- Linoleum. However, this possibility will appear only in the case of its impeccable styling. It will not allow moisture to get on the laminate and will work as a heater.
- Penofol. This material is usually used in conjunction with foil, creating an excellent sound deadening layer. This underlay can be used for rooms with underfloor heating.
- Polyethylene foam. It is cheap, well repels moisture and retains heat, resistant to bacteria. True, it is short-lived and quickly loses its shape.
- Cork. It perfectly hides the flaws of the base, serves as a heat and moisture insulator, and is durable. But quite costly.
The thickness of the underlay must be calculated depending on the laminate. Usually, when buying this flooring, a brochure is included with it, which contains the manufacturer's recommendations regarding the underlay. As a rule, a 3 mm insulator should be placed under a 9 mm laminate.
Warm floor
In some way, they are also related to what is placed under the laminate. Their use promises the use of only certain types of substrate. Foil and other insulators based on it, for example, penofol, are suitable. What are the underfloor heating, their pros and cons.
Heating with wires
In rooms that require additional heating, electric underfloor heating shows good results when laying under a laminate. Depending on the size of the room and the required temperature, you can choose a floor of different power. 150 W is enough to create comfort in the kitchen and in the living room. 220 W is able to completely heat a balcony or a room where there is a large heat leakage.
 Underfloor heating, electrical system
 - Easy installation, which is able to produce a person who does not have special skills.
- The main or additional heating of any room.
- No additional substrate required. All laying is carried out on the insulation already existing under the laminate.
The disadvantages include only the high cost of electricity with its constant use. Also, in the event of a wire break or burnout, the entire system will cease to be operational.
Infrared film
Among the residents of houses with laminate flooring, film infrared heating is the most used. This happens because such floors provide an optimal temperature regime that does not allow the floor covering to overheat.

- Damage to one or more sections does not entail the failure of the entire heating system.
- Its service life is at least 50 years.
- All installation work is carried out within two hours.
- Very thin, will not reduce the height of the room.
- The use of various heating modes significantly reduces the cost of heating.
- The film is not affected by corrosive and biological factors.
- There is no need to purchase any other equipment.
- Completely safe.
There is only one downside to this system. Significant costs will have to be spent compared to water and wired systems.
water system
This type of heating is less popular. However, it has positive properties that are not inherent in other types of warm floors. Also, preparatory work should be carried out before laying. First, turn on the system, drying the base. Secondly, before laying the laminate, it is recommended to cover the warm floor with a sound insulator about 3 mm thick. This will allow the laminated coating to deteriorate less when in contact with the screed.

- Constant and uniform heating of the concrete base, increasing the life of the laminate.
- Durability. The system without mechanical damage will last for many years.
- Availability. Of all types of underfloor heating, this option is the most economical in use. No need to pay for anything other than central heating.
- Difficulty of installation. For wiring this system of underfloor heating, debugging and launch, you will have to hire specialists.
- Additional labor costs. She can hit the pocket quite noticeably.
- In addition to acquiring the system itself, you will have to fork out for fittings and other accessories.
- In the event of a breakthrough in the heating system, the floor covering will be damaged. You will also have to compensate for the damage to the neighbors below, if any.
Conclusion
After studying the content of the article, each home master is able to independently choose the optimal type of substrate and base. Also, qualitatively carry out preparatory work and calculate the approximate cost of future repairs. Or at least not allow yourself to be deceived by negligent hired workers with the choice of material and, if necessary, make changes to their work.