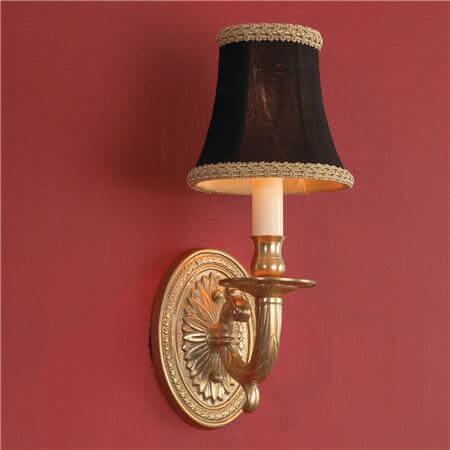
Wall lamps, sconces with a switch. How to connect the sconce correctly: detailed instructions Sconce for the bedroom and children's room
Wall sconces, as well as floor lamps, are very popular in our country, decorating most apartments and being an excellent addition to the interior. By emitting diffused light, they contribute to the creation of comfort in the house, making the home more comfortable. The sconce is ideal as a lighting fixture in the bedroom or home reading area, providing a soft light that promotes good visibility without straining the eyes. With the help of patches of light created by these lamps, designers mask or, on the contrary, emphasize the necessary elements of the situation. The topic of this article is how to connect a sconce with a cord switch with your own hands.
Choosing a place to connect a wall lamp
Before proceeding with the installation of the sconce, it is necessary to choose its location correctly, without being too lazy to make careful measurements. This is especially true for paired lamps, which should be parallel to each other. Otherwise, there is a great risk of getting from the lighting not at all the effect that was expected.
When choosing a place for installation, it is advisable to take into account that it is recommended to mount the sconces at a height of one and a half meters from the floor. Take care in advance to covertly connect the wiring to the connection point of the device.

Since this material is dedicated specifically to connecting sconces equipped with a built-in switch that is controlled by a rope or chain, let's talk in detail about the installation procedure for this type of fixtures.
Preparation for installation work
Before you start installing and connecting the wall lamp to your home network yourself, you need to prepare the following tools and accessories:
- Electric drill with drills. The type of the latter must be chosen based on the wall material. If electrical wiring is installed in a house with wooden walls, the drills should be designed to work with wood, but if the walls are concrete, then the type of drill should be “on concrete”.
- Phillips or flat screwdriver.
- Indicator screwdriver.
- Pliers.
- Pencil.
- Ladder stepladder.
- Sharply sharpened knife.
The sconce connection diagram is usually included in the box with the product. It schematically shows how to connect the lamp to the wiring.

Installation order
Now let's figure out how to install a sconce lamp with a rope-shaped switch. When doing this work, be guided by the following step-by-step instructions:
- We de-energize the room by turning off the switch or unscrewing the plugs.
- We make sure that there is no voltage on the wires that will be connected to the sconce. To this end, we check the contacts one by one with an indicator screwdriver.
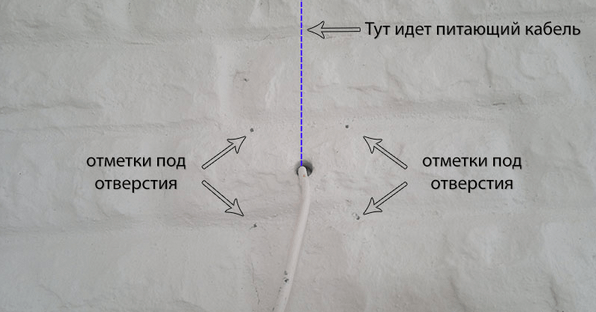
- We attach the back cover of the wall lamp to the installation site.
- We make marks with a simple pencil for the holes into which the fasteners will be mounted. In this case, the cover must be kept level, otherwise the holes in the wall will not coincide with the mounting points on the device.
- Using a drill, we make holes in the marked places.
- Dowel-nails fix the sconce cover to the wall.
- With a sharp knife, remove the insulation from the ends of the input contacts (approximately 5 mm).
- We connect the cores of home electrical wiring and the lamp according to the connection diagram.

- We attach the body to the cover and fix it with the bolts supplied with the device.
- We fasten the lampshade with bolts (it is more convenient to do this from a stepladder).
- We screw a lamp (regular, fluorescent or LED) into the lamp.
- Slightly shake the sconce to check the quality of the installation. A well-fixed instrument should be held firmly in place.
- We turn on the breaker to supply electricity to the apartment.
- Turn on the sconce with a rope switch and check the quality of its work. With proper installation, the lamp should not blink, and the wire connections should not spark.
Visually installing and connecting the sconce lamp on the video:
On this, the process of installing a wall lamp can be considered complete. We hope that our story was detailed enough, and after getting to know him, you have no questions left on how to properly connect a wall lamp with a cord switch.
A wall lamp (sconce) is a popular lighting fixture that complements a chandelier, sometimes replacing it. It gives a beautiful diffused light, which in some models can be directed in different directions. Such lighting is ideal for reading in the evenings, work, creating a cozy atmosphere.
Sconces have many advantages over floor lamps - they are cheaper, do not take up extra space. Before proceeding with the installation, you need to decide how to connect the sconce, choose the scheme and location, and also purchase the necessary tools.

Connection methods by model types
Connecting a wall lamp, or rather, its method, depends on the type of device. In stores there are different types of sconces - with a cord, fork, rope (chain, sonnet), without a cord - on the keys. To properly connect the device to the mains, it is important to familiarize yourself with the specifics of the work.
When installing, consider the following points:
- at high humidity, make sure that the lighting device has moisture protection;
- take into account what type of light bulbs are used - you cannot buy those that exceed the power indicated in the passport;
- if the lamp is powered by 12-24 volts, additionally purchase a voltage transformer, include it in the circuit.
rope model
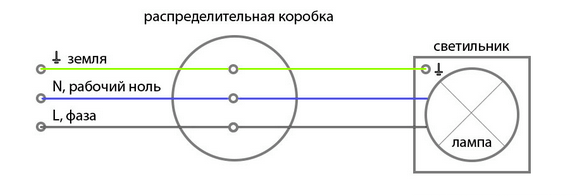
It will not be difficult to hang a rope lamp on the wall, even a novice master can do it. Electrical wires are brought to the height required by the user (usually 1-2 meters from the floor) in a hidden way so as not to spoil the view of the room. There should be three of them - zero (N), phase (L) and ground (PE). Then, in accordance with the attached diagram, you need to attach the contacts to the blocks with the terminals of the appropriate marking. The phase is connected to the phase, zero to zero and ground to ground.

keyboard model
Installing a sconce with a key switch has a number of features. Instead of a rope, such devices have contacts that connect independently. All wires and connections for such a sconce are completely hidden in the wall. To do this, you need to ditch, so you should think about fixing the lamp in advance.
Care must be taken while working. Otherwise, the risk of a short circuit is high, and since the wiring is internal, it will be difficult to eliminate the consequences. It is necessary to install the sconce strictly according to the scheme, joining the wires by color and marking. The network introductory phase will go to the switch, from it - again to the sconce, in order to ensure the possibility of disconnecting the electrical circuit. Zero and ground during installation work must be connected directly.

Cord with plug
Hanging a wall sconce with a plug on a cord is very simple. Such lamps have a wire, like all electrical appliances, they are plugged into sockets with a plug. It is recommended to buy them if it is not possible to gouge the wall, lay new wiring and mount a separate switch. To turn on the light, simply insert the plug into the socket or use the switch (it is added for a more comfortable disconnection of the circuit). You can hang such devices on the wall without basic knowledge of electrical wiring diagrams.
Step by step instructions
All modern fixtures have three wires - phase, zero and ground. If the apartment has the appropriate wiring, there will be no difficulties with the connection. If there is only a working phase and zero, when it is not possible to change the wiring, you will have to act differently. You can install the lamp by connecting through one phase interrupted by the switch and zero, while observing the marking.
Selecting the connection point for the wall lamp
Usually sconces are placed in the bedroom at the head of the bed. For a small one, one electrical appliance is enough. If the bed is of an impressive size, it is optimal to mount one lamp on each side. In the nursery, a sconce is usually placed so that the bright light does not interfere with the baby. A good solution is to hang a lamp over an armchair so that you can read a book to your child before going to bed. For older children, a lamp is placed above the bed.

Sconces can act as the main source of light in the bathroom or hallway. In such rooms they are mounted symmetrically on both walls or illuminate the area around the mirror. The bathroom will require a waterproof lamp.
Before installation, you should measure the distance from the floor and between the lamps, which is especially important when installing two or more sconces. If you hang "by eye", you will get unnecessary holes in the wall or the lamps will hang crookedly.
Preparation for installation work
Before independent work, immediately prepare the necessary tools and fixtures. You will definitely need an electric drill with a drill, which is selected depending on the material of the walls. For concrete - do not use wood drills and vice versa.
Also needed to work:
- screwdriver;
- indicator screwdriver;
- pliers;
- pencil;
- sharp knife.

If the sconce will be mounted high, you should stock up on a stepladder. In extreme cases, you can stand on a reliable chair, with one hand leaning against the wall.
Installation
To connect the sconce, you must follow the following step-by-step instructions:
- Turn off the desired machine to de-energize the room or the entire apartment, depending on the type of wiring installation.
- Using an indicator screwdriver, make sure that there is no voltage on the contacts.
- Attach the sconce cover to the place of future installation, which is already marked on the wall. Make marks with a pencil in the area of \u200b\u200bthe holes into which the fasteners will then be installed.
- Drill holes according to the marks. You can pre-cut the wallpaper carefully so as not to tear it with a drill.
- Fasten the sconce cover with dowels to the wall.
- Remove 0.5 cm of insulation from each core with a sharp knife.
- Connect the wires to each other according to the selected connection scheme, usually standard.
- Fix the body of the sconce with special bolts that are attached to the lamp. Attach a lampshade, if any.
The advantage of these fixtures is that they emit a diffuse, not bright light flux, which can illuminate a certain part of the room. They are often used as bedside lamps in the bedroom, because. you can read your favorite book without distracting the person sleeping next to you. Now we will consider the main ways to install and connect a sconce to the network with our own hands.


Another important advantage of the products is the ability to control the angle of incidence of light. The design includes a rotating lamp mount, which allows you to direct the light flux to a specific area. In addition, the lamps complement the interior of the rooms, due to the fact that they can be made of beautiful plastic, forged metal and even crystal.
To date, there are sconces with a rope switch, as well as those working from a keyboard model. Next, we will consider the features of installing and connecting to the network of each of the options.
Connection methods
rope model
If the sconce lamp has a rope switch, then it will not be difficult to install the product.

First you need to bring the wires to the connection point. Usually not standardized and ranges from 1 to 2 meters. Cable wiring is recommended to be carried out in a hidden way so as not to spoil the interior of the room. At the output, you should have 3 wires: ground, phase and zero. Marking N means that the wire is zero, L - phase, PE - grounding. The cord switch is easier to connect, all you need is to make contacts to the terminal blocks and fix them according to the diagram. In order not to make mistakes, we recommend that you familiarize yourself with. Phase must be connected to phase, zero to zero, and ground to ground.
Video tutorial on connecting the product
keyboard model
Alternative - keyboard. Very often, the design of the sconce is designed in such a way that instead of a string or chain, only contacts are left that you need to connect yourself. There is nothing complicated here, the main thing is to do it at the stage or at home. This is due to the fact that during electrical work in a hidden way, it will be necessary to hammer the strobes under the switch and cable laying.

So, the installation diagram has the following form: the introductory phase from the network must go to the switch, and from it back to the lamp (so that the circuit can be disconnected). Zero and ground are connected directly.
To your attention, visual diagrams for connecting a wall sconce with your own hands:

Please note that in some (especially Chinese) products, the colors of the wires may be the same. In this case, it is recommended for yourself to mark each contact with colored cambric. This will make repairs and maintenance safe.
Cord with plug
There is another way to connect the sconce to the network - an electric wire with a plug. In this case, the wires from the lamp must be connected to a regular cord, which will be connected to the outlet with a plug. The advantage of this option is that you can do without wall chasing and without additional installation of a switch. In addition, a cord can be added to the chain, which will break the chain so as not to constantly pull the plug from the outlet.
Main Process
So, we figured out how to connect the wires, now consider the instructions for installing the sconce on the wall.
In order to independently connect the wall lamp to a 220 Volt network, you must prepare the following tools and materials:
- a drill with a set of drills (if carried out, then the drills should be “on wood”, for concrete walls, buy drills of the appropriate type);
- dowel-nails;
- a set of screwdrivers, including indicator;
- ladder;
- pliers;
- sharp knife or special;
- simple pencil.
To your attention step-by-step photo instructions for mounting a sconce with three lamps:
- Turn off to de-energize the room.
- We check the voltage at the contacts to which we will connect the sconce. To do this, we use an indicator screwdriver.
- We apply the back cover to the installation site and use a simple pencil to mark the holes for mounting. Make sure that the cover is fixed evenly.
- We drill holes at the marked points and fasten the cover with dowel-nails.

- Using a knife, we clean the input contacts by 5-7 mm for connection with a terminal block.

- We fix the cores in accordance with the scheme.
- We fix the case with the bolts that come with the kit, as shown in the picture.

- We install the lampshade with a few more bolts. It is better to do this from above, on a stepladder, to make it more convenient to tighten the bolts.
- We screw
This is a common type of wall lamp, which is used for local lighting and is most often installed above a bed. It is convenient because it gives a "soft" light, and its direction can usually be changed. With the help of such a lamp, you can, for example, read and not interfere with a person resting nearby.
Before those who have purchased one, but do not want to turn to specialists for installation, the question arises - how to connect the sconce correctly.
The installation method depends on the type of device. We offer you step-by-step instructions for any of these types, plus a more detailed description of individual varieties.
Preparation for work
First, let's figure out what set of tools you may need. In most cases, this is the following set:
- insulating tape;
- a set of fasteners (the type of fastener depends on the wall material);
- puncher or drill with a set of drills (if it is necessary to make holes in the wall);
- a well-sharpened knife or a special tool for stripping wires;
- screwdrivers (including indicator);
- tape measure and pencil for marking.
Installation steps:
- The power supply is turned off in the panel. They check on switches and electrical appliances, but it will be most reliable to test the wires themselves with an indicator screwdriver.
- The back cover or the sconce mounting plate is applied to the wall surface. Mark the places of future fasteners.
- The cover is attached using self-tapping screws or screws with dowels.
- If necessary, the power cable is cut off (leave 10–12 cm). The wires are stripped (by 5–8 mm) and connected in pairs, which will be described in more detail below. Next, securely insulate the connection!
- The body is placed, usually fastened with decorative nuts that come with the kit.
- The light bulb is installed.
- The lampshade (plafond) is fixed.
- The electricity is turned on, the operation of the device is checked.
How to identify wires?
- Phase, L, - usually black, brown, white. There are, however, gray and even red, orange, purple and turquoise.
- Zero, N, - as a rule, blue or blue color.
- Grounding, PE, - green, yellow or yellow-green.
Although such markings are a good help for an electrician, there are several difficulties. Firstly, manufacturers sometimes still differ greatly in assigning colors to conductors (and there is also an old standard that we had in the last century, and a new one). Secondly, the craftsmen who laid the wiring might not care about compliance.
Therefore, the most reliable ways to determine is to use an indicator screwdriver (especially if there are only two conductors: the probe will work per phase) and, if there is a ground wire, use a multimeter.
You also need to understand that if the lamp has more than one bulb, but more, there will also be more wires.
Connecting a sconce with a cord
Such models are also called "rope type".
You can connect the device to the wiring so that the light is switched on and off only with the cord that comes with the lamp. Such installation is carried out simply.
It is necessary to bring the wires to the installation site on the wall, and then match them with those available on the sconce. There should be three of them, as already mentioned: phase (L), zero (N) and ground (PE), the latter may be absent.
The corresponding wires are connected in pairs, L to L and so on. If there is no ground in the house wiring, the corresponding sconce conductor is insulated.
As a rule, a terminal block is built into the sconce, which simplifies the process.


Using a rocker switch
In this case, it will play the same role as the lace. The connection goes like this:
- Phase goes to the switch.
- Next - to the lamp.
- "Zero" and ground are connected directly.
Switching on via a cord with a plug
 In this case, you may not even have a question about how to connect the sconce - everything is done directly. However, this method can be improved if the device is equipped with a cord. Then the plug can be almost all the time in the socket, and to turn the light on and off, it will be enough to pull the rope.
After studying the instructions and choosing the appropriate connection scheme, it is easy to hang both and sconces with your own hands. Experienced friends and relatives can also help you with advice.
You can choose the lighting devices themselves from the catalog of our company "Republic of Light". We have presented a lot of models of different designs, with a description of the technical characteristics and with a photo. Make your apartment or house more attractive and comfortable with us!
In the article we will analyze a detailed, step-by-step instruction - how to connect a sconce lamp:
- How to connect a sconce with a switch;
- How to properly attach a sconce to the wall;
- Installation and connection of the sconce lamp.
How to connect a sconce with a switch
The power cable of the sconce must be pulled only vertically from above or below. It is important to take this fact into account when installing to the mounting platform.
To turn the sconce on and off, more often use light switches or a switch system. Depending on the selected control, wiring will be carried out.
When choosing a conventional switch, the circuit will look like this: the switch must be installed in the break of the phase wiring going to the sconce, in other words, the neutral wire and protective zero (grounding) go directly to the sconce lamp, and we connect the phase wire to the switch itself. Thus, the switch will close (or open) the electrical circuit, as a result of which the sconce will light up (or go out).
If the switch is already in the sconce, which is often found (usually they are push-button or rope), the connection system is much simpler: you need to connect a wire to the sconce, which will be under constant voltage.
We will describe the method when the wiring is done for a conventional switch, which in turn controls two sconces.
How to properly attach a sconce to the wall
Most sconce models have an identical design and instructions for installation and connection.
- First of all, we turn off the power supply (in cases where the packet boxes in the switchboard do not have signatures, it is necessary to turn off all available ones in turn, while simultaneously checking the current on the phase wire (brown or white) of the sconce);
- We apply the mounting pad to the place of the planned installation and mark the position of the holes for mounting on the wall. Mounting holes must be located in accordance with the rules for vertical installation. It is important to think about not getting into the cable when deepening the holes;
- We select the fasteners and tools necessary for installation. For a brick or concrete wall - puncher and. If the base of the wall is soft (wood, foam block), ordinary self-tapping screws will come off for installation.
Installation and connection of the sconce lamp
- We cut the power cable to the desired length (leaving a margin of 10-15 cm), remove the insulating winding from it and clean the ends of the wires by 7-10 mm. You can cut it with an ordinary knife or heat the desired ends of the wire on fire;
- We disassemble the system block of the lamp. The first part of the block is the terminals with wires connected, going straight to the lamp sockets, the second is the outer part of the housing for the supply wires with a protective cover;
- We put on a part of the body with a protective cover on the supply input cable;
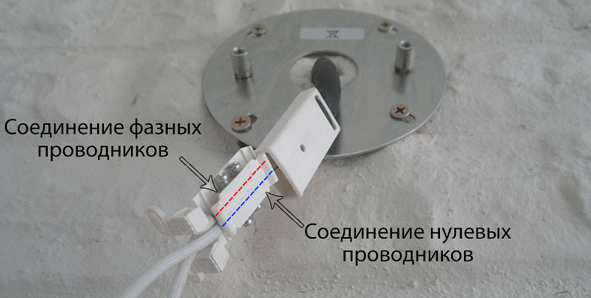
- We connect the wires in the terminals, connect the phase supply conductor to the block with the brown wire, and connect zero to the block with the blue wire coming from the sconce. We close the block with terminals with a housing with a protective casing.
- We fix the body of the sconce to the mounting platform with the help of bolts;
- The last step is to install the sconce lampshade. It is necessary to combine the seats for pre-prepared fixing bolts. Then we fasten these bolts. The easiest way to do this is from the top of the sconce, because of its shape, there is a lot more space on top, and it will be easier for you to reach.