Insulation of the concrete floor with penofol. Methods of thermal insulation with modern types of materials: floor insulation in a wooden house from below without dismantling. The use of mineral wool
Floor insulation - methods and materials
The floor in a wooden house, as a rule, requires additional insulation in the same way as the foundation, ceiling and walls. Otherwise, very noticeable heat losses cannot be avoided - they can be up to 20 percent of the total heat loss. For this reason, special attention is paid to the thermal insulation of the floor.
In modern construction, there are various methods of thermal protection of the floor. Various materials of the new generation are used, which very effectively help to keep the heat in the room. Among them, a special place is occupied by foil insulation - it consists of a thermal layer with foil glued to it. Such insulation is effective not only due to low thermal conductivity, but also due to the reflective properties of the foil - it reflects thermal radiation into the room.
There are various types of foil thermal insulators, but the most popular among them is penofol - a material made of foil and foamed polyethylene. This insulation has gained an excellent reputation due to its characteristics and ease of working with it - all work on the thermal insulation of premises can be done by hand, without even having the qualifications of a builder.
Disadvantages and advantages of penofol
As mentioned above, penofol consists of a foil layer and a heat insulator, which is polyethylene foam. It is distinguished by the following properties:
- High heat-shielding and noise-suppressing properties;
- Absolute waterproofness - the foil repels water;
- High environmental friendliness - the materials from which it is made are used even in the food industry;
- Small layer thickness, which gives serious advantages in terms of saving the usable area of the room;
- Non-flammable - this insulation belongs to flame-retardant materials;
- Simple and easy to work with;
- Inedible for rodents - a very relevant property when it comes to floor insulation;
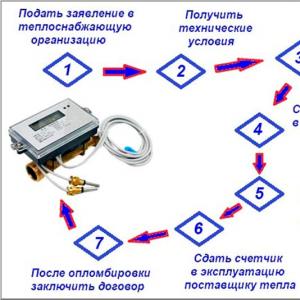
There are penofol of the following types:
.jpg)
- Type A - foil layer on one side, polyethylene foam on the other;
- Type B - the foil layer is located on both sides of the polyethylene;
- Type C - self-adhesive. On the one hand there is a foil layer, on the other - an adhesive layer with which the insulation is attached to the surface to be insulated;
- Type ALP - the foil layer is laminated with a polyethylene coating.
The convenience of penofol is that it does not require special hydro and vapor barrier. But when performing floors in the house, it is necessary to provide an air gap - in order for the heat-reflecting properties of the foil to work and so that the moisture that can settle on the water-repellent surface has the opportunity to evaporate.
Sometimes this insulation is used as an additional layer along with other types of heat insulators to protect against moisture and reflect heat into the room. It is very popular when it comes to warming baths - in this case, the reflection of thermal radiation into the steam room helps to maintain a consistently high temperature.
Do-it-yourself floor insulation technology in a wooden house with penofol
The process of thermal insulation itself is quite simple. Penofol is very easy to use and does not require special construction qualifications. The step by step process is as follows:
- We prepare the base for insulation - we fill in a concrete screed with the addition of expanded clay;
- We wait for the concrete to dry completely, after which we lay out penofol. The insulation is laid with the foil side inside the room - in this way the heat will be reflected inside the housing. We carefully glue all joints with a special adhesive aluminum tape. The insulation should overlap the walls by 10 - 15 cm;
- We put wooden logs, checking that they lie in the same horizontal plane;
- We carry out the installation of a wooden floor on the logs, carefully making sure that the insulation and the floor have an air layer between them. Boards must be impregnated with a special antiseptic solution to prevent them from rotting. To evaporate moisture that can collect on the foil surface, special vents should be made.
- On a wooden floor, you can mount an additional coating in the form of a laminate. This will further help reduce heat loss in the house.

Penofol insulation of the "warm floor" system
If we install underfloor heating in the house, the insulation process is as follows:
- We fill as a base a concrete screed with the addition of expanded clay;
- After the screed dries, we lay out the insulation on the base, and, as mentioned above, we glue all the joints with aluminum tape, achieving complete tightness - this is necessary to ensure the hydro- and vapor barrier of the floor;
- We lay out heating elements on the heater;
- We put logs between the heating elements, on which we install the wooden floor. If we decide to pour a concrete screed over the foam foam, then a reinforcing mesh is stretched over the heating elements and the screed is poured. In this case, it is necessary to use foam type ALP - concrete is an aggressive environment and can destroy other types of heat insulator;
- After the concrete has dried, cut the edges of the thermal insulator. We mount a decorative coating on top of the screed.

Until the concrete dries, it is absolutely not allowed to turn on floor heating to avoid cracks. After the screed is completely dry, you can turn on the heating elements little by little, gradually adding temperature and making sure that cracks do not form.
Conclusion
Penofol is perhaps one of the most convenient types of modern insulation, which is suitable for thermal protection of almost any area in the house. The presence of a foil layer adds efficiency to its heat-insulating properties. It does not require hydro and vapor barrier - this role is played by foil. The self-adhesive type of penofol eliminates the need for glue and other fasteners. Ease of use makes it possible to do all the work with your own hands.
In terms of price, penofol is significantly superior to mineral wool, foam plastic, expanded clay, but the effect of its use more than justifies the financial costs, which, moreover, will pay off in the near future by saving the cost of heating the house.
In order not to freeze at home during the cold season, it is necessary to take care of the problem of floor insulation in advance.
It is most convenient to do this at the construction stage, but it is possible after it. As a heater, it is best to choose a high-quality, proven, multifunctional, inexpensive material.
Penofol is suitable for warming any room.
Benefits of penofol
It is widely used in the insulation of rooms due to the following advantages:
- Aluminum foil, which acts as the basis of the insulation, does not allow steam to pass through, therefore it is successfully used in damp, poorly ventilated rooms (for example, underground rooms).
- The material can also be used for soundproofing purposes.
- If you use penofol in conjunction with other materials, the heat-insulating functions are enhanced. In a bath or sauna, foil insulation contributes to long-term preservation of heat.
- Penofol is allowed to be used indoors with a high fire hazard, it does not catch fire.
- It is easy to carry out installation, since the material is rolled up. It is convenient to transport, cut, stack.
- Due to its small thickness, it slightly reduces the size of the room after installation.
- The material is completely environmentally friendly, does not release hazardous compounds, mice do not gnaw it.
Features of laying penofol
Penofol is a composite substance consisting of polyethylene foam and aluminum foil. Able to delay the dispersion of hot air in different directions. 
Penofol is common in many types of premises. You can use it during the insulation of the flooring of the sauna or bath due to the lack of pores that can pass air.
Installation is usually performed on a metal crate. With its help, a small space is created above the metal layer, through which excess moisture can be removed from the air.
Laying on wood floor
When insulating wooden floors, proceed as follows:
- Before starting work, carefully inspect all the floorboards, then change copies that are damaged by time.
- Unfold the roll, glue it with the adhesive side down. If such a layer is not found, you will have to buy a suitable glue.
- Gather and place a crate over the insulation, which will create a small gap between the foil layer and the coating.
- Fix chipboard or hardboard with a log.
- Lay the chosen covering on top.
You can place insulation inside a wooden house under the boards. To do this, you must first remove the old coating.
concrete floor insulation
Usually a cold base has to be insulated using an additional heat insulator. 
This is done using the following technology:
- Preparatory stage. It is necessary to clean the surface from dust, then fill it with expanded clay. At the same time, cement milk should be diluted and poured over the resulting layer. After that, you should wait 24 hours, during which time the solution will seize and completely harden;
- Level the floor with a screed along the horizon line. Once again we clean the concrete, vacuum it, cover it with a primer;
- We lay out a roll of insulation on the surface, cut off the excess. If there is no sticky layer on the material, fix it with glue. Paying special attention to the edges, the glue is applied to the matte side. Allow a couple of minutes for the product to harden before gluing. Then place the cut on the concrete, iron and press to fully fix;
- If the area of \u200b\u200bthe room is large, lay the second piece here, connect the joints with aluminum tape;
- Place the slats around the room, fasten with dowels to the surface. Install the beams in a horizontal plane;
- Lay another piece of material on top of the first with the shiny side up;
- To complete the floor covering, nail boards or plywood sheets to the beams. On top you can lay linoleum, laminate.
Instead of expanded clay, you can use foam or polystyrene foam with a thickness of 5-10 cm.
Use in underfloor heating system
The combined use of these two heaters allows you to increase the amount of stored heat by 20%. 
The method of laying ponofol with warm floors looks like this:
- Cover the cleaned surface with a concrete screed mixed with expanded clay, let dry completely;
- Lay sheets of penofol ("A", "C", "Alp") foil up. Make sure that there are no gaps between the pieces; overlap them by 10-15 cm near the wall;
- Glue the joints with reinforced tape, place heating elements on top (water pipes, electrical cables);
- Place a metal mesh on top, pour a screed on top to level the surface;
- When the mortar hardens, cut off unnecessary pieces near the walls. To speed up the drying process, briefly turn on the heating elements. Be careful, at too high temperatures, the screed can quickly crack;
- Install your chosen flooring.
Insulation disadvantages
Penofol has far fewer cons than pros. Its price is slightly higher than that of other heaters. Penofol is not always enough to retain heat; it is often necessary to use several materials at the same time. 
The use of additional adhesive liquids will help to fix the material evenly during installation. They slightly increase the cost of the project.
Watch the video:
It is difficult to lay a foam foam heat-insulating coating on the floor yourself, because the slightest technological errors can be the basis for a strong decrease in the room air temperature. Before work, study in detail all the nuances of the project and take the task seriously.
The floor is rightfully considered one of the coldest parts of the house. This is especially true for apartments on the first floors and private houses. As you know, warm air tends to rise, while cold air tends to descend, moreover, drafts often make their way from under the floor covering. Heat loss can be prevented by insulating floors in wooden houses. The warming procedure is especially useful if the house has wooden floors. Over time, the boards, whatever they are, begin to dry out, cold air blows out of the resulting cracks. Such an omission can lead to the loss of 30% of all heat in the house, as a result of which the question arises - how to insulate the floor in a wooden house?
Insulation of floors in a wooden house is carried out according to a fairly simple technology, and in the process of thermal insulation, various heaters are used, the choice of which depends on certain circumstances.
Preparatory work
Before starting the insulation of floors in a wooden house, it is necessary to determine some parameters. So, we need information about the temperature and humidity in the room, as well as calculations of future loads on the floor and, in general, the purpose of the room. You will also need to approximately calculate the height of the thermal insulation layer and the entire structure.
Insulating the floor with your own hands is quite simple, the technology is quite easy and does not require a large investment of time. Thermal insulation of the floor is divided into the following layers: thermal insulation itself - vapor barrier - floor covering. The floor is insulated in a certain order, familiar in a wooden house.
 First, wooden logs are laid. At the bottom of the log, boards or shields made of wood are fixed, these components will play the role of an additional base on which the insulation will be laid out. A heater is placed between the lags.
The material should be laid close, and possible gaps between the lags and layers of insulation should be sealed with foam or sealant. A layer of vapor barrier is placed on the laid out layer of insulation in the same way.
It is attached directly to the lags, and the joints and gaps can be glued with metallized tape.
The last step will be the installation of wooden flooring with subsequent finishing. When planning thermal insulation, it is necessary to first determine the required thickness, which is selected according to climatic conditions, as well as the type of insulation.
How to choose the right material
Wooden floors can be insulated with a variety of materials, which are also often used for insulating walls and roofs.
Such materials are:
- Mineral wool of various types (glass, stone, slag);
- Ecowool, polyurethane foam insulation;
- Polystyrene, penofol, isolon.
Materials known since ancient times can also be used: sawdust, polystyrene foam or expanded clay. Choosing a floor insulation should be based on humidity, the purpose of the room, as well as on personal tastes and financial capabilities. In a wooden house, the possibility of waterproofing and resistance to insects should be additionally noted.
Wood insulation along the lags
Most often, for the thermal insulation of a wooden floor, the method of insulation along the logs is used. It is quite simple, but at the same time effective, as it allows you to avoid large heat losses. This method is most relevant when insulating a floor located close to the ground.
The technology is produced in stages. First of all, we install logs made of wood with a T-shaped cut into a log house, or put them on the foundation, observing a step from 0.6 to 1 meter. We fasten boards or wooden shields under the lags - insulation will be placed on them. Next, we lay hydro and vapor barrier, but only in the case of using a certain insulation (mineral or ecowool).
Vapor barrier sheets are laid with an overlap of 100-150 mm, and the edges must be bent to a height of up to 100 mm. Both special materials and ordinary polyethylene film can become a vapor barrier. At the end, we install the floor boards and finish the coating.
You can insulate the floor in a wooden house with the help of logs placed on brick columns. Logs are mounted on a brick pole through a wooden layer. A floor insulation is placed between the lags, which is immediately protected by a vapor barrier material.
The main argument when choosing thermal insulation in a wooden house along the logs is the simplicity of this method, as well as its high efficiency.
Using this insulation method, we do not subject the insulation to mechanical stress, so any heat-insulating structure is suitable as a material.
sawdust insulation
Floor insulation with sawdust is one of the most profitable ways of insulation. 
The main advantages of sawdust as a type of insulation are:
- Low cost (compared to other materials);
- Ease of installation (sawdust is poured into the required place), thanks to which even the most inaccessible place can be insulated;
- Ecological purity of the material, as a result of the wood origin of materials.
Insulation can be not only sawdust in its pure form, but also building materials that include them in their composition. Wood blocks - made from sawdust, blue vitriol and cement, this material is cheap and effective, but is more often used for wall insulation.
 Wood blocks.
 Sawdust granules (pellets) - insulation in the form of granules, which consists of sawdust, antiseptic and glue. Thanks to these components, the insulation not only stores heat well, but is also resistant to fire, sawdust concrete is a mixture of sand, sawdust, cement and water. In terms of thermal conductivity, it is comparable to slag concrete, but more environmentally friendly. The presence of sawdust in the composition requires good waterproofing before installing sawdust concrete.
Arbolit - cement mixed with organic aggregates (wood chips) and chemical impurities. Arbolite slabs have high rates of noise and heat insulation, and are also fire resistant, easy to process and bend.
Before using wood concrete, it will be useful to check the waterproofing, because the plates made of this material are very unstable against moisture. Despite the abundance of materials from sawdust, floor insulation is most often made with sawdust in its pure form, especially in a wooden house.
The use of mineral wool
Mineral wool rightfully bears the title of the most popular insulation. Cotton wool is slag, glass and stone. The most important advantage of this heater is its fire safety. Mineral wool is also famous for its resistance to chemical and biological destroyers, and also has good insulating performance.
 Mineral wool.
 Minuses of mineral wool can be called its low strength and poor vapor permeability. The material perfectly absorbs moisture from the air, losing its properties of a heat-insulating agent. That is why when using cotton wool, special attention is paid to isolation from steam. Mineral wool is not included in the list of materials safe for humans, so it must be used very carefully.
Cotton wool is produced in tiles or in the form of a plastic mat. The hard board is made from hydrophobized mineral wool and the harder side is indicated by a blue stripe. During installation, the hard side must be facing up. Solid floor insulation is mainly used for thermal insulation of the floor in a wooden house and is placed in one layer.
 Rockwool also has good soundproofing properties.
 Mineral wool-based floor heaters - Izovol and Rockwool - are also very popular. Izovol has a low thermal conductivity, and its hydrophobic properties are much higher than in ordinary cotton wool. Izovol is also a biologically, chemically and fire resistant material, which makes floor insulation in a wooden house an excellent opportunity to make a video about the process, everything is so simple and easy.
Rockwool - basalt insulation based on mineral wool. A distinctive feature of rockwool is its high resistance to physical stress, due to which the material does not deform during installation and operation. Due to the porous structure, Rockwool also perfectly absorbs sounds, so it can also be a soundproofing layer.
Penofol in isolation
Penofol is a fairly new material on the insulation market, and therefore has not yet gained popularity. Penofol is a rolled material having several layers, consisting of a heater and a reflective layer (foil). Any material can be used as an insulating layer, but it is preferable to use light-transmitting materials (polyethylene foam). 
The classic Penofol, which was invented by the Russians, is a polyethylene foam that is thermally bonded to the foil. But this option is not suitable for all the nuances of construction, so now you can find a large number of varieties of penofol. As an insulating layer, different floor heaters can be used, which allows you to get an improved version of Penofol.
The classic version of Penofol has a high density, therefore it is suitable for insulating the floors of a wooden house with a high level of load. The insulation is universal, and can be used for the main heat, hydro and vapor barrier, as well as an auxiliary insulating layer.
Penofol can also have both one- and two-sided foiling. Penofol-2000, which can be found on the market in one- and two-sided versions, repeats the classic version of Penofol in everything, but at the same time it is cheaper.
There is also Penofol type C, which means self-adhesive. This insulation has several layers: sewn polyethylene foam, on one side of which aluminum foil is welded, and on the other side, waterproof glue with an anti-adhesive coating is applied. Thanks to the adhesive, the insulation is easily attached to almost any surface, which makes it a great way to insulate the floor in a wooden house.
 Gluing joints.
 Due to the small thickness and foil, the installation of Penofol is easy and fairly fast. The material is placed on the floor surface with an overlap or end-to-end, and the resulting joints are glued with metallized adhesive tape. When using Penofol, you can forget about the presence of hydro and vapor barrier, since this function is performed by foil.
Use of polystyrene
Expanded polystyrene (polystyrene) is also among the leaders in thermal insulation. Such popularity is due to the huge number of pluses and a minimum of minuses.
Polyfoam has low heat-conducting qualities and is practically vapor-tight, durable and fire-resistant. Styrofoam never molds and does not attract rodents. The cellular structure extends the life of the foam and makes it more effective as a heat-insulating material. 
Among the shortcomings of the foam, high moisture absorption can be noted, so attention should be paid to the organization of vapor and waterproofing.
Benefits of using ecowool
Ecowool is a natural insulation, consisting of 80% waste paper and 20% natural additives. It is a mixture of cellulose fibers with boric acid and lignin. Such a composition ensures the environmental friendliness of the material, and therefore safety for the human body.
 Ecowool insulation process.
 Ecowool is characterized by low thermal conductivity, fire resistance and the fact that if it gets wet, it is worth drying the material, and the thermal insulation properties will be restored. At the same time, ecowool is more expensive than most heaters, but with its use, there will be no repeated question of how to properly insulate a house, including its wooden floor.
New - Izolon
A new type of heat-insulating material was named Izolon. It is made from foamed polyethylene and has a number of advantages over competitors.
Izolon has a small thickness (from 2 to 10 mm.), Which ensures ease of installation, but despite the thickness, 1 mm Izolon corresponds to a brick wall in terms of thermal conductivity, and also looks like from a beautiful photo. 
Isolon does not absorb moisture, and also acts as a vapor and water insulator. Isolon is also environmentally friendly, so it can be used in any room, both as a main and auxiliary insulator. Isolon, to all its advantages, also absorbs noise, so it can also act as a sound insulator. There are many materials for thermal insulation available on the market. They vary in cost, installation method, size and properties. before purchasing, it is worth considering all the steps, planning the progress of work, and only then acquiring the material.
But, despite the choice of material, wooden floor insulation is very important and will help keep the house warm, and after reading this material, you should have no questions about how to properly insulate the floor in a wooden house.
pol-inform.ru
Overview of penofol properties
Penofol is a material made from polyethylene by foaming with special reagents. This polyethylene foam is applied to a foil base, to which it reliably sticks. The foil base greatly enhances the thermal insulation properties of the material due to the reflection of thermal waves inside the room.
Therefore, penofol belongs to the class of reflective thermal insulation. This foil insulation has the following performance characteristics:

Advice! There are several product classes: A, B and C. Class A insulation has a foil on one side, and the B series material has two. Class C insulation has a foil base on one side, and an adhesive layer on the other, which makes it easier to install in inconvenient areas.
Application area
Penofol has a versatility of application: it is used for insulation and vapor barrier not only for residential premises, but also for industrial facilities. Here is a far from complete list of where this material is used: 
- Ceiling ceilings.
- Wall insulation.
- Waterproofing and floor insulation.
- Arrangement of warm balconies and loggias.
- Thermal insulation of air ducts and technical pipelines.
- Application in the automotive industry for thermal insulation of bodies.
As you can see, the list of applications is quite extensive. We will consider where you can use penofol with your own hands - the home area of \u200b\u200bapplication.
The use of penofol
Even for domestic needs, this versatile material is used quite extensively. Let's consider the main directions.
Most often, penofol insulates the floors in a wooden house. This process is absolutely simple, you can easily do it yourself, just follow this technology: 
- It is best to remove the old boards and lay several layers of penofol between the lags. In this case, all layers of material must be laid with a foil base inside the room. Then old boards are laid in place or a sheet of plywood is stuffed.
- Another way is that the heat insulator is laid on top of a wooden covering. One layer of insulation is applied, while the laying is done end-to-end, and the seams must be glued with aluminum tape. Then, plywood sheets are laid on the laid heat-insulating layer and screwed to the wooden base with self-tapping screws.
Advice! It is impossible to fix penofol to a wooden base mechanically, for example, with brackets. If there is a need to fix the insulation, it is better to treat it with glue or use an adhesive-based material.
Thermal insulation of concrete floors
As a rule, penofol for warming concrete floors in a house or on a balcony is used in conjunction with other types of heat-insulating materials. The technology of work in this case is as follows:

The use of penofol in the underfloor heating system
It is very common to use penofol when arranging a system of underfloor heating, both in a private house and in an apartment or on a balcony. The use of this reflective material increases the heat transfer of the entire system by 15–20%, which, at the current cost of energy carriers, is a significant savings. Penofol is used when installing underfloor heating using this technology:
- After the main insulation has been laid, foil material is mounted on it.
- In this case, the general rule is observed: the installation is done end-to-end, the seams are sealed with aluminum tape.
- For this option, a one-sided option is usually used. If fixation of the reflective layer is necessary, then penofol with an adhesive base can be used.
- Then an electric cable or a water circuit piping system is mounted on the foil.
Advice! You can cover the heating elements of the underfloor heating system not only with boards or plywood, but also fill it with cement screed. The foil base of penofol is resistant to various aggressive operating conditions.
Having studied the properties and got acquainted in more detail with such material as foil foam, it is easy to agree with the opinion of professionals that this material is an excellent addition to existing insulation technologies. In addition, this insulation can be used as an independent heat insulator.
utepleniem.ru
Penofol classification
Since the production of penofol began, its properties, scope and structure have undergone tremendous changes. Previously, the material looked like a roll of sewn polyethylene foam, one side of which was foiled with aluminum. With the help of this variant of the material, thermal insulation of premises is still performed, since it has high efficiency. In addition to the classic type of penofol, other types of material are produced, which are endowed with a number of useful properties:
- With one-sided foiling - type "A". It is used in conjunction with other materials for insulation.
- With double-sided foiling - type "B". Offline use is allowed.
- Type "C" - one side is covered with special glue and a protective film, and the other side is covered with foil. It is installed by gluing to the surface that requires insulation.
- Type "R" and "M" - embossed foam with one foil side.
- Type "ALP" - has one-sided foiling up to 14 microns, which is laminated with a polyethylene film.
- perforated material. It has a special structure that allows air to pass through.
The type of penofol is selected depending on the type of insulation work, i.e. walls, floor, roof.
Penofol laying technology
Before insulating the floor with insulating material, it is necessary to determine its type and installation technology. It is necessary to lay penofol types "C" and "A" under the finishing floor. The insulation process begins with a concrete screed mixed with expanded clay, or with the placement of foam plastic plates with a thickness of 5 to 10 cm. Then foam foam is spread with an overlap of about 10 cm and all joints are glued with construction tape.
It should be noted that condensation may form on the thermal insulation material, so measures must be taken to prevent this phenomenon. To do this, fill the slats up to 2 cm thick above the foil surface, which will create a ventilated space. If the wooden floor is being insulated, then the role of the rails is played by the logs. It is important to remember that all slats and logs must be impregnated with an antiseptic and drying oil to protect the wood from decay.
If the insulation is carried out using the “warm floor” system, then the penofol is laid with the foil side down on a completely dried screed, and in other cases the material must be placed with the reflective side up. A plastic film is laid over the heat insulator, which will be a vapor barrier. To insulate the floor on the lower floor, located above the basement, type "B" foam should be used.
As a rule, when installing a “warm floor” system, the heating elements must be filled with a screed in order to subsequently obtain a flat surface for laying, for example, a laminate. In such cases, the ALP foam type should be used, since its foil side is laminated with a film, and, as you know, cement is aggressive towards aluminum.
Floor insulation with penofol of this type is performed on top of the primary screed, while the reflective side should be on top. The sheets are laid with a slight bend, about 10 cm, on the walls and they are glued with aluminum tape. Next, heating elements are installed, a reinforcing mesh is laid and the entire floor area is poured with a concrete screed. When the surface is completely dry, it is necessary to trim the free edges of the insulation.
Using penofol for floor insulation is the best solution. With this material, moisture will not penetrate into the room, noise will decrease and it will become much warmer, since the foil surface reflects heat, directing it back into the house.
kuhnyamoya.ru
Of course, it is possible to insulate the floor with penofol in a wooden house, we will discuss this issue in this article.
So how to insulate the floor in a wooden house with penofol?
Penofol is a base made from foamed cellophane, which at the same time performs the function of preserving heat and vapor barrier of the interior. In addition, a foil layer welded on top of the polyethylene recreates thermal self-radiation.
The source does not contain pores - this circumstance means that it does not allow air to pass through itself and gives the insulated system the features of a thermos. it may be needed, when warming baths and saunas, which in the future simply must be and are, a storehouse of warm and damp air, for as long as possible in principle.
 penofol
 In addition, penofol is spread on concrete or a wooden floor so that it separates the pipes of a water-heated floor from the concrete base on the 1st floor of the building. Let's take a look at how the floors are insulated with penofol in each of these situations.
How penofol is used, and its classification.
A layer of foamed cellophane, in a foam sheet, having air bubbles, due to such oxygen-filled bubbles, in fact, insulation is performed. This same layer should be a layer of 3 up to 10 millimeters.
 penofol with foil classification A, C
 The foil layer in absolutely all penofol variations is similar, however, it can be welded on one side of the edge, this is the 1st option (classification A), or from 2 edges, option 2 (classification B).
In addition, there is penofol, which has foil on one edge, and on the other, an adhesive layer, this layer is like a self-adhesive tape that can be glued to any non-rough surface (classification C).
In addition, there is penofol with one foil film, which is laminated on top with a layer of cellophane (ALP classification).

Penofol class "A", as a rule, is strengthened to another insulation (polystyrene, styrodur) with support for staples for a stapler or nails. Class "C" is able to stick on them, or directly into the base. Class "B" is used for the purpose of independent fastening.
If you have a wooden floor, and a concrete screed is made on it, how can penofol be laid.
Floor insulation with penofol in a wooden house;
If your floor is cold, it is necessary to first fill in reinforced concrete with expanded clay for about 5 centimeters for insulation, or it can be replaced by a layer of foam plastic with a thickness of 5 cm up to 10 cm thick.

On top of the foam, a layer of foam foam (classification “A” or “C”) is strengthened or glued with a whip on the walls, about ten cm, from each edge. And the joints between the penofol tape are glued with aluminum tape.
Dampness, from which penofol protects the entire structural system of the building, without having any chance to flow through it, and will begin to settle on it with small drops of water.
In order to prevent this from happening, it is necessary to organize a space above the foil shell of the penofol for the purpose of air ventilation, with vents and holes through which the atmosphere of warm air from the room is able to freely pass in order to remove this water.
For this fact, slats 1.5-2 cm wide are stuffed onto the penofol from the edge of the foil, forming a space for the purpose of air movement.
The same significance, have every chance to play, wooden logs, if a decision is made to cover the wooden floor. Logs and slats must be thoroughly impregnated with an antiseptic or drying oil.
It is necessary to lay them along the entire length of the floor, retreating from the wall one or two centimeters, with an interval of about thirty-five forty centimeters. The laying horizon of the log is checked by the level, the bending logs must be pressed with split rails, the so-called wedges.
It is placed perpendicularly on the logs, an inch board, and on top of the inch board, a sheet of plywood about 12 millimeters thick (it can be thicker, it depends on your budget).
It is quite possible to use plywood 6-8 millimeters, however, it will need to be laid in at least 2 layers. With a finishing coating, it is possible in this case to choose linoleum or laminate.
How to equip the system (Heated floor).
At the base of the warm floor, penofol is laid with the foil side up (classification “A” or “C”), heating components are placed on it, and between them, depending on the width of the elements, logs are laid, on which the floorboard is directly laid (1st method) .
In the event that a concrete screed is poured on top of the heating components (for example, under a tile), penofol of the ALP classification is required. Since the solution is cement, this will always be a hostile environment for aluminum foil, which is covered with penofol (2nd method). 
In order to isolate the floor from any shock resonant rumble, penofol is laid with a twist of ten centimeters on each wall. In a similar way of laying, the concept of "floating floor" is obtained.
In order to guarantee hydro and vapor barrier, all joints of the canvas without exception are glued with a special construction aluminum tape.
Already after laying the heating components, a reinforcing mesh is placed and after that the main pouring of the floor area with a concrete screed is performed. Already after pouring the solution, the sides of the penofol are cut off.
Following this, a sufficiently long period is required for heating the floor and putting it into operation.
Insulation of floors with penofol provides heat, hydro and sound insulation to the coating (reduces impact sound by about twenty decibels) and guarantees uniform heating of the floor plane due to the foil present in the penofol, which effectively reflects heat.
woodenhouse24.ru
Why is floor insulation worth it?
Warm flooring provides a comfortable stay in the house. The health of the residents and their well-being depend to a large extent on the temperature values that are stored in the living rooms.
To minimize heat loss, you need to figure out how to properly install the insulation, which materials have the best characteristics and the longest service life. It is also worth noting that the choice of thermal insulation material is influenced by many factors that cannot be ignored. For example, it is necessary to take into account not only the material from which the building was erected, but also the number of floors, as well as whether the building was built on the ground or a basement (basement) was built under it.
Why do floors need to be insulated?
 In a private house from below, the insulation of a wooden floor is carried out in several cases.
If it occurs:
- the need to get rid of the cold floor of the room, which is located above the basement;
- the desire to insulate the attic floor;
- the need for thermal insulation of interfloor ceilings, in this case, not only the rooms are insulated, but additional sound insulation is also achieved.
When to do insulation from below correctly
Above a cold basement, floor insulation is best done from below, while insulation above an attic is recommended to be done from above. This approach is technically competent and allows you to achieve the best results. But when implementing thermal insulation from below, some problems sometimes arise:
- limited choice of materials;
- unreliable fixation of the insulation;
- due to the fact that the installation work is carried out on the ceiling, the masters quickly get tired;
- the complexity of the implementation of the tasks in a low subfloor.
However, taking care of the insulation from below, you can eliminate the following problems:
- the appearance of fungus, mold on the surface of a wooden structure;
- excessive fuel consumption during space heating;
- violation of the functions of structures due to their decay;
- lack of conditions for maintaining the optimal regime of temperature and humidity in the premises.
When designing a private house, it is necessary to consider thermal insulation measures at this stage. By taking care of the heat in advance, it will be possible to eliminate many problems in the future.
 The essence of this technology is the laying of rigid sheets of thermal insulation between the subfloor and the floor covering. Of course, this option is more profitable, but it is only suitable for those regions where the climate is warm and mild.
In a region where winters are quite cold, it is still better to insulate from below. This option of thermal insulation is recommended to choose if there is a minimum space between the ground and the floor level.
If this gap is large enough, the warming procedure will be expensive.
Benefits of bottom floor insulation
In a wooden house, the thermal insulation of the floor should be carried out precisely from below, this option is technically correct. The advantages of this technology are:
- during the operation of the house, the height of the ceilings in the rooms does not change;
- the overlap, made of wood, is reliably protected from freezing;
- there is no need to purchase hard insulation that can withstand the weight of large pieces of furniture and household appliances;
- the condensate settling line can be shifted outside the wooden structure, so that the building does not rot.
Floor insulation technique
There are two main options for thermal insulation:

- Thermal insulation on the joists. Choosing this technology, the insulation in the form of plates has to be laid out in a checkerboard pattern. It also requires ligation of sutures. You should first lay a special film to ensure waterproofing. Fixation of the material can be done both with dowels and with glue. Having completed the installation of the plates, the seams are carefully sealed with mounting foam, and then the floor covering is fixed to the logs. If you choose a reliable insulation, such a floor will retain heat.
- Insulation ending with a screed. If you are thinking about how to properly insulate the floor in a wooden house, consider the thermal insulation option, which involves creating a concrete screed over the thermal insulation layer. First of all, waterproofing the base is performed. The next step is laying the mesh made of fiberglass. As a result, the structure becomes stronger. Next, a concrete solution is applied over the mesh.
How to choose the right heat insulator
Do not know what is the best way to insulate the floors in a wooden house? Familiarize yourself with the basic requirements for thermal insulation materials, and it will be easier for you to choose the right materials. Due to the presence of certain features in the implementation of installation work, only certain types of heaters can be used. The list of requirements for them is as follows:
- high indicators of reliability and efficiency;
- minimum weight of the material;
- ease of use;
- the ability to withstand the action of fire to achieve a high level of fire safety of a wooden structure;
- maximum possible density.
Materials for thermal insulation works
 The quality of the created thermal insulation layer depends on the technical parameters of the insulation material.
Familiarize yourself with the features of suitable materials for insulation and decide what is the best way to insulate the floor from below in a wooden house in your case, so that it is most profitable and effective.
Now the market represents a wide selection of thermal insulation materials, but it is recommended to choose from the best and most popular options, such as penoplex, mineral wool, penofol, expanded polystyrene.
Mineral wool
Manufacturers of building materials offer several types of mineral wool:
- slag;
- stone;
- glass.
Among the advantages, one can single out a high level of heat and sound insulation, incombustibility, biological stability, resistance to aggressive substances.
- insufficiently high resistance to mechanical stress, this is due to the strength of the material;
- low rate of vapor permeability;
- lack of absolute safety for human health;
- loss of thermal insulation properties due to the gradual absorption of moisture.
Mineral wool can be purchased in the form of a flexible mat and solid boards.
Basically, buyers prefer Rockwool and Izovol, which are based on mineral wool. The first version of the insulation can withstand loads, does not deform and retains heat well. In a wooden house, floor insulation with Izolon is also more preferable than mineral wool, since this material has low thermal conductivity, it is non-flammable and more moisture resistant.
Styrofoam
 Deciding what is the best way to insulate the floor in the country house from below? Consider another option for insulation - polystyrene foam, which is known to many as polystyrene foam. No wonder it is still popular, because there are many advantages, and the number of minuses is insignificant.
The benefits include:
- fire resistance;
- high strength and thermal insulation;
- the ability to withstand biological effects and the influence of chemical factors;
- long service life due to structural features.
There are much fewer cons, and they are insignificant, but these disadvantages can be eliminated: the material has low vapor permeability, is subject to the negative effect of moisture and, as it is absorbed, loses its ability to thermal insulation - by providing high-quality vapor and waterproofing.
Penoplex
Floor insulation in a wooden house from below with foam plastic is more effective than thermal insulation made using the two previous versions of heaters. Penoplex is made in the form of plates by foaming extruded polystyrene foam, it is also quite often used for the implementation of thermal insulation measures.
 Here are some advantages of insulating a wooden floor with penofol (roll material):
- High rates of thermal insulation.
- Excellent performance.
- Simple installation process.
- No need for additional provision of vapor and waterproofing, since for these purposes the insulation contains a layer of foil.
Most often, at the heart of the insulation in rolls there are reflective and translucent materials. During installation, the foam layers are placed with a slight overlap or end-to-end. For reliable fixation in the area of \u200b\u200bthe joints, a metallized adhesive tape is attached.
Instructions for organizing installation work
Do you want to know how to insulate the underground in a wooden house? First of all, read the general rules for performing installation work. In this order, any insulation is fixed:
- creation of a waterproofing layer;
- the formation of thermal insulation;
- application of vapor barrier material;
- attaching structural elements of the floor;
- laying decorative flooring.
Experts assure that when the layers are formed in this order, the thermal regime will be optimal, and it will be possible to ensure the necessary circulation of moisture in the living rooms.
Thinking through the thermal insulation on the basement floor, it is necessary to prepare beams with a cross section of 50-100 mm. These elements are fixed from below using a layer of insulation, after which the floor is sewn up with boards.
If there is a wooden floor on the ground floor, the beams are connected to bars, the cross section of which is 50x50, not more than 50x100. A layer of insulating material is laid between them. After the waterproofing layer, sheathing with boards is made.
Most often, the installation of a heat-insulating layer is carried out along the logs:

- lay the logs on the finished foundation, keeping certain gaps between the bars - about one 1 m, maximum 1.2 m;
- fix the sheets of chipboard or plywood with self-tapping screws, as a result you will get the basis for applying a layer of insulation;
- distribute the insulation material between the lags. Determine the appropriate thickness of the insulation, taking into account its features, but remember that the insulation material should not be thicker than the log;
- form a waterproofing layer. Experts advise going through this stage to achieve the best possible results. You can skip it, but before you abandon this step, pay attention to the features of the selected material. If a heater is purchased for installation, unable to repel moisture, it is still worth forming a waterproofing layer;
- install the floor covering. You can apply the old version or update the coating with a new material.
When insulating the floor from the basement below and in other parts of the house, follow the indicated sequence of actions.
What tools and materials will be required
Of the tools and materials for laying thermal insulation, the following are required:
- insulation;
- building level;
- screwdriver;
- construction stapler filled with staples;
- self-tapping screws;
- lumber (bars measuring 50x50 mm, boards);
- reinforced tape;
- a tool designed to work with wood;
- materials for vapor and waterproofing (vapor barrier membrane, special film for waterproofing);
- sheets to create the base of the floor.
Floor waterproofing
 Since the air in the basement is not heated, condensation can form on the warm ceiling.
In cases where moisture is constantly present on the structure, ideal conditions are created for the formation of fungus and mold, and subsequently the process of decay begins. Moreover, it does not matter whether the wood was treated with a special agent before use or not.
Condensate violates the thermal insulation properties of the insulation, gradually penetrating into it, it increases its thermal conductivity. This problem can be prevented by laying a layer of moisture insulation on the cold air inlet side.
vapor barrier
From the residential premises, instead of condensate, warm steam is formed, which also passes through the insulation and, cooling, turns into moisture. The harm to the insulation is that, unlike condensate, water is present not on the surface, but inside the structure. In this option, there is a risk of damage to the heat-insulating material with its subsequent destruction, and the likelihood of rotting of wood elements also increases. It is to prevent evaporation that a layer of vapor barrier is needed.
The simplest option for protection against condensate and steam is polyethylene film. In some cases, when providing thermal insulation of the basement floor, a waterproofing layer is covered with a moisture-windproof membrane, which not only effectively retains moisture, but also does not allow air to pass through.
Despite the fact that it is possible to increase the level of thermal insulation in the house during its operation in order to reliably insulate the building, it is better to think over this issue at the design stage. If the construction was completed a long time ago, it is possible to insulate the old wooden floor without dismantling, which will not cause much discomfort for residents.
Instructions for the formation of hydro and vapor barrier
Waterproofing

vapor barrier
This task is performed after laying the heat-insulating layer. If mineral wool is used, it is important that there are no gaps in the cells. When laying expanded polystyrene and polystyrene, the stock is not left, the plates are cut exactly to the size of the cells. After completion of installation, to increase the reliability of the insulation, the seams are filled with mounting foam.
Vapor barrier is performed in this way:
- install the protective membrane over the thermal insulation layer;
- securely attach the film along the lags and perimeter with staples;
- attach counter-rails (elements in the form of bars) along the wooden logs, which will become the basis for the flooring;
- on the surface of the rails, attach sheet material, for example, plywood, apart. As a topcoat, you can use any material according to your own preferences, for example, linoleum, laminated flooring or parquet.
How to insulate a concrete floor in a house
If you are wondering how to insulate the floor in an old wooden house where the floor is made of concrete, check out the step-by-step instructions:

- Create a multilayer base that will become a reliable protection for the insulation. In no case do not refuse the waterproofing layer, since the concrete passes moisture well, and gradually it will pass to the layer formed for thermal insulation.
- Make a crate consisting of metal or wooden slats. Lay the resulting frame (this step is required when implementing the classic version of floor insulation from below using mineral wool).
- Having cut the insulation into strips of the required size, install it into the cells by surprise.
- Next, proceed to the organization of work aimed at protecting the heat-insulating layer from evaporation.
- On top of the vapor barrier film, place a counter batten and plywood or other material of the same type (without the batten, the work process is faster, but later there are difficulties associated with the installation of the cladding).
Sawdust floor insulation technology
Consider an economical option with sawdust. Work is carried out up to the flooring.
Before performing insulation, treat sawdust with a special antiseptic and dry thoroughly. By this treatment, you can protect the material from mold and rodents.
When the insulation is ready for use, evenly distribute the slaked lime in it with a shovel. To determine the required amount of this material, focus on the amount of sawdust (you will need 1/10 of the insulation taken).
At the next stage, be sure to add gypsum, it will give strength to the heat-insulating material. Keep the ratio 17:2:1 (sawdust: lime: gypsum). After adding water, prepare a moderately steep solution.
Fill the cells gradually, laying the solution in small portions.
Floor insulation with mineral wool
Make sure the boards to be treated are dry. If not, dry them thoroughly first.
Create a waterproofing layer, then lay the mineral wool, after cutting it into pieces of the desired size. Use stainless steel wire and staples as fasteners. The wire can be replaced with a plastic mesh. The heat-insulating layer will protect against steam with the help of a special membrane.
Floor insulation with penofol
 Install the insulation so that its reflective side is directed downward, that is, towards the warm space.
Attach the insulation to the joists, keeping a small gap between it and the rough surface. Secure the material with slats, stuffing them in a perpendicular direction, or construction staples.
Basement floor insulation
If the house provides for the presence of a basement, the process of increasing the thermal insulation properties of the coatings must begin from this particular room, since heat losses are the highest in it.
If you want to learn how to insulate a floor without opening it, consider this procedure:
- prepare wooden slats of small thickness, securely fasten the vapor barrier film to the ceiling lining with them. Make sure that the overlap is 10 cm;
- when stuffing wooden blocks, keep gaps between them corresponding to the size of the plates with which it is planned to make insulation;
- place insulation boards in the cells, securely fasten them with slats or wire mesh;
- attach boards over the heat-insulating layer.
The process of floor insulation is quite simple and can be done independently. The choice of material remains with the consumer. Consider all the options presented and choose the one that best suits your case.
Penofol is a versatile material that includes steam, noise, and heat-insulating properties. This is a modern heat insulator that has proven itself from the best side. Insulation with penofol concrete floor is an important element for creating comfort for the home. This is especially important if the dwelling is located on the first floor.
This material is made of polished aluminum foil, on which polyethylene foam is applied by thermal welding. Aluminum reflects heat by about 70%, thanks to polishing, the percentage reaches 97.
It is sold in rolls, which facilitates the process of transportation, storage, installation. The thickness of the sheet varies from 3 to 10 millimeters. This type of insulation is perfectly combined with the use of fiberglass, mineral, basalt types of insulation. Due to its flexibility and lightness, it is often used when installing underfloor heating.
This material, due to its heat-insulating properties, is suitable for all types of screeds. In the absence of the possibility of using another material, floor insulation with penofol is not inferior to them in quality.
Under equal conditions, the thermal efficiency coefficient of foam type B, 4 mm thick is:
- Clay brick measuring 67.2 centimeters (2.5 bricks).
- Silicate brick - 84 centimeters (3.5 bricks).
- Aerated concrete - 38.4.
- Expanded clay concrete - 49.
- Mineral wool - 6.7.
- Expanded polystyrene - 4.6.
Insulation characteristic
There are several types of penofol:
- A. Foiling is applied from one surface. It is used for floor and wall insulation, for communication isolation.
- B. Foiling on both sides. The main place of use is when isolating interior partitions, as well as when interfloor overlapping.
- C. Foil on one side, self-adhesive backing on the other, covered with a film that prevents sticking in the roll.
- Super - NET. Scope - isolation of networks, pipelines, technological equipment, as well as noise insulation in cars.
- ALP. Laminated with polyethylene film. It is used for warming outbuildings in agriculture.
- M - R. Foiled on one side, has an embossed surface.
The most common and also commonly used penofol for the floor is type A, B, C.

These types have the same operating temperature range, which varies from -60 to +100 degrees.
The thermal reflection coefficient is also the same, from 95 to 97%.
The weight of one cubic meter for A is 44 kilograms, for B - 54 and for C - 74.
Moisture resistance when immersed in water for a day is 0.7 percent for A, 0.6 for B and 0.35 for C.
The vapor permeability of these species does not exceed 0.001 mg / mchPa.
Laying technology using lag
To insulate the floor in a wooden house, the first step is to make an expanded clay concrete base. To do this, you will need to distribute expanded clay between the beacons and then pour everything with cement milk. This is necessary to ensure the setting of building materials among themselves. After screed work, you can walk after 24 hours.
There is also an alternative solution. You can lay foam 5-10 cm on the floor. Then we treat the surface with glue and lay the foam. A and C are suitable for these purposes. The device must be made with a slight overlap on the wall, by about 10 centimeters. Penofol joints are glued with aluminum tape. 
Due to the high moisture resistance, condensation may form on the surface of the penofol. To avoid this, you need to leave space between the material and the floor. To do this, logs of 1.5 or 2 centimeters in size are attached from the side of the foil. This will be enough for ventilation.
The logs are set according to the level, their bending is not allowed, we lay plywood 12 millimeters thick on top. It is also possible to use plywood 6 or 8 centimeters, but this will require laying in two layers.
Thermal insulation of a wooden floor can be made on a rough surface. To do this, the coating is pre-treated with antiseptic agents or drying oil. After that, we put penofol end-to-end, glued with aluminum tape, and covered with plywood, which is screwed with self-tapping screws.
Penofol laying technology for underfloor heating
For effective insulation, a tandem, penofol and a warm floor are perfect.
In this case, penofol is laid down with polyethylene foam. After that, heating elements are installed from the side of the foil and logs for flooring are laid between them.
If it is planned to fill the warm floor with a screed and mount the tiles, then ALP type foam will do. After the installation of the insulation, heating elements are laid on it, then a reinforcing mesh, after which you can proceed to the screed. After complete drying, the protruding edges must be trimmed. The next step is to turn on the heating elements for a few days to improve the drying process. After the floor dries, you can begin the process of mounting the decorative coating.
You are very lucky if your neighbor, who lives on the floor below, took care of the insulation of his balcony or loggia. Warm air rising up will warm the balcony slab, and it will not freeze, creating a lot of inconvenience - the inability to go out onto the balcony in the cold season in socks or leave a tub with your favorite clematis for the winter.
Take care of the insulation of the balcony floor, still have to. Floor insulation with penofol is the best option.
Preparatory stage of work
Balcony insulation with isolon (penofol) consists of a series of sequential operations. Any work on arranging the floor begins with its alignment. The principle of operation is standard and does not depend on what material you plan to make it from.
Step one: Closing all the defects of the balcony slab
In the presence of cracks, chips protruding to the surface of the reinforcement, defects are eliminated with building cement mixtures (cement grade 200-400) + building sand in a ratio of 1:4.
It is better not to use sand from a children's sandbox. It may contain cat feces.
And this will give your balcony a specific “ambergris” for many years to come.

It is better to fill the gaps between the wall and the balcony slab with mounting foam. Cut off the rebar protruding to the surface with a “grinder” flush.
Step Two: Waterproofing
If your apartment is located on the 1st or the top floor, it makes sense, at the preparatory stage, to waterproof the balcony (loggia). Its device is simple and consists in gluing a vapor-water-proofing material (Izospan, Megaizol) onto a polymer building adhesive.

Be sure to make allowances of 100-1500 mm. in places of adjunction to the walls and parapet of the balcony (loggia).
Arrangement of a leveling screed
A leveling screed is necessary if the balcony slab has flat defects or a slope in any direction exceeding 1°. If these shortcomings of the builders are not eliminated, the floor may creak or be inconvenient to use. Yes, and it is much more convenient to arrange a crate for flooring a clean floor on a flat surface.

As a leveling mixture, it is best to use ready-made cement mixtures or polymer compositions based on epoxy resins. For fast work, self-levelling, light, quick-drying polymer-based mixtures (Nipline, Skorline, Startoline) are especially good. It is enough to pour a leveling mixture, liquid in consistency, onto a pre-laid vapor barrier, and it will self-level in an absolutely horizontal plane. No comb trowel or needle roller required.
Remember that the balcony slab according to SNiP does not exceed a thickness of 100 mm. Therefore, its strength characteristics do not provide for large loads. The floor leveling layer should not exceed 40 mm. at the lowest points of the balcony slab.
Arrangement of lathing for a clean floor
Since, as a heater, it is planned to use penofol (izolon), which has a metallized aluminum surface, ceramic tiles or thin flooring (linoleum, laminate, parquet) cannot be directly laid on it. Due to the porous structure of the insulation, such a coating will “walk” underfoot and creak.

Therefore, when the screed fully gains technological strength (indicated on the packaging), it is necessary to make a crate.
The best option is to use a wooden block (coniferous) with a section of 40x40 mm.
There are two options for laying the lathing bars - longitudinal (along the length of the balcony) and transverse (along the width of the balcony (loggia). The first option is preferable for regular-shaped balconies, the second for wedge-shaped, rounded, curved, corner balconies.
Be sure to focus on the material from which the clean floor will be laid. If these are panels (chipboard, moisture-resistant drywall 10-12 mm) - it is necessary to take into account the dimensions of the material so that there is always a bar at the joints of the plates. Otherwise, chips may occur during operation.

Bars prepared to size are drilled with a thin ∅ 2.5-3 mm. with a drill, laid out in increments of 400-450 mm. and with a thin long nail inserted into the drilled holes, the drilling points for plastic dowels are marked.
For reliable fastening of the crate, dowels of at least ∅ 10 mm should be used. Be very careful with the markup. Most balcony slabs have voids. If you drill holes for fastening the crate and get into them, the floor will “play”.

The second important condition is the use of a depth stop (limiter) for the puncher. The balcony slab is only 100 mm thick. Therefore, it is not worth drilling deeper than 80 mm. Otherwise, you will find problems with neighbors living on the floor below because of the perforated roof of their balcony (loggia).
Laying a heat insulator (insulation)
When the bars of the crate are fixed, you can lay the insulation (penofol isolon). The distances between the bars of the crate are small 400-4500 mm. Therefore, joints between insulation sheets can be avoided. But, if such a need arises, be sure to glue the joints between the adjoining edges of Izolon (Penofol) with metallized tape.

Any polymer moisture-resistant building mastic is suitable for gluing. Be sure to leave an allowance of 40 mm. so that the edges of the isolon (penofol) lie along the end sides of the wooden bar. Irregularities are cut flush with a retractable construction knife.
Finished floor installation
The easiest and fastest option is to equip a clean floor made of moisture-resistant drywall or chipboard. But this option is difficult for irregularly shaped balconies. You will have to very accurately cut out curved or beveled sheets. Both materials have good thermal insulation characteristics. Therefore, the floor of the loggia or balcony will not freeze through. The best option when you have laid penofol is a floorboard 30-40 mm thick. with groove. In order to make your floor look perfect, in no case do not nail through the boards and do not fasten them with self-tapping screws.

For this, thin construction nails with a hat, 1 mm thick and 25-30 mm long, are used. They are hammered into the groove shelf at an angle of 45-50 ° using a core with a blunt end and a hammer weighing 200-300 grams. The use of such a hammer allows you to control the force of impact and is not tiring when working. The best option is to use a hammer with a wooden handle. The hand does not sweat, does not slip. You can work without the use of construction gloves. Be sure to use a building mallet with a white or clear rubber hammer to fit the planks. In no case do not adjust the boards with a hammer. Dents and chips are formed, which will be very noticeable on a clean floor.

After installing the clean floor covering, it remains to mount the plinth around the perimeter and your balcony will not only be insulated, but will also acquire a new look.
Depending on the grade of the floorboard, you can cover the boards with a tinted clear varnish, or lay linoleum, carpet or artificial grass over the wooden flooring. It all depends on your imagination and the design concept of arranging a balcony (loggia).
Summing up
The use of penofol (isolon) as a heater is a very lightweight option that can be used by residents of warm regions. For Yamalo-Nenets or the Republic of Sakha, floor insulation with Izolon is absolutely not suitable. Izolon (Penofol) is not capable of resisting freezing in forty-degree frosts without arranging electric heating.